
Streaming video with WebCodecs
There are many ways to stream video over the internet, and of all the ways to deal with video streaming in the browser (<video>, MSE, WebRTC), WebCodecs provides the lowest level control.
Emerging technologies like Media Over Quic use WebCodecs to provide lower latency and higher scalability than with previous options.
Unlike a transcoding pipeline, where it’s pretty clear cut what needs to be done, how you would build a video-streaming application depends entirely on what you are trying to do.
Here are just a few kinds of applications with some form of video streaming:
- An application to watch live sports broadcasts
- Recording software to stream your webcam to multiple social-media live-streaming platforms
- A webinar tool where a few hosts stream content to many attendees
Each would have a different architecture, and for each there might be multiple ways to accomplish the same thing, so the choice of WebCodecs vs MSE vs WebRTC etc.. becomes a design choice.
To make this manageable, I’ll focus on how to do the following with WebCodecs:
- Stream video from a browser to a browser (e.g. video conferencing)
- Stream video from a browser to a server (e.g. recording studio)
- Stream video from a server to a browser (e.g. live broadcast)
I’ll then provide a quick overview of the alternatives (WebRTC, MSE) and include some real world case studies of streaming applications and their architectures, to help you decide if and where WebCodecs makes sense.
Because WebCodecs works with binary encoded video data, it’s a lot easier to integrate with server media processing libraries like ffmpeg and gstreamer. I’ll therefore assume you can do whatever processing you need based on your application’s business logic with server media processing libraries, and I’ll stick to how you’d stream video to/from the browser with WebCodecs.
Data transfer
Section titled “Data transfer”Raw video is too large to stream over a network, so in any streaming scenario we’ll be working with encoded video and audio data. For WebCodecs specifically, we’ll primarily be working with EncodedVideoChunk and EncodedAudioChunk objects.
Other browser APIs like WebRTCand MSE have data transfer built-in and application developers don’t normally manage how individual video packets are sent over the network.
The strength and weakness of WebCodecs is that it is very low-level, so you absolutely can control how individual video packets are sent over the network, but then you have to figure out how to send individual video packets over the network.
The requirements
Section titled “The requirements”Let’s start with the example of sending a video stream from the browser to a server. Our VideoEncoder gives us EncodedVideoChunk objects, and an EncodedVideoChunk is just binary data with some meta data attached.
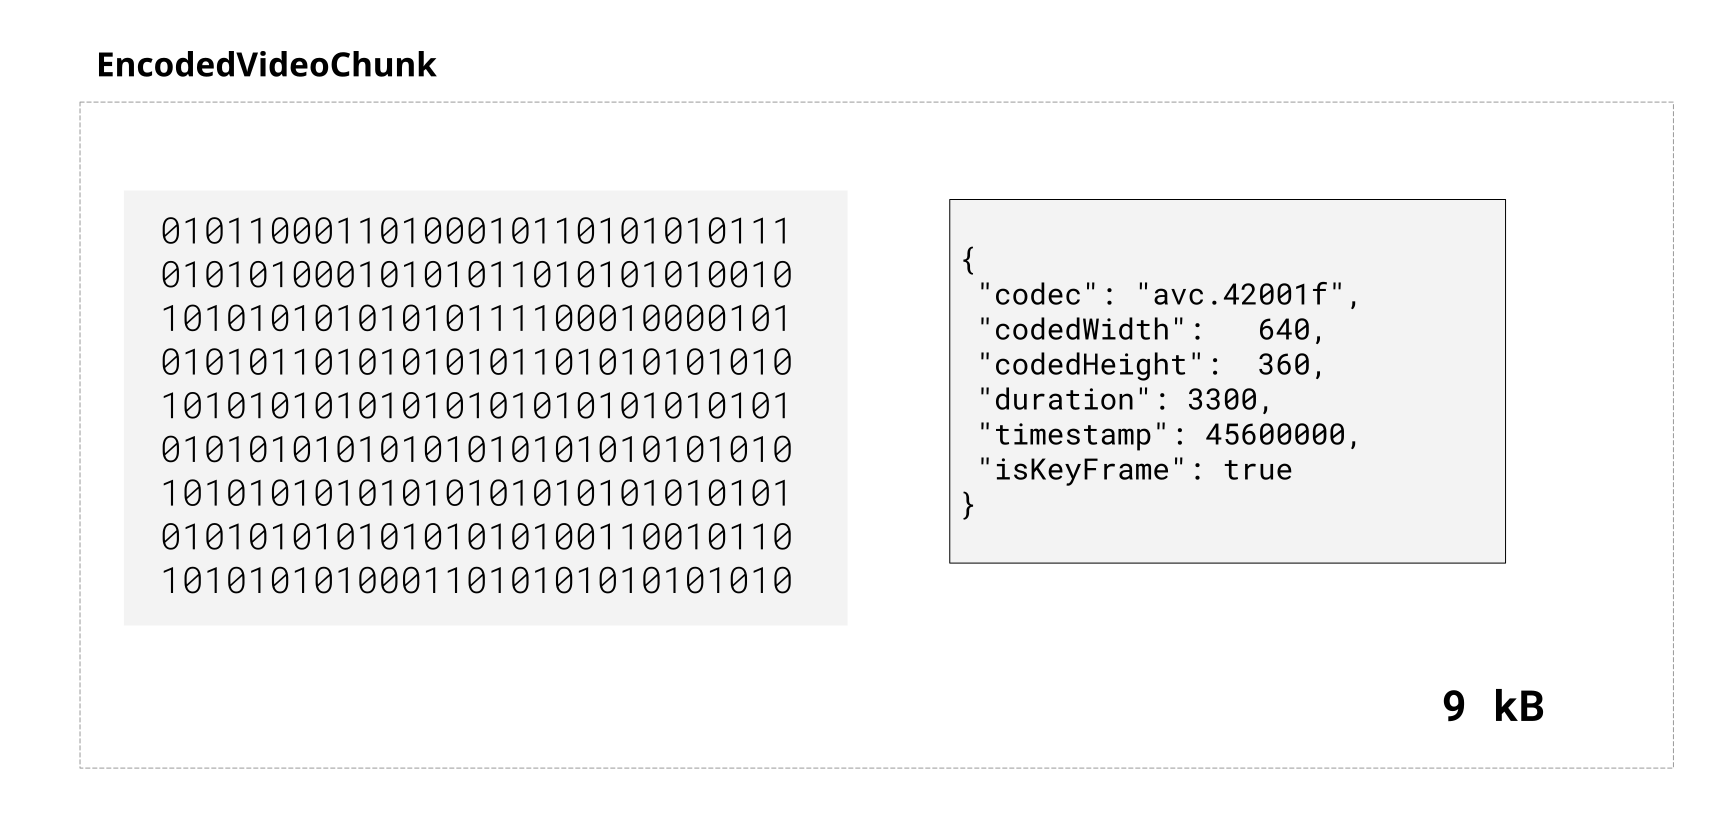
For a streaming, we’d need to send a bunch of these chunks, in real time, in order, over a network, in a bidirectional manner.
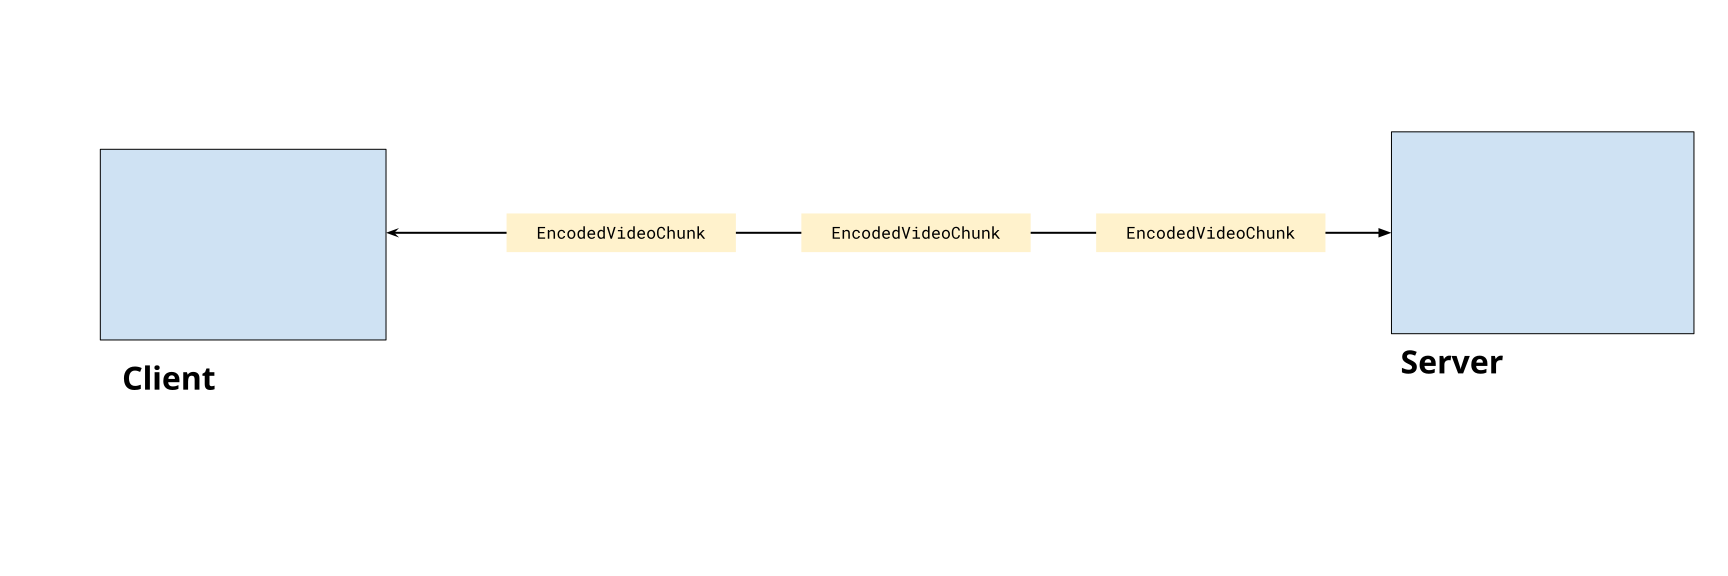
With generic data transfer, there are a number of ways we could accomplish this:
The do-it-yourself networking options
Section titled “The do-it-yourself networking options”You could theoretically expose an HTTP endpoint on your server and POST every frame as data. Here’s a simplified example where metadata is sent as a header
const buffer = new Uint8Array(chunk.byteLength)chunk.copyTo(buffer);
fetch('/upload', { method: 'POST', headers: { 'Content-Type': 'application/octet-stream', 'X-Timestamp': chunk.timestamp.toString(), 'X-Index': chunkIndex.toString(), 'X-Keyframe': chunk.type === 'key' ? '1' : '0', }, body: chunk.data,});app.post('/upload', (req, res) => { const timestamp = parseInt(req.headers['x-timestamp']); const keyframe = req.headers['x-keyframe'] === '1'; const chunkIndex = parseInt(req.headers['x-index']); const data = req.body; res.json({ ok: true });});For streaming this is impractical, as you’d be sending dozens of http requests per second which is slow and error prone. There is also no way to send data back to the client. You could make http work if you just need to upload media in chunks without worrying about real-time, but there are also inherently more suitable options.
Web Sockets
Section titled “Web Sockets”Web Sockets enables you create a persistent connection with a server, and it enables bidirectional flows of data. Here you could come up with your own binary encoding scheme to fit metadata and chunk data together into a single binary buffer and send those between server and client.
const ws = new WebSocket('ws://localhost:3000/upload');
const encoder = new VideoEncoder({  output: (chunk) => {      const binaryData = <Uint8Array> customBinaryEncodingScheme(chunk);      ws.send(binaryData);  },  error: (e)=>{} //error handling});
// Just an example, this is not official or canonical but it would workfunction customBinaryEncodingScheme(chunk: EncodedVideoChunk): Uint8Array {
const metadata = { timestamp: chunk.timestamp, keyframe: chunk.type === 'key', size: chunk.data.byteLength, };
// Format: [metadata JSON length (4 bytes)] [metadata JSON] [binary data] const metadataStr = JSON.stringify(metadata); const metadataBytes = new TextEncoder().encode(metadataStr);
const frame = new ArrayBuffer(4 + metadataBytes.length + chunk.data.byteLength); const view = new DataView(frame);
// Write metadata length as 32-bit integer view.setUint32(0, metadataBytes.length, true);
// Write metadata new Uint8Array(frame, 4, metadataBytes.length).set(metadataBytes);
// Write binary data return new Uint8Array(frame, 4 + metadataBytes.length).set(new Uint8Array(chunk.data)};const express = require('express');const WebSocket = require('ws');const app = express();const server = http.createServer(app);const wss = new WebSocket.Server({ server });
wss.on('connection', (ws) => {
ws.on('message', (data) => { // data is a Buffer const chunk = parseCustomBinary(data); });
});If you are only sending data one way, this could work, but if you need to enable data from one browser to another, you’d need your server to concurrently handle multiple websocket sessions and set up your own routing system.
Web Transport
Section titled “Web Transport”WebTransport is like a successor to WebSockets, with support being rolled out [2], but it enables better performance and uses the Streams API. WebTransport lets you write this as a pipeline, where the video frame source (e.g. a user webcam) gets piped through the encoder (a TransformStream wrapper) and piped to a writer, which then writes data in a stream-like fashion over the network.
const transport = await WebTransport.connect('https://localhost:3000/upload');const stream = await transport.createUnidirectionalStream();const writer = stream.getWriter();
//PseudoCodeframeSource.pipeThrough(videoEncoder).pipeTo(writer);
This is a practical option for unidirectional streams, though like WebSockets, if you need to enable data from one browser to another, you’d need to set up your own routing system.
Media over Quic
Section titled “Media over Quic”Media over Quic is a new protocol specifically designed for this use case of facilitating delivery of WebCodecs and other low-level streaming data without the need for ‘do-it-yourself’ networking.
It works as a pub-sub system, where a publisher can publish a stream of data to a relay, and a subscriber can subscribe to streams of data from a relay.
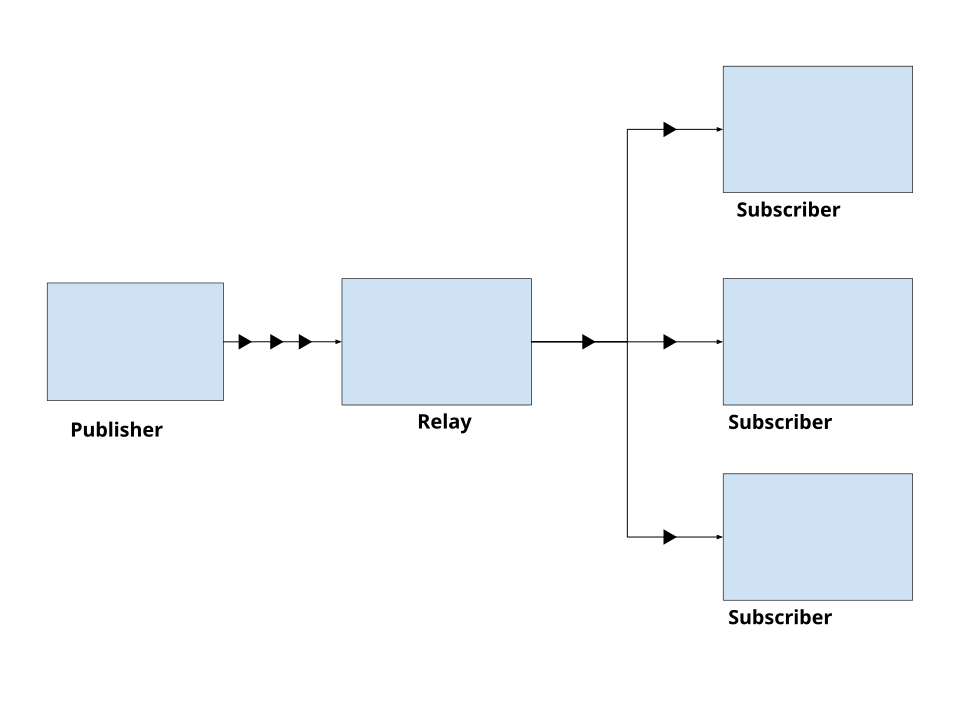
Unlike WebRTC servers (which are also relays) Media over Quic relays are content-agnostic and don’t rely on ‘session state’, making it more scalable. You can self host a relay [2], but several CDN providers also offer Media Over Quick relays [3].
import * as Moq from "@moq/net";
// The origin holds what we publish; the connection announces it to the relayconst origin = new Moq.Origin.Producer();const connection = await Moq.Connection.connect({url: new URL("https://relay.moq.some-cdn.com"),publish: origin.consume(),});
const broadcast = origin.createBroadcast(Moq.Path.from("my-broadcast"));broadcast.announce();
const track = broadcast.createTrack("chat");
const group = track.appendGroup();group.writeString("Hello, MoQ!");group.close();
import * as Moq from "@moq/net";
const origin = new Moq.Origin.Producer();const connection = await Moq.Connection.connect({ url: new URL("https://relay.moq.some-cdn.com"), consume: origin,});
// Wait for the publisher to announce the broadcastconst request = origin.request(Moq.Path.from("my-broadcast"), { announced: true });let broadcast = request.active.peek();while (!broadcast) broadcast = await request.active.changed();
// Subscribe to a specific trackconst track = broadcast.track("chat").subscribe();
// Read data as it arrivesfor (;;) { const group = await track.recvGroup(); if (!group) break;
for (;;) { const frame = await group.readString(); if (!frame) break; console.log("Received:", frame); }}Here’s a quick demo of MoQ using a public relay, where one iframe will publish text messages in a track, and the other a iframe will subscribe to the same track, and listen for messages from the relay
Media over Quic greatly simplifies the networking aspect (you don’t even need to host your own server) while also being performant (CDN relays scale better than a WebRTC server) and providing low-level control over how and when you send encoded video chunks.
This all makes it ideal for our use case of streaming encoded chunks, so that’s what we’ll use in the rest of our examples. You are of course free to use any data transfer mechanism you see fit, that is one of the benefits of WebCodecs.
You can find out more about Media over Quic here, it’s worth a read in general but for now it’s time to get to code.
Getting webcam data
Section titled “Getting webcam data”We’re going to start with streaming video and audio from the browser. Presumably the most common use case is to stream webcam audio and video and so that’s what we’re going to start with.
getUserMedia
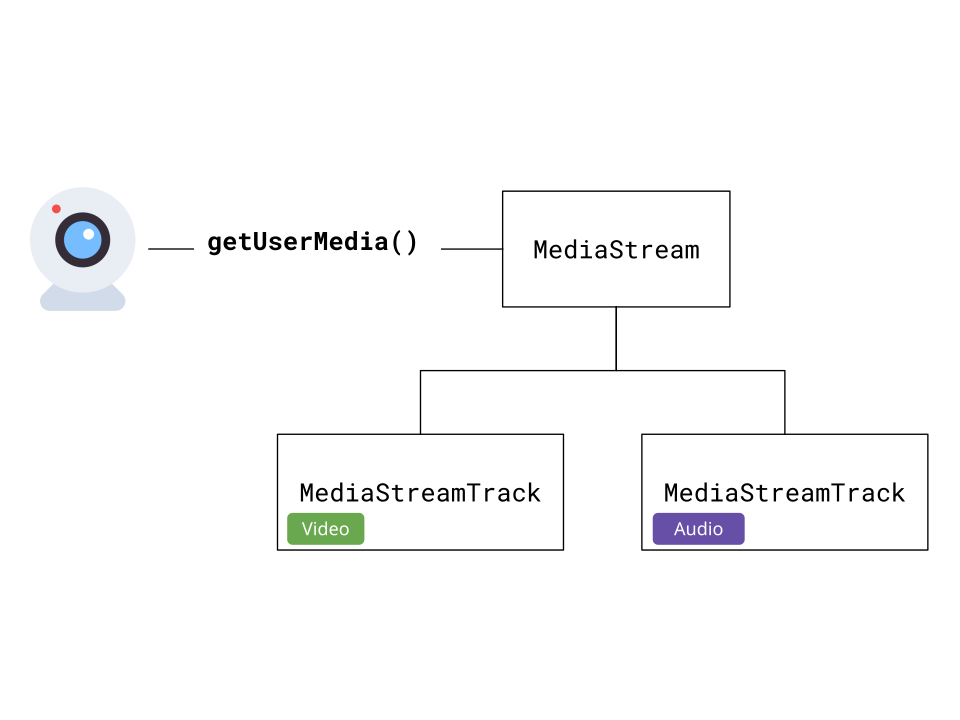
Section titled “getUserMedia”Our first step is to call getUserMedia which is an async call which will request the user’s webcam, specifically the audio you request
const stream = <MediaStream> await navigator.mediaDevices.getUserMedia({ video: { width: 1280, height: 720 }, audio: true,});This returns a MediaStream object, which allows us to both preview the video, and is necessary for reading raw video frames or audio samples, or with use in other APIs like WebRTC.
We then extract the tracks:
const videoTrack = <MediaStreamTrack> stream.getVideoTracks()[0];const audioTrack = <MediaStreamTrack> stream.getAudioTracks()[0];And this lets get the specific track for audio and video.
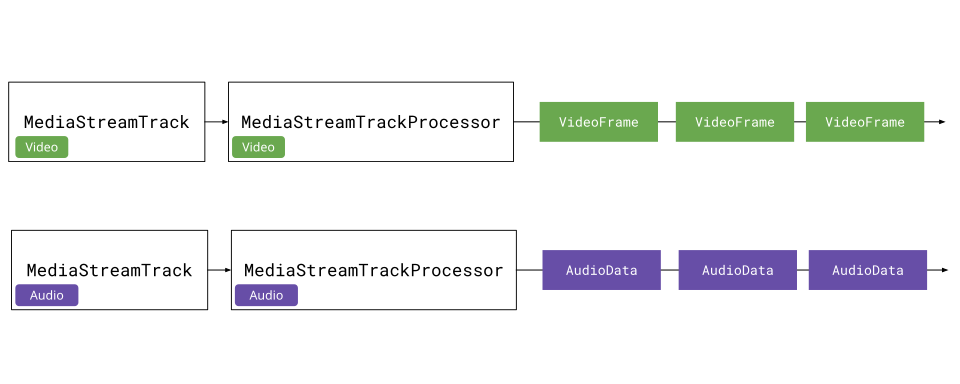
MediaStreamTrackProcessor
Section titled “MediaStreamTrackProcessor”To actually get raw audio and video data from the stream, we’ll need a MediaStreamTrackProcessor. It’s not yet supported on Safari or Firefox, but we can use a polyfill:
import { MediaStreamTrackProcessor } from 'webcodecs-utils'const videoProcessor = new MediaStreamTrackProcessor({ track: videoTrack });We can then start reading VideoFrame objects:
const reader = videoProcessor.readable.getReader();
while (true) {  const { done, value: frame } = await reader.read();  if (done) break;
  // Process the VideoFrame  console.log('Frame timestamp:', frame.timestamp);
  // Don't forget to close frames when done!  frame.close();}
Each VideoFrame contains the raw video data along with metadata like timestamp. We need to close frames after processing to free memory.
const audioProcessor = new MediaStreamTrackProcessor({ track: audioTrack });const reader = audioProcessor.readable.getReader();
while (true) {  const { done, value: audioData } = await reader.read();  if (done) break;
  // Process the AudioData  console.log('Audio sample rate:', audioData.sampleRate);  console.log('Number of frames:', audioData.numberOfFrames);
  // Don't forget to close audio data when done!  audioData.close();}
The audio processor returns AudioData objects containing raw audio samples along with metadata like sample rate and channel count.
Encoding Pipeline
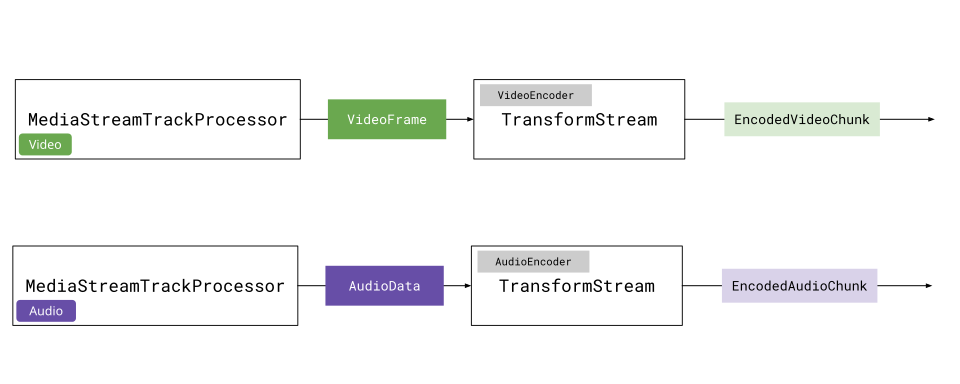
Section titled “Encoding Pipeline”Rather than manually reading frames and encoding them one-by-one, we can use the Streams API to create a pipeline. We can wrap VideoEncoder and AudioEncoder in TransformStream objects.
Here’s what a VideoEncoderStream looks like:
class VideoEncoderStream extends TransformStream<VideoFrame, { chunk: EncodedVideoChunk; meta: EncodedVideoChunkMetadata }> {  constructor(config: VideoEncoderConfig) {    let encoder: VideoEncoder;    let frameIndex = 0;
    super({      start(controller) {        encoder = new VideoEncoder({          output: (chunk, meta) => {            controller.enqueue({ chunk, meta });          },          error: (e) => controller.error(e),        });        encoder.configure(config);      },
      async transform(frame, controller) {        // Apply backpressure        while (encoder.encodeQueueSize >= 20) {          await new Promise((r) => setTimeout(r, 10));        }        encoder.encode(frame, { keyFrame: frameIndex % 60 === 0 });        frame.close();        frameIndex++;      },
      async flush() {        await encoder.flush();        if (encoder.state !== 'closed') encoder.close();      },    }, { highWaterMark: 10 });  }}
The TransformStream takes VideoFrame as input and outputs EncodedVideoChunk. The start method sets up the encoder, transform encodes each frame, and flush cleans up when the stream ends.
import { getBitrate, getCodecString } from 'webcodecs-utils';
const videoSettings = videoTrack.getSettings();const width = videoSettings.width;const height = videoSettings.height;const fps = videoSettings.frameRate || 30;
// Calculate optimal bitrate and codec stringconst bitrate = getBitrate(width, height, fps, 'good');const config: VideoEncoderConfig = {  codec: getCodecString('avc', width, height, bitrate),  width,  height,  bitrate,  framerate: fps,};
const videoEncoderStream = new VideoEncoderStream(config);
// Pipe frames through encoderconst encodedVideoStream = videoProcessor.readable  .pipeThrough(videoEncoderStream);
The pipeline will now output EncodedVideoChunk objects representing the user’s webcam (you can do the same for audio). Using the Streams API helps us manage memory and automatically handles setup, flushing and clean up.
Recording WebCam demo
Section titled “Recording WebCam demo”Now we have a stream of EncodedVideoChunk and EncodedAudioChunk data from our webcam. In the next section, we’ll pipe this to the internet, but just to have an intermediate working demo, we’ll pipe this data to a file.
First, we’ll create a muxer
import { Muxer, StreamTarget } from 'mp4-muxer';
const storage = new InMemoryStorage();const target = new StreamTarget({  onData: (data: Uint8Array, position: number) => {    storage.write(data, position);  },  chunked: true,  chunkSize: 1024 * 1024 * 10});
const muxer = new Muxer({  target,  video: {    codec: 'avc',    width: videoSettings.width!,    height: videoSettings.height!,  },  audio: {    codec: 'aac',    numberOfChannels: audioSettings.channelCount!,    sampleRate: audioSettings.sampleRate!,  },  firstTimestampBehavior: 'offset',  fastStart: 'in-memory',});
Then we’ll create a muxer writer for each track
createVideoMuxerWriter(muxer: Muxer<StreamTarget>): WritableStream<{ chunk: EncodedVideoChunk; meta: EncodedVideoChunkMetadata }> { return new WritableStream({ async write(value) { muxer.addVideoChunk(value.chunk, value.meta); } });}function createAudioMuxerWriter(muxer: Muxer<StreamTarget>): WritableStream<EncodedAudioChunk> { return new WritableStream({ async write(chunk) { muxer.addAudioChunk(chunk); } });}Then we can create a pipeline.
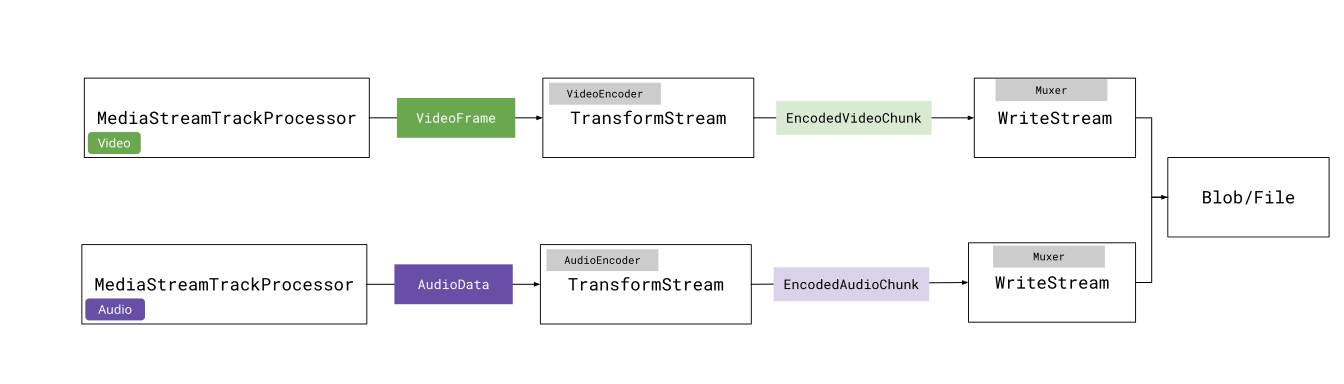
The AbortController allows us to stop the pipelines at any time via abortController.abort(), and so you could create a ‘stop recording’ button and have that call abortController.abort() to stop recording.
const abortController = new AbortController();
const videoPipeline  = videoProcessor.readable.pipeThrough(videoEncoderStream).pipeTo(createVideoMuxerWriter(muxer), { signal: abortController.signal });
const audioPipeline = audioProcessor.readable.pipeThrough(audioEncoderStream).pipeTo(createAudioMuxerWriter(muxer), { signal: abortController.signal })
We can await the pipelines, and the promise will resolve when the pipelines are done. We can then get our recorded video back;
// Resolves when we call abortController.abort()await Promise.all([videoPipeline, audioPipeline]);muxer.finalize();const blob = storage.toBlob('video/mp4');Putting it all together, we can now record video in the browser without MediaRecorder, but rather by extracting VideoFrame and AudioData objects from the MediaStream, piping those through encoders, and streaming the results to a file.
See the full code here
Streaming video over MoQ
Section titled “Streaming video over MoQ”Now that we’ve covered:
- How to send data over a Media over Quic (MoQ) relay
- How to grab a stream of encoded audio & video from a webcam
The next obvious step is to send encoded video over the network. We’re going to start with sending data between browsers as it’s the simplest case.
The way to send arbitrary binary data over a track using the @moq/net library is as follows:
const track = broadcast.createTrack('video');
const group = track.appendGroup();group.writeFrame({  payload: <Uint8Array> buffer, // whatever you want  timestamp: Moq.Time.Timestamp.now(),});group.close();
Where you create a group, and in that group you can attach an arbitrary number of frames, each a Uint8Array payload plus a timestamp.
MoQ doesn’t provide a specific protocol for how to send video or audio data. A core aspect of MoQ is that it is content agnostic, so you can come up with any schema you want for transmitting encoded chunks, as long as it is packaged as a Uint8Array.
This goes well with WebCodecs, in that both technologies give you much more control over encoding/data-transfer than is possible with WebRTC.
If you want other software to be able to play your stream though, you’ll want to use an existing format, and the de-facto one is Hang.
Hang format
Section titled “Hang format”Hang is the media format the MoQ project uses on top of MoQ. It’s specified in draft-lcurley-moq-hang (overview), it’s what the reference players like <moq-watch> and the moq CLI understand, and it’s modeled directly on WebCodecs. This page follows draft -03 (September 2026).
There is a library that implements it, but the parts you need for a WebCodecs publisher and subscriber are simple enough to implement yourself, which is what we’ll do here.
A Hang broadcast consists of:
- A
catalog.jsontrack describing the media tracks - One track per rendition (e.g.
videoandaudio), carrying timestamped frames
Broadcast names SHOULD end in .hang (e.g. room123/alice.hang) so players know which catalog to expect.
Catalog.json
Section titled “Catalog.json”The catalog lists the available video and audio renditions. Here’s the catalog our demo publishes:
{ "clock": { "wall": 213390311582400, "timescale": 1000000 }, "video": { "renditions": { "video": { "codec": "avc1.64001f", "container": { "kind": "legacy" }, "description": "01640c1fffe1000f67640c1fac18d00a00b7403c2211a801000468ce3c80fdf8f800", "codedWidth": 1280, "codedHeight": 720, "framerate": 30, "bitrate": 2211840 } } }, "audio": { "renditions": { "audio": { "codec": "opus", "container": { "kind": "legacy" }, "sampleRate": 48000, "numberOfChannels": 1, "bitrate": 128000 } } }}Each key under renditions is the name of the track a subscriber subscribes to, and each value is the WebCodecs VideoDecoderConfig or AudioDecoderConfig needed to decode it, plus a few Hang fields:
containersays how frames are framed.legacyis the default, which we’ll cover below. A consumer MUST ignore renditions with a containerkindit doesn’t recognize.- Byte fields like
description(theavcCbox for H.264) are lowercase hex strings, not base64. Without adescription, H.264/H.265 are Annex B with the parameter sets sent before each keyframe, and decoders should handle both. clock(optional) gives the wall-clock time of timestamp zero, which we’ll come back to.
Building renditions from the configs we already have for the encoders is straightforward:
export function videoRendition(config: VideoEncoderConfig, description?: Uint8Array): VideoRendition {  return {    codec: config.codec,    container: { kind: 'legacy' },    ...(description?.byteLength ? { description: toHex(description) } : {}),    codedWidth: config.width,    codedHeight: config.height,    ...(config.framerate ? { framerate: config.framerate } : {}),    ...(config.bitrate ? { bitrate: config.bitrate } : {}),  };}
export function audioRendition(config: AudioEncoderConfig, description?: Uint8Array): AudioRendition {  return {    codec: config.codec,    container: { kind: 'legacy' },    ...(description?.byteLength ? { description: toHex(description) } : {}),    sampleRate: config.sampleRate,    numberOfChannels: config.numberOfChannels,    ...(config.bitrate ? { bitrate: config.bitrate } : {}),  };}
So to actually connect to a session, and be ready to start sending data, we’d have the publisher publish a broadcast, and have each subscriber subscribe to a broadcast, which provides the namespace.
import * as Moq from "@moq/net";const origin = new Moq.Origin.Producer();const connection = await Moq.Connection.connect({ url: new URL("https://relay.moq.some-cdn.com"), publish: origin.consume() });const broadcast = origin.createBroadcast(Moq.Path.from("my-broadcast.hang"));broadcast.announce();import * as Moq from "@moq/net";const origin = new Moq.Origin.Producer();const connection = await Moq.Connection.connect({ url: new URL("https://relay.moq.some-cdn.com"), consume: origin });const request = origin.request(Moq.Path.from("my-broadcast.hang"), { announced: true });let broadcast = request.active.peek();while (!broadcast) broadcast = await request.active.changed();The catalog track is made of groups, one per update, where each group holds a single frame of UTF-8 JSON. A catalog may be published once for the whole broadcast, so we give it an unlimited maxAge so the relay can still hand it to someone who joins an hour later.
const catalogTrack = broadcast.createTrack('catalog.json', { maxAge: Number.MAX_SAFE_INTEGER, priority: 100 });const group = catalogTrack.appendGroup();group.writeJson(catalog);group.close();Any subscriber can then subscribe to the catalog.json track in the broadcast, and once it receives the catalog, it can set up the AudioDecoder and VideoDecoder and subscribe to the tracks it lists.
const catalogTrack = broadcast.track('catalog.json').subscribe();const catalogGroup = await catalogTrack.recvGroup();const catalog = await catalogGroup.readJson();// You know what tracks to listen forThe spec also says a publisher SHOULD serve a DEFLATE-compressed copy as catalog.json.z. Consumers read whichever they prefer, and the reference players default to plain catalog.json, so we skip it to keep things simple.
Frames: the legacy container
Section titled “Frames: the legacy container”The catalog has most of the data needed to decode video or audio chunks, but there are still two key bits of info needed: the timestamp of each chunk, and which chunks are key frames.
In the legacy container, each frame is a timestamp in microseconds, followed by the raw EncodedVideoChunk / EncodedAudioChunk data:
[timestamp: QUIC varint, microseconds] [codec payload]The timestamp is a QUIC variable-length integer: the top 2 bits of the first byte say how long it is (1, 2, 4 or 8 bytes), and the rest of the bits hold the value. A 10 second timestamp takes 4 bytes rather than a fixed 8.
export function encodeVarint(value: number): Uint8Array {  if (!Number.isSafeInteger(value) || value < 0) {    throw new RangeError(`varint must be a non-negative safe integer: ${value}`);  }
  if (value < 2 ** 6) {    return new Uint8Array([value]);  }  if (value < 2 ** 14) {    const buf = new Uint8Array(2);    new DataView(buf.buffer).setUint16(0, value | 0x4000);    return buf;  }  if (value < 2 ** 30) {    const buf = new Uint8Array(4);    new DataView(buf.buffer).setUint32(0, (value | 0x80000000) >>> 0);    return buf;  }
  const buf = new Uint8Array(8);  new DataView(buf.buffer).setBigUint64(0, BigInt(value) | 0xc000000000000000n);  return buf;}
/** Decode a varint from the start of `buf`, returning the value and the bytes after it. */export function decodeVarint(buf: Uint8Array): [number, Uint8Array] {  if (buf.byteLength === 0) throw new Error('varint: buffer is empty');
  const size = 1 << (buf[0] >> 6); // 1, 2, 4 or 8 bytes  if (buf.byteLength < size) throw new Error(`varint: need ${size} bytes, have ${buf.byteLength}`);
  const view = new DataView(buf.buffer, buf.byteOffset, size);  let value: number;  if (size === 1) value = view.getUint8(0) & 0x3f;  else if (size === 2) value = view.getUint16(0) & 0x3fff;  else if (size === 4) value = view.getUint32(0) & 0x3fffffff;  else value = Number(view.getBigUint64(0) & 0x3fffffffffffffffn);
  return [value, buf.subarray(size)];}
Then, to encode a chunk, we write the timestamp followed by the chunk data, and the receiver does the reverse:
export function encodeFrame(data: Uint8Array | ByteSource, timestamp: number): Uint8Array {  const header = encodeVarint(timestamp);  const frame = new Uint8Array(header.byteLength + data.byteLength);  frame.set(header, 0);
  if (data instanceof Uint8Array) {    frame.set(data, header.byteLength);  } else {    data.copyTo(frame.subarray(header.byteLength));  }
  return frame;}
export function decodeFrame(frame: Uint8Array): { timestamp: number; data: Uint8Array } {  const [timestamp, data] = decodeVarint(frame);  return { timestamp, data };}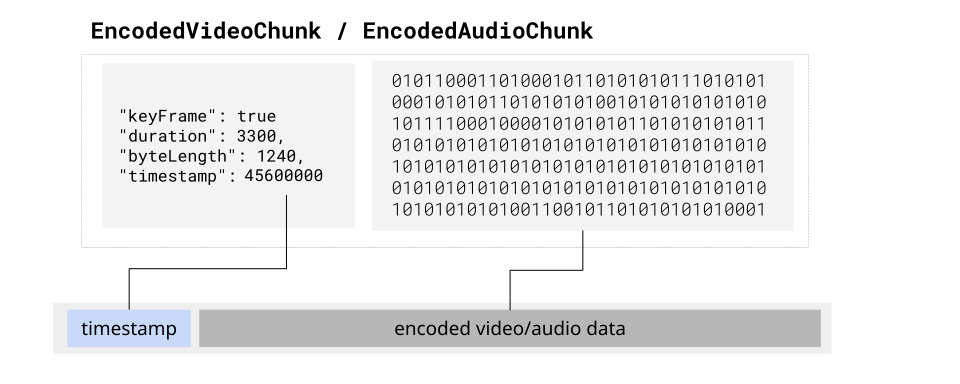
Timestamps and the clock
Section titled “Timestamps and the clock”There’s a subtle gotcha here: you can’t just use the timestamp WebCodecs gives you. In Chrome, MediaStreamTrackProcessor stamps video frames on the camera’s capture clock (roughly system uptime, so ~135,000 seconds on a machine that’s been up for 37 hours), while audio is stamped on performance.now(). The two tracks aren’t even on the same clock.
Hang timestamps count from the broadcast’s “PTS zero”. Like the reference publisher, we use the page’s clock as PTS zero (the moment performance.now() was 0), and give each track its own MediaClock which is anchored to performance.now() when its first raw frame arrives, before encoding, so encoder latency doesn’t skew audio/video sync. The catalog’s clock then records the wall-clock time of PTS zero, in microseconds since 2020-01-01.
/** Maps one track's capture timestamps (microseconds) onto PTS. Use one instance per track. */export class MediaClock {  private offset: number | undefined;
  /** Call with each raw frame as it's captured: the first one anchors the clock to "now". */  observe(captureTimestamp: number, now = performance.now() * 1000): void {    if (this.offset === undefined) {      this.offset = Math.round(now) - captureTimestamp;    }  }
  toPts(captureTimestamp: number): number {    this.observe(captureTimestamp);    return captureTimestamp + this.offset!;  }}
/** A pass-through stream that anchors `clock` on the first raw VideoFrame / AudioData, before encoding. */export function anchorClock<T extends { timestamp: number }>(clock: MediaClock): TransformStream<T, T> {  return new TransformStream({    transform(frame, controller) {      clock.observe(frame.timestamp);      controller.enqueue(frame);    },  });}
/** The catalog's root `clock`: the wall-clock time of PTS zero, in microseconds since the moq epoch. */export function wallClock(): Clock {  return { wall: Math.round((performance.timeOrigin - MOQ_EPOCH_UNIX_MS) * 1000), timescale: 1_000_000 };}
Groups and keyframes
Section titled “Groups and keyframes”This just leaves the question of which chunks are keyframes, and that’s handled by groups. While MoQ was built to be content agnostic, one reason for including groups as a core aspect was to enable sending groups of pictures (a key frame and all its subsequent delta frames):
- Video: each group is a GoP. It MUST start with a keyframe followed by its delta frames, so a subscriber knows the first frame of every group is a keyframe. A relay can drop a whole group under congestion, and a viewer can join at any group boundary, without the decoder ever seeing a frame whose reference is missing.
- End markers: a frame with an empty payload marks the exclusive end of the frame before it. A video publisher SHOULD end each group with one when it knows that time, which we do when the next keyframe arrives. Consumers MUST skip them and never pass them to a decoder.
- Audio: every audio frame is a keyframe, so a group may hold one or many frames. Like the reference publisher, we put each one in its own group so the relay can forward it immediately.
Media tracks also need a couple of track settings: a microsecond timescale (@moq/net defaults to milliseconds, which mangles frame durations for consumers like the moq CLI), a 30 second retention window, and Hang’s priorities (catalog 100, audio 80, video 60). Here are the writers which take encoded chunks and write them to MoQ tracks:
// WritableStreams that write WebCodecs chunks to MoQ tracks using Hang's group rules and legacy containerimport { encodeFrame } from './hang';
// Video: each group is a GoP (a keyframe followed by its delta frames).// When the next keyframe arrives we know where the previous group's last frame ends,// so we close the group with an empty-payload end marker at that timestamp.// `toPts` maps a chunk's capture timestamp onto the broadcast's PTS (see MediaClock)export function createVideoWriter(  moqTrack: any,  toTimestamp: (micros: number) => any,  onFrame?: () => void,  toPts: (micros: number) => number = (micros) => micros): WritableStream<{ chunk: EncodedVideoChunk; meta?: EncodedVideoChunkMetadata }> {  let group: any = null;
  const writeFrame = (data: Uint8Array | EncodedVideoChunk, timestamp: number) => {    group.writeFrame({ payload: encodeFrame(data, timestamp), timestamp: toTimestamp(timestamp) });  };
  return new WritableStream({    write({ chunk }) {      const pts = toPts(chunk.timestamp);
      if (chunk.type === 'key') {        if (group) {          writeFrame(new Uint8Array(), pts); // end marker for the previous frame          group.close();        }        group = moqTrack.appendGroup();      }
      // A group MUST start with a keyframe      if (!group) return;
      writeFrame(chunk, pts);      onFrame?.();    },    close() {      group?.close();      moqTrack.close();    },    abort() {      group?.close();      moqTrack.close();    },  });}
// Audio: every audio frame is a keyframe, so each one gets its own group and the relay// can forward it without waiting for a group boundary.export function createAudioWriter(  moqTrack: any,  toTimestamp: (micros: number) => any,  onFrame?: () => void,  toPts: (micros: number) => number = (micros) => micros): WritableStream<EncodedAudioChunk> {  return new WritableStream({    write(chunk) {      const pts = toPts(chunk.timestamp);      const group = moqTrack.appendGroup();      group.writeFrame({ payload: encodeFrame(chunk, pts), timestamp: toTimestamp(pts) });      group.close();      onFrame?.();    },    close() {      moqTrack.close();    },    abort() {      moqTrack.close();    },  });}
Then, when the subscriber listens for new groups in the track, the first frame in each group is a keyframe, and it skips the empty end markers:
const track = broadcast.track("video").subscribe();
// Read data as it arrivesfor (;;) {  const group = await track.recvGroup();  if (!group) break;  let keyframe = true; // First is always a key frame  for (;;) {    const frame = await group.readFrame();    if (!frame) break;    const { timestamp, data } = Hang.decodeFrame(frame.payload);    if (data.byteLength === 0) continue; // end marker, not media    decode(timestamp, data, keyframe);    keyframe = false;  }}
By default a subscription only follows the live edge, so when a new group starts, the relay may abandon the end of the previous one, and readFrame() throws. A live player should just skip to the next group (which starts with a keyframe), while a recorder that wants every group in full should subscribe with a maxAge covering the retention window.
Validating against the spec
Section titled “Validating against the spec”Because this is a hand-written implementation, the examples repo checks it against the reference implementation three ways:
- Unit tests (
npm test) compare our varints, frames, groups, catalog and track settings byte-for-byte with@moq/hang, which is used only as a test dependency. - An interop page (
demos/moq/hang-interop) plays our publisher in the reference<moq-watch>player, and plays the reference<moq-publish>publisher in our subscriber. - The
moqCLI, an independent Rust implementation, can remux any broadcast to MP4:moq --connect https://cdn.moq.dev/anon --broadcast my-broadcast.hang export fmp4 > out.mp4.
Browser to Browser Streaming
Section titled “Browser to Browser Streaming”With the Hang format, we now have everything to start streaming WebCodecs audio and video over MoQ. We’ll start by defining a publisher, which takes in the Audio/Video Config, creates the catalog and audio/video tracks, publishes the catalog, and creates audio/video pipelines to stream over MoQ.
Publisher
import { MediaStreamTrackProcessor } from 'webcodecs-utils';import { VideoEncoderStream } from './video-encoder-stream';import { AudioEncoderStream } from './audio-encoder-stream';import {  CATALOG_TRACK, VIDEO_TRACK, AUDIO_TRACK, PRIORITY,  catalogTrackInfo, mediaTrackInfo, videoRendition, audioRendition, wallClock, MediaClock, anchorClock, type Catalog,} from './hang';import { createVideoWriter, createAudioWriter } from './hang-writers';
export { VIDEO_TRACK, AUDIO_TRACK };
export class MoqPublisher {  private videoTrack: MediaStreamTrack;  private audioTrack: MediaStreamTrack;  private videoConfig: VideoEncoderConfig;  private audioConfig: AudioEncoderConfig;  private toTimestamp: (micros: number) => any;  readonly catalogMoqTrack: any;  private videoMoqTrack: any;  private audioMoqTrack: any;  private abortController: AbortController | null = null;  videoFrameCount = 0;  audioFrameCount = 0;
  constructor(    videoTrack: MediaStreamTrack,    audioTrack: MediaStreamTrack,    broadcast: any,    videoConfig: VideoEncoderConfig,    audioConfig: AudioEncoderConfig,    // @moq/net frames carry their own timestamp, e.g. (us) => Moq.Time.Timestamp.fromMicros(us)    toTimestamp: (micros: number) => any  ) {    this.videoTrack = videoTrack;    this.audioTrack = audioTrack;    this.videoConfig = videoConfig;    this.audioConfig = audioConfig;    this.toTimestamp = toTimestamp;
    // Create tracks up front: @moq/net refuses a subscribe to a track that doesn't exist yet    this.catalogMoqTrack = broadcast.createTrack(CATALOG_TRACK, catalogTrackInfo());    this.videoMoqTrack = broadcast.createTrack(VIDEO_TRACK, mediaTrackInfo(PRIORITY.video));    this.audioMoqTrack = broadcast.createTrack(AUDIO_TRACK, mediaTrackInfo(PRIORITY.audio));  }
  // Encode one frame to read the encoder's decoderConfig.description (avcC for H.264, none for VP8/VP9)  static async getDescription(videoTrack: MediaStreamTrack, config: VideoEncoderConfig): Promise<Uint8Array | undefined> {    const processor = new MediaStreamTrackProcessor({ track: videoTrack });    const reader = processor.readable.getReader();
    // Read one frame    const { value: frame } = await reader.read();    reader.releaseLock();
    if (!frame) {      return undefined;    }
    // Encode the frame to get metadata    return new Promise((resolve) => {      const encoder = new VideoEncoder({        output: (chunk, meta) => {          const description = meta?.decoderConfig?.description;          resolve(description ? new Uint8Array(description as ArrayBuffer) : undefined);        },        error: (e) => {          console.error('Test encoder error:', e);          resolve(undefined);        },      });
      encoder.configure(config);      encoder.encode(frame, { keyFrame: true });      encoder.flush().then(() => {        encoder.close();        frame.close();      });    });  }
  // Publish the Hang catalog: one group holding one frame of UTF-8 JSON  publishCatalog(videoDescription?: Uint8Array): Catalog {    const catalog: Catalog = {      clock: wallClock(),      video: { renditions: { [VIDEO_TRACK]: videoRendition(this.videoConfig, videoDescription) } },      audio: { renditions: { [AUDIO_TRACK]: audioRendition(this.audioConfig) } },    };
    const group = this.catalogMoqTrack.appendGroup();    group.writeJson(catalog);    group.close();
    return catalog;  }
  async start(): Promise<void> {    if (this.abortController) {      throw new Error('Already publishing');    }
    this.abortController = new AbortController();
    // Each track has its own clock: Chrome stamps camera and microphone frames on different clocks    const videoClock = new MediaClock();    const audioClock = new MediaClock();
    // Video pipeline    const videoProcessor = new MediaStreamTrackProcessor({ track: this.videoTrack });    const videoEncoderStream = new VideoEncoderStream(this.videoConfig);
    videoProcessor.readable      .pipeThrough(anchorClock<VideoFrame>(videoClock))      .pipeThrough(videoEncoderStream)      .pipeTo(createVideoWriter(this.videoMoqTrack, this.toTimestamp, () => this.videoFrameCount++, (ts) => videoClock.toPts(ts)), {        signal: this.abortController.signal      });
    // Audio pipeline    const audioProcessor = new MediaStreamTrackProcessor({ track: this.audioTrack });    const audioEncoderStream = new AudioEncoderStream(this.audioConfig);
    audioProcessor.readable      .pipeThrough(anchorClock<AudioData>(audioClock))      .pipeThrough(audioEncoderStream)      .pipeTo(createAudioWriter(this.audioMoqTrack, this.toTimestamp, () => this.audioFrameCount++, (ts) => audioClock.toPts(ts)), {        signal: this.abortController.signal      });  }
  stop(): void {    if (this.abortController) {      this.abortController.abort();      this.abortController = null;    }  }
  isPublishing(): boolean {    return this.abortController !== null;  }}
Next we define the subscriber, which reads catalog.json, picks the first video and audio renditions with a container it understands, sets up a VideoDecoder and AudioDecoder from them, and then subscribes to the tracks the catalog names, retrieving each group of frames and sending them for decode.
Subscriber
import {  PRIORITY,  decodeFrame,  firstRendition,  videoDecoderConfig,  audioDecoderConfig,  type Catalog,} from './hang';
export interface MoqFrame {  timestamp: number;  type?: 'key' | 'delta';  data: Uint8Array;}
// A live group can be reset mid-stream (e.g. dropped by the relay): skip to the next groupasync function readFrame(group: any): Promise<{ payload: Uint8Array } | undefined> {  try {    return await group.readFrame();  } catch (error) {    console.warn(`Group ${group.sequence} reset, skipping to the next group:`, (error as Error).message);    return undefined;  }}
export class MoqSubscriber {  private broadcast: any;  private catalog: Catalog;  private videoDecoder: VideoDecoder | null = null;  private audioDecoder: AudioDecoder | null = null;  private subscriptions: any[] = [];
  // `broadcast` is the @moq/net broadcast consumer the catalog came from  constructor(catalog: Catalog, broadcast: any) {    this.catalog = catalog;    this.broadcast = broadcast;  }
  // Read the latest catalog: each group holds one frame of UTF-8 JSON  static async getCatalog(broadcast: any): Promise<Catalog> {    const catalogTrack = broadcast.track('catalog.json').subscribe({ priority: PRIORITY.catalog });    const group = await catalogTrack.recvGroup();    const catalog = await group.readJson();    catalogTrack.close();    return catalog as Catalog;  }
  async startVideo(onFrame: (frame: VideoFrame) => void): Promise<void> {    // Pick the first rendition with a container we understand; its key is the track name    const selected = firstRendition(this.catalog.video?.renditions);    if (!selected) throw new Error('No playable video rendition in catalog');    const [trackName, rendition] = selected;
    this.videoDecoder = new VideoDecoder({      output: onFrame,      error: (e) => console.error('Video decoder error:', e),    });    this.videoDecoder.configure(videoDecoderConfig(rendition));
    const track = this.broadcast.track(trackName).subscribe({ priority: PRIORITY.video });    this.subscriptions.push(track);
    // Start reading video frames    (async () => {      try {        while (true) {          const group = await track.recvGroup();          if (!group) break;
          // Each group is a GoP, so the first frame in a group is always a keyframe          let isKeyframe = true;
          for (;;) {            const moqFrame = await readFrame(group);            if (!moqFrame) break;
            const frame = this.parseFrame(moqFrame.payload, isKeyframe);
            // An empty payload marks where the previous frame ends: never decode it            if (frame.data.byteLength === 0) continue;
            this.videoDecoder!.decode(new EncodedVideoChunk({              timestamp: frame.timestamp,              type: frame.type!,              data: frame.data,            }));            isKeyframe = false; // Subsequent frames are delta          }        }      } catch (error) {        console.error('Video read error:', error);      }    })();  }
  async startAudio(onData: (audioData: AudioData) => void): Promise<void> {    const selected = firstRendition(this.catalog.audio?.renditions);    if (!selected) throw new Error('No playable audio rendition in catalog');    const [trackName, rendition] = selected;
    this.audioDecoder = new AudioDecoder({      output: onData,      error: (e) => console.error('Audio decoder error:', e),    });    this.audioDecoder.configure(audioDecoderConfig(rendition));
    const track = this.broadcast.track(trackName).subscribe({ priority: PRIORITY.audio });    this.subscriptions.push(track);
    // Start reading audio frames    (async () => {      try {        while (true) {          const group = await track.recvGroup();          if (!group) break;
          // Every audio frame is a keyframe, and a group may hold one or many of them          for (;;) {            const moqFrame = await readFrame(group);            if (!moqFrame) break;
            const frame = this.parseFrame(moqFrame.payload, true);
            // An empty payload marks the end of the source audio: never decode it            if (frame.data.byteLength === 0) continue;
            this.audioDecoder!.decode(new EncodedAudioChunk({              timestamp: frame.timestamp,              type: 'key',              data: frame.data,            }));          }        }      } catch (error) {        console.error('Audio read error:', error);      }    })();  }
  // Hang legacy container: [timestamp varint (microseconds)] [codec payload]  private parseFrame(buffer: Uint8Array, isKeyframe: boolean): MoqFrame {    const { timestamp, data } = decodeFrame(buffer);    return { timestamp, type: isKeyframe ? 'key' : 'delta', data };  }
  stop(): void {    for (const track of this.subscriptions) track.close();    this.subscriptions = [];
    if (this.videoDecoder && this.videoDecoder.state !== 'closed') {      this.videoDecoder.close();    }    if (this.audioDecoder && this.audioDecoder.state !== 'closed') {      this.audioDecoder.close();    }  }}
We’ll render the video frames to a <canvas> which is simple enough, but we also need to play back the AudioData objects via WebAudio, so we’ll create an Audio Player class.
Audio Player
export class AudioPlayer {  private audioContext: AudioContext;  private gainNode: GainNode;  private sampleRate: number;  private numberOfChannels: number;  private nextPlayTime: number = 0;
  constructor(sampleRate: number, numberOfChannels: number) {    this.sampleRate = sampleRate;    this.numberOfChannels = numberOfChannels;    this.audioContext = new AudioContext({ sampleRate });    this.gainNode = this.audioContext.createGain();    this.gainNode.connect(this.audioContext.destination);  }
  play(audioData: AudioData): void {    // Extract PCM data from AudioData    const numberOfFrames = audioData.numberOfFrames;    const buffer = this.audioContext.createBuffer(      this.numberOfChannels,      numberOfFrames,      this.sampleRate    );
    // Copy data for each channel    for (let channel = 0; channel < this.numberOfChannels; channel++) {      const channelData = new Float32Array(numberOfFrames);      audioData.copyTo(channelData, {        planeIndex: channel,        format: 'f32-planar',      });      buffer.copyToChannel(channelData, channel);    }
    // Create and schedule buffer source    const source = this.audioContext.createBufferSource();    source.buffer = buffer;    source.connect(this.gainNode);
    const currentTime = this.audioContext.currentTime;    const playTime = Math.max(currentTime, this.nextPlayTime);
    source.start(playTime);    this.nextPlayTime = playTime + buffer.duration;  }
  setVolume(volume: number): void {    this.gainNode.gain.value = volume;  }
  close(): void {    this.audioContext.close();  }}
Now finally we can add the interface which will load the publisher and subscriber respectively, use getUserMedia to get the source from the publisher, and start publishing data to the subscriber(s).
Interface
<!DOCTYPE html><html lang="en"><head><meta charset="UTF-8"><meta name="viewport" content="width=device-width, initial-scale=1.0"><title>MoQ Publisher</title><style>  body {    font-family: -apple-system, BlinkMacSystemFont, 'Segoe UI', Roboto, Helvetica, Arial, sans-serif;    margin: 0;    padding: 15px;    background-color: #f8f9fa;  }
  .container {    max-width: 100%;  }
  h3 {    margin: 0 0 10px 0;    color: #2d3748;    font-size: 16px;  }
  .status {    padding: 10px;    margin: 10px 0;    border-radius: 4px;    border: 1px solid #e2e8f0;    background: #f7fafc;    font-size: 13px;    font-weight: 500;  }
  .status.connected {    background: #c6f6d5;    border-color: #9ae6b4;    color: #22543d;  }
  .status.error {    background: #fed7d7;    border-color: #fc8181;    color: #742a2a;  }
  .log {    background: #1a202c;    color: #e2e8f0;    padding: 10px;    border-radius: 4px;    max-height: 200px;    overflow-y: auto;    font-family: 'Monaco', 'Courier New', monospace;    font-size: 11px;    margin-top: 10px;  }
  .log-entry {    margin: 3px 0;    padding: 3px;    border-left: 3px solid transparent;    padding-left: 8px;  }
  .log-entry.info { border-left-color: #4299e1; }  .log-entry.success { border-left-color: #48bb78; }  .log-entry.error { border-left-color: #f56565; }
  .log-entry .timestamp {    color: #a0aec0;    margin-right: 8px;    font-size: 10px;  }
  button {    padding: 8px 16px;    font-size: 13px;    cursor: pointer;    background: #3182ce;    color: white;    border: none;    border-radius: 4px;    font-weight: 500;    transition: background-color 0.2s;    margin-right: 5px;  }
  button:hover {    background: #2b6cb0;  }
  button:disabled {    background: #cbd5e0;    cursor: not-allowed;  }
  .controls {    margin: 10px 0;  }</style></head><body><div class="container">  <h3>📤 Publisher</h3>  <div id="status" class="status">Initializing...</div>
  <div class="controls">    <button id="startWebcamBtn">Start Webcam</button>    <button id="startPublishBtn" disabled>Start Publishing</button>  </div>
  <video id="preview" autoplay muted playsinline style="width: 100%; max-width: 355px; border-radius: 4px; margin: 10px 0;"></video>
  <div class="log" id="log"></div></div>


<script type="module">


  import * as Moq from 'https://esm.sh/@moq/net@0.4.2';  import { MoqPublisher, Hang } from '../../../src/moq/index.ts';  import { getSampleRate, getBitrate, getCodecString } from 'webcodecs-utils';

  // Get URL parameters  const params = new URLSearchParams(window.location.search);  const relayUrl = params.get('relay') || 'https://cdn.moq.dev/anon';  // Hang broadcast names end in .hang so players know which catalog to expect  const broadcastName = Hang.broadcastName(params.get('broadcast') || 'my-broadcast');
  // UI Elements  const statusEl = document.getElementById('status');  const logEl = document.getElementById('log');  const startWebcamBtn = document.getElementById('startWebcamBtn');  const startPublishBtn = document.getElementById('startPublishBtn');  const preview = document.getElementById('preview');
  // State  let connection = null;  let broadcast = null;  let videoTrack = null;  let audioTrack = null;  let stream = null;  let publisher = null;
  // Logging  function log(message, type = 'info') {    const entry = document.createElement('div');    entry.className = `log-entry ${type}`;    const timestamp = new Date().toLocaleTimeString();    entry.innerHTML = `<span class="timestamp">[${timestamp}]</span>${message}`;    logEl.appendChild(entry);    logEl.scrollTop = logEl.scrollHeight;    console.log(`[${type.toUpperCase()}] ${message}`);  }
  function updateStatus(message, type = 'info') {    statusEl.textContent = message;    statusEl.className = 'status';    if (type === 'success') statusEl.className = 'status connected';    if (type === 'error') statusEl.className = 'status error';  }
  async function startWebcam() {    try {      updateStatus('Requesting webcam access...', 'info');
      stream = await navigator.mediaDevices.getUserMedia({        video: { width: 1280, height: 720 },        audio: true,      });
      videoTrack = stream.getVideoTracks()[0];      audioTrack = stream.getAudioTracks()[0];
      preview.srcObject = stream;
      updateStatus('Webcam ready', 'success');      log('Webcam started', 'success');
      startWebcamBtn.disabled = true;      startPublishBtn.disabled = false;    } catch (error) {      updateStatus('Failed to get webcam', 'error');      log('Webcam error: ' + error.message, 'error');    }  }
  async function startPublishing() {    try {      updateStatus('Connecting to relay...', 'info');
      const origin = new Moq.Origin.Producer();      connection = await Moq.Connection.connect({ url: new URL(relayUrl), publish: origin.consume() });      broadcast = origin.createBroadcast(Moq.Path.from(broadcastName));      broadcast.announce();
      updateStatus('Publishing...', 'success');      log('Connected to relay', 'success');
      startPublishBtn.disabled = true;
      // Create encoder configs      const videoSettings = videoTrack.getSettings();      const audioSettings = audioTrack.getSettings();      const sampleRate = await getSampleRate(audioTrack);
      const codec = 'avc';      const bitrate = getBitrate(videoSettings.width, videoSettings.height, 30, 'good');      const codecString = getCodecString(codec, videoSettings.width, videoSettings.height, bitrate);
      const videoConfig = {        codec: codecString,        width: videoSettings.width,        height: videoSettings.height,        bitrate: Math.round(bitrate),        framerate: 30,      };
      const audioConfig = {        codec: 'opus',        sampleRate: sampleRate,        numberOfChannels: Math.min(audioSettings.channelCount || 2, 2),        bitrate: 128000,      };
      // Get description using the same config      const description = await MoqPublisher.getDescription(videoTrack, videoConfig);
      // Creates the catalog, video and audio tracks, then publishes the Hang catalog      const toTimestamp = (micros) => Moq.Time.Timestamp.fromMicros(micros);      publisher = new MoqPublisher(videoTrack, audioTrack, broadcast, videoConfig, audioConfig, toTimestamp);      publisher.publishCatalog(description);      log('Published catalog', 'success');
      await publisher.start();      log('Publisher started', 'success');
    } catch (error) {      updateStatus('Connection failed', 'error');      log('Error: ' + error.message, 'error');    }  }
  // Event listeners  startWebcamBtn.addEventListener('click', startWebcam);  startPublishBtn.addEventListener('click', startPublishing);
updateStatus('Ready to start', 'info');</script></body></html><!DOCTYPE html><html lang="en"><head> <meta charset="UTF-8"> <meta name="viewport" content="width=device-width, initial-scale=1.0"> <title>MoQ Subscriber</title> <style> body { font-family: -apple-system, BlinkMacSystemFont, 'Segoe UI', Roboto, Helvetica, Arial, sans-serif; margin: 0; padding: 15px; background-color: #f8f9fa; }
.container { max-width: 100%; }
h3 { margin: 0 0 10px 0; color: #2d3748; font-size: 16px; }
.status { padding: 10px; margin: 10px 0; border-radius: 4px; border: 1px solid #e2e8f0; background: #f7fafc; font-size: 13px; font-weight: 500; }
.status.connected { background: #c6f6d5; border-color: #9ae6b4; color: #22543d; }
.status.error { background: #fed7d7; border-color: #fc8181; color: #742a2a; }
.messages { background: #fff; border: 1px solid #e2e8f0; border-radius: 4px; padding: 10px; max-height: 150px; overflow-y: auto; margin: 10px 0; }
.message { padding: 8px; margin: 5px 0; background: #edf2f7; border-radius: 4px; font-size: 13px; }
.message .time { color: #718096; font-size: 11px; margin-right: 8px; }
.log { background: #1a202c; color: #e2e8f0; padding: 10px; border-radius: 4px; max-height: 150px; overflow-y: auto; font-family: 'Monaco', 'Courier New', monospace; font-size: 11px; margin-top: 10px; }
.log-entry { margin: 3px 0; padding: 3px; border-left: 3px solid transparent; padding-left: 8px; }
.log-entry.info { border-left-color: #4299e1; } .log-entry.success { border-left-color: #48bb78; } .log-entry.error { border-left-color: #f56565; }
.log-entry .timestamp { color: #a0aec0; margin-right: 8px; font-size: 10px; } </style></head><body> <div class="container"> <h3>📥 Subscriber</h3> <div id="status" class="status">Initializing...</div>
<canvas id="canvas" width="640" height="360" style="width: 100%; max-width: 355px; border-radius: 4px; margin: 10px 0; background: #000;"></canvas>
<div class="log" id="log"></div> </div>
<script type="module"> import * as Moq from 'https://esm.sh/@moq/net@0.4.2'; import { MoqSubscriber, AudioPlayer, Hang } from '../../../src/moq/index.ts';
// Get URL parameters const params = new URLSearchParams(window.location.search); const relayUrl = params.get('relay') || 'https://cdn.moq.dev/anon'; const broadcastName = Hang.broadcastName(params.get('broadcast') || 'my-broadcast');
// UI Elements const statusEl = document.getElementById('status'); const logEl = document.getElementById('log'); const canvas = document.getElementById('canvas'); const ctx = canvas.getContext('2d');
// State let connection = null; let subscriber = null; let frameCount = 0;
// Logging function log(message, type = 'info') { const entry = document.createElement('div'); entry.className = `log-entry ${type}`; const timestamp = new Date().toLocaleTimeString(); entry.innerHTML = `<span class="timestamp">[${timestamp}]</span>${message}`; logEl.appendChild(entry); logEl.scrollTop = logEl.scrollHeight; console.log(`[${type.toUpperCase()}] ${message}`); }
function updateStatus(message, type = 'info') { statusEl.textContent = message; statusEl.className = 'status'; if (type === 'success') statusEl.className = 'status connected'; if (type === 'error') statusEl.className = 'status error'; }
// Resolves once the publisher has announced the broadcast on the relay. Without // `announced: true` the request resolves blindly, and subscribing before the // publisher announces is reset with code 54 (Unroutable) async function waitForBroadcast(request) { let active = request.active.peek(); while (!active) active = await request.active.changed(); return active; }
async function init() { try { updateStatus('Connecting to relay...', 'info'); const origin = new Moq.Origin.Producer(); connection = await Moq.Connection.connect({ url: new URL(relayUrl), consume: origin }); log('Connected to relay', 'success');
updateStatus('Waiting for broadcast...', 'info'); const broadcast = await waitForBroadcast(origin.request(Moq.Path.from(broadcastName), { announced: true })); log(`Consuming broadcast: ${broadcastName}`, 'info');
const catalog = await MoqSubscriber.getCatalog(broadcast); log('Received catalog', 'success'); console.log('Catalog:', catalog);
updateStatus('Starting decoders...', 'info');
// Create audio player for the audio rendition the subscriber will pick const [, audioRendition] = Hang.firstRendition(catalog.audio?.renditions); const audioPlayer = new AudioPlayer(audioRendition.sampleRate, audioRendition.numberOfChannels);
// Subscribes to the tracks named in the catalog subscriber = new MoqSubscriber(catalog, broadcast);
// Start video decoding and rendering await subscriber.startVideo((frame) => { ctx.drawImage(frame, 0, 0, canvas.width, canvas.height); frame.close(); frameCount++; });
// Start audio decoding and playback await subscriber.startAudio((audioData) => { audioPlayer.play(audioData); audioData.close(); });
updateStatus('Receiving stream', 'success'); log('Decoders started', 'success');
} catch (error) { updateStatus('Connection failed', 'error'); log('Init error: ' + error.message, 'error'); } }
// Initialize init(); </script></body></html>We can now finally put everything together in a live demo, where it will stream your webcam through Media over Quic (via a public relay) from the publisher tab to the subscriber tab.
And that’s it! That’s the basics of streaming audio and video over Media over Quic. You can find the source code for the demo here: (HTML, JS).
A lot of this was manually implemented to show the WebCodecs side, but for a more out-of-box experience the MoQ project has @moq/publish and @moq/watch web components (<moq-publish> and <moq-watch>), built on the hang library.
Streaming to and from a server
Section titled “Streaming to and from a server”The idea behind MoQ is that a server can act as a publisher or a subscriber just like any browser client. When streaming data from a browser to a server, the browser would act as a publisher, and the server would act as a subscriber. When streaming from a server to a browser, the server would be the publisher and the browsers would be subscribers.
Browser to Server
Section titled “Browser to Server”A primary use case for streaming from a browser to a server would be for “recording” features, such as recording a meeting / webinar, or recording high-definition versions of user’s web-cameras, which are common features of meeting, webinar and live-streaming softwares.
To accomplish this, we’ll have a server connect to a MoQ relay, and subscribe to the same stream that subscribers listen to.
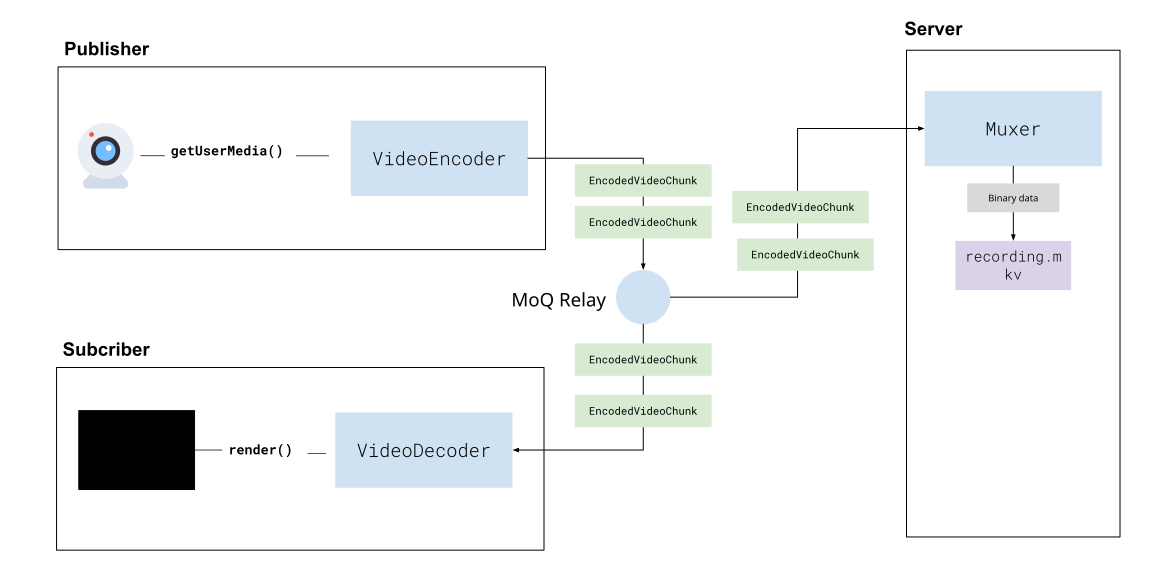
Many existing platforms use a similar approach with WebRTC where the sever joins a session as a participant and just ‘records’, however this usually involves decoding the video from the WebRTC stream and re-encoding it, which is compute intensive and limits scalability.
One advantage of Webcodecs is that we can avoid a decode/encode process and directly mux video to hard disk which is much more efficient. Because WebCodecs provides raw encoded video/audio data, it can work with server-side media processing libraries like PyAV and NodeAV, which are server-runtime bindings for ffmpeg, allowing you to mux encoded video data on the server (to record a user’s stream).
Because Mediabunny works on the server, we’ll use that as our example, but you can use whatever media processing library is available for your target language:
Using Mediabunny to mux files in a javascript/typescript run time, here’s how you’d set up the muxer to write the encoded stream to disk:
import { Output, EncodedPacket, EncodedVideoPacketSource,EncodedAudioPacketSource, FilePathTarget,  Mp4OutputFormat, WebMOutputFormat } from 'mediabunny';
const output = new Output({  format: new Mp4OutputFormat(),  target: new FilePathTarget(outputPath), //Wherever you save this});
// Create video sourceconst videoSource = new EncodedVideoPacketSource('avc');output.addVideoTrack(videoSource);
// Create audio sourceconst audioSource = new EncodedAudioPacketSource('opus');output.addAudioTrack(audioSource);
Because the browser publishes in the Hang format, the server doesn’t need any custom serialization: it reads the same catalog and frames as the browser subscriber does. EncodedVideoChunk and EncodedAudioChunk don’t exist in server runtimes, but they don’t need to, since Hang frames are just a timestamp and the raw chunk data, and the catalog has the decoder config.
The server reuses the same hand-written hang.ts as the browser demos (Node 22.6+ can import TypeScript directly by stripping the types). It subscribes to the tracks named in the catalog, and decodes each frame. Note that unlike a live player, a recorder subscribes with a maxAge covering the retention window, so it receives every group in full rather than just the live edge:
/** * Process video track from MoQ */async function processVideoTrack(videoTrack) {  console.log('Processing video track...');
  const [, videoRendition] = Hang.firstRendition(catalog.video.renditions);
  // Prepare decoderConfig for MediaBunny (the catalog's description is hex)  videoDecoderConfig = Hang.videoDecoderConfig(videoRendition);
  console.log('Video decoder config ready');
  try {    while (true) {      const group = await videoTrack.recvGroup();      if (!group) break;
      // First frame in group is always a keyframe      let isKeyframe = true;
      // Read all frames in the group      for (;;) {        const moqFrame = await readFrame(group);        if (!moqFrame) break;
        // Hang legacy container: [timestamp varint (microseconds)] [codec payload]        const { timestamp, data } = Hang.decodeFrame(moqFrame.payload);
        // An empty payload marks where the previous frame ends: it's not media        if (data.byteLength === 0) continue;
        const frame = { timestamp, data, type: isKeyframe ? 'key' : 'delta' };        await handleVideoFrame(frame, isKeyframe);
        isKeyframe = false; // Subsequent frames are delta      }    }  } catch (error) {    console.error('Video processing error:', error);  }
Each frame is then muxed with Mediabunny, using the decoder config from the catalog for the first packet:
/** * Handle incoming video frame */async function handleVideoFrame(frame, isKeyframe) {  try {    // Only write frames if recording    if (!currentRecording) {      return;    }


    // Set first timestamp on first keyframe    if (isKeyframe && currentRecording.firstVideoTimestamp === null) {      currentRecording.firstVideoTimestamp = frame.timestamp;    }
    // Skip frames until we have a keyframe    if (currentRecording.firstVideoTimestamp === null) {      return;    }
    const relativeTimestamp = (frame.timestamp - currentRecording.firstVideoTimestamp) / 1e6;    const packet = new EncodedPacket(frame.data, frame.type, relativeTimestamp, 0);
    // Add decoderConfig on first packet only    if (!addedVideoConfig) {      currentRecording.videoSource.add(packet, { decoderConfig: videoDecoderConfig });      addedVideoConfig = true;      console.log('Added video decoderConfig to first packet');    } else {      currentRecording.videoSource.add(packet);    }
    currentRecording.videoFrames++;  } catch (error) {    console.error('Error handling video frame:', error);  }
When you’re done recording, just call output.finalize()
await output.finalize(); // File saved to diskThe file will be saved to disk. Muxing is efficient enough that you could record dozens of streams in parallel on a single server.
The @moq/net client we used earlier in the browser also works on the server, although as of October 2026, WebTransport is not natively available in server js environments like Node, Bun or Deno, so the server will fall back to connecting to the relay via WebSockets.
Bun and Node v21+ have WebSocket built in, so no setup is needed. On older versions of Node, you’ll need a polyfill to enable WebSocket support
import WebSocket from 'ws';import * as Moq from '@moq/net';// Polyfill WebSocket for MoQglobalThis.WebSocket = WebSocket;There is also an experimental WebTransport polyfill if you want full HTTP3/QUIC on the server.
For the first time, this demo can’t be embedded in the document as it’s a server repo. You’ll need a javascript runtime (e.g. node, bun, deno) to run the server:
git clone https://github.com/sb2702/webcodecs-examples.gitcd webcodecs-examples/src/moq-servernpm installnpm run subscriberAnd just open up to http://localhost:3000/upload.html
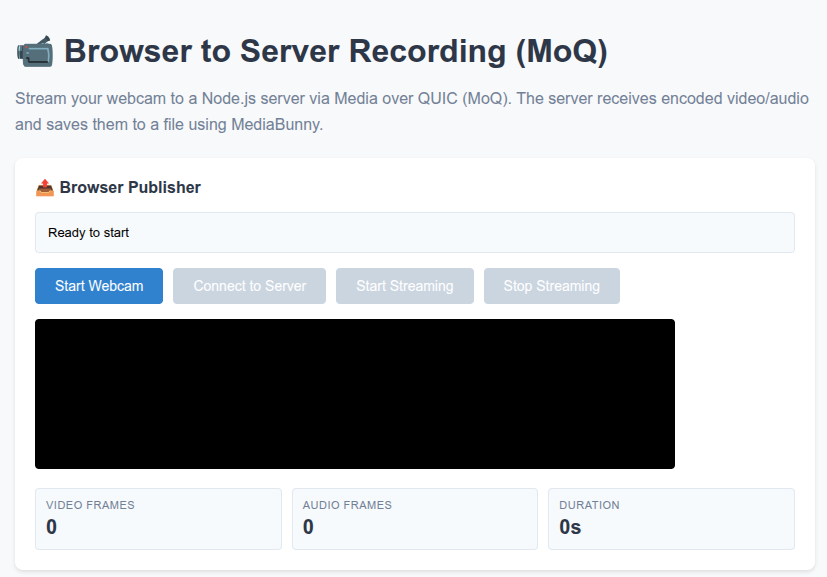
You’ll be able to stream encoded video data to the local server over webcodecs, and mux the stream to a local video file. You can of course see the full source code here: (server, browser)
Server to browser
Section titled “Server to browser”HLS & Dash
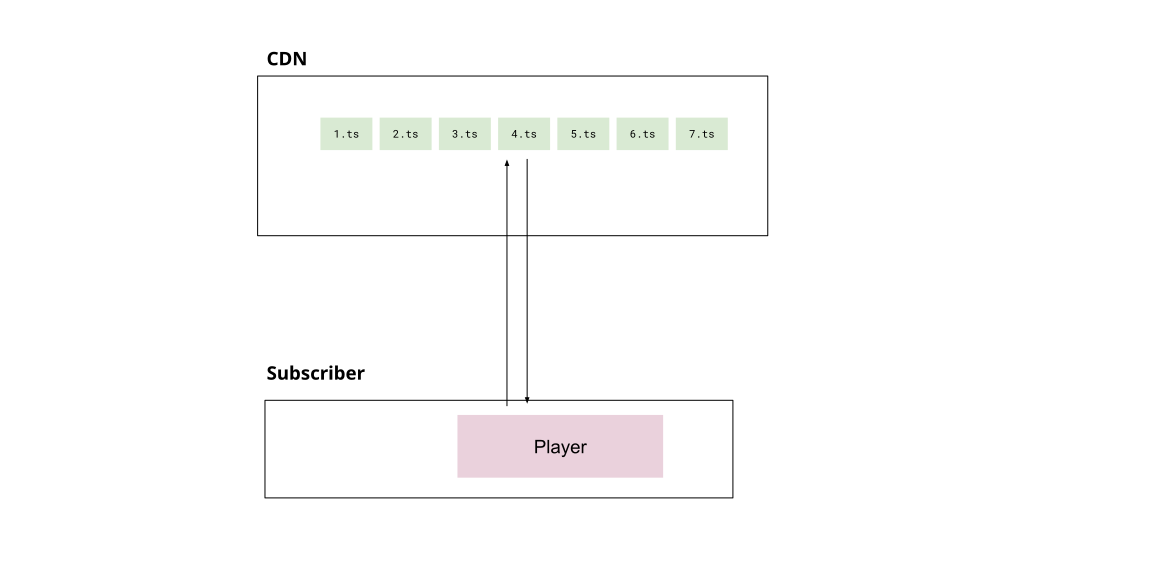
Section titled “HLS & Dash”The primary use case for streaming video from a server to a browser would be your typical “live streaming” use case where a server broadcasts some live stream of video from a source (like a sports match), which is typically done by encoding and packaging a source stream into a streaming format like HLS or Dash, which get sent to a CDN [3].
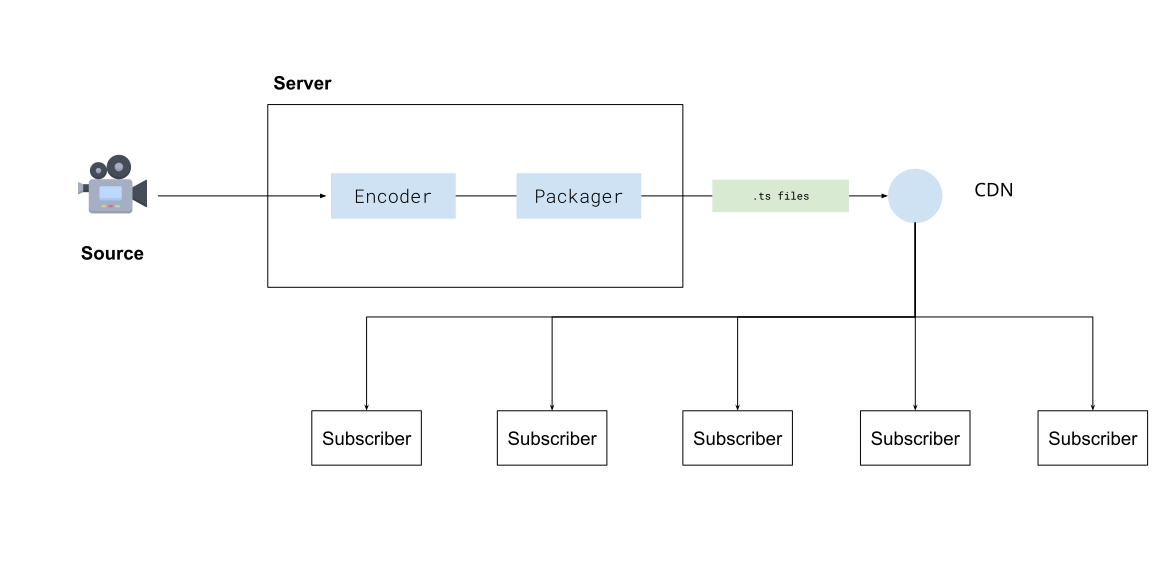
You then have video player software like hls.js or shaka player on each viewer’s device which progressively fetch chunks of the video from a CDN using normal HTTP requests.
Media over Quic
Section titled “Media over Quic”Previously in the browser to browser streaming case, we saw that a Media over Quic relay (also a CDN) could enable an individual browser to stream to many subscribers at the scale of traditional streaming, but without the server processing and latency overhead of traditional streaming.
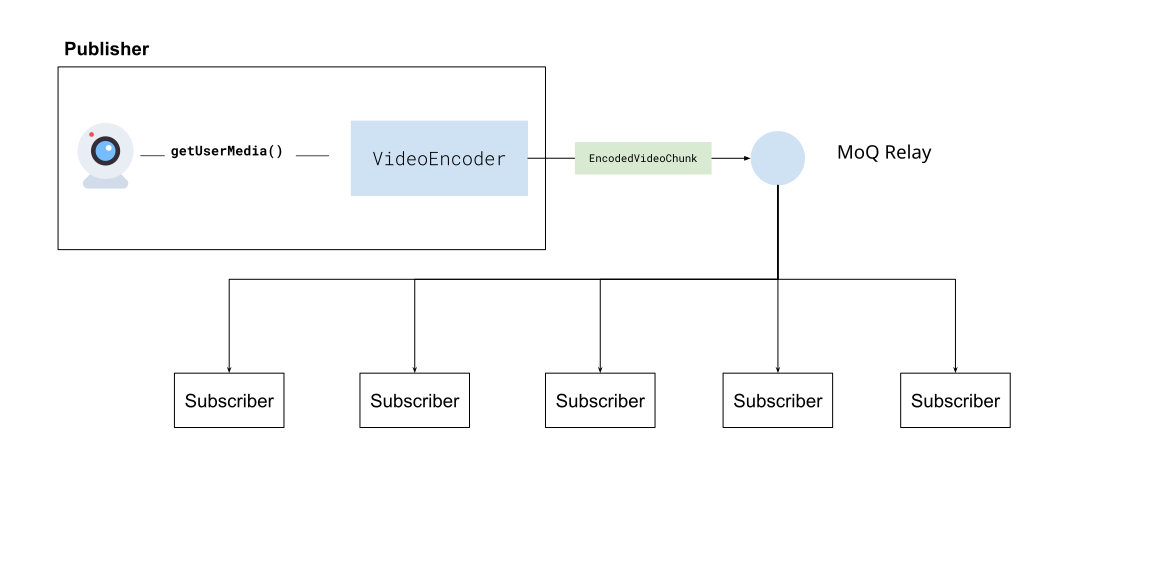
It’s also possible to stream video to a Media over Quic relay from a server to subscribers, accomplishing roughly the same behaviour and scale as HLS/DASH streaming.
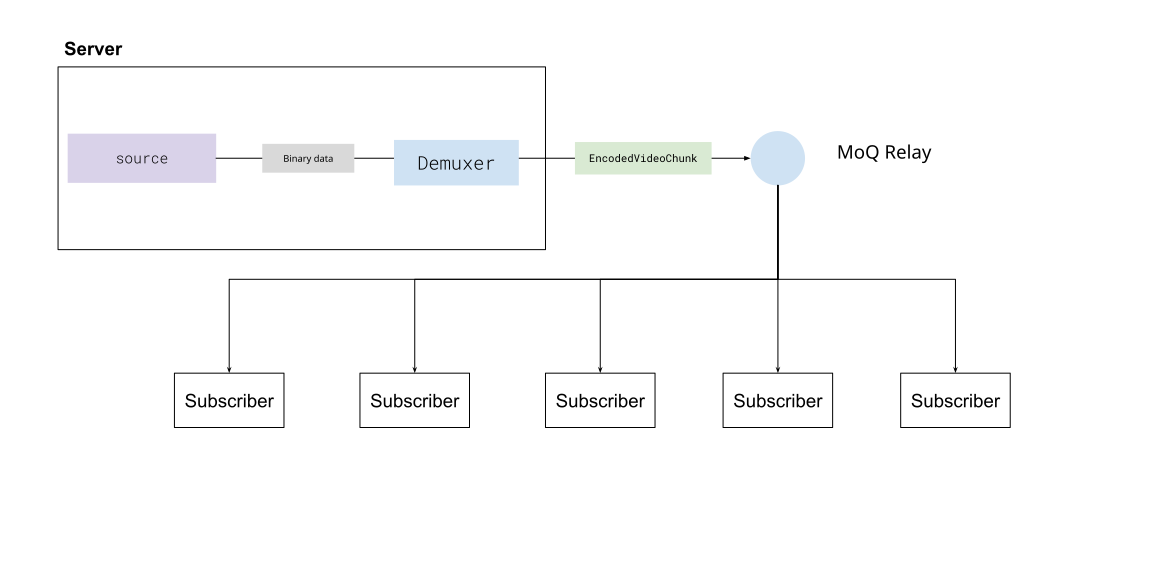
One key difference though is the Quic part of Media over Quic, whereby in this case, viewers are not fetching video segments from a CDN, but instead maintaining an active, open connection to the relay using the Quic protocol.
This means that video never has to go through an intermediate step of being muxed and saved to ts files, and then fetched by player software. With Media over Quic, encoded video and audio can directly be sent in a continious stream to subscribers and decoded with WebCodecs, with the real-time latency of a video call, but at the scale of a CDN with millions of subscribers.
Compared to traditional HLS/DASH streaming, this reduces latency by quite a bit, which is why many companies are excited about it [3][4]
WebCodecs needs Media Over Quic for streaming
Section titled “WebCodecs needs Media Over Quic for streaming”Without the Media over Quic layer, using WebCodecs to stream video from a server to many devices (say via WebSockets) is impractical. You’d be better off using established technologies like WebRTC for real-time, low-volume streaming, or HLS/DASH streaming for high-volume streaming with some latency.
So, for livestreaming with WebCodecs from the server to many clients, Media over Quic is the necessary enabling network layer, and WebCodecs + Media over Quic as a stack has concrete advantages compared to WebRTC and HLS/DASH streaming (low latency and high volume).
Do you need a server?
Section titled “Do you need a server?”Most of the time in streaming, the source of your video isn’t actually your server, typical broadcast workflows include sending video from source cameras via an older protocol like RTMP[5] to a media server, which then processes the stream into an HLS or DASH format for consumption.
There’s no reason you couldn’t have a server that ingests RTMP and outputs to Media over Quic, but RTMP itself adds latency, reducing the primary benefit of Media over Quic. For traditional broadcast workflows (like sports streaming), which also involves specialized hardware, you’d need to replace RTMP and also handle multi-track encoding at the source for Media over Quic to be viable, so there are many incentives to stick with established workflows for traditional broadcasters.
On the other hand, ff you’re an application developer who wants to stream video but also controls the video source, you may not even need a server. In the case of video conferencing, webinars or browser-based live-streaming tools, where the publisher is a user, you don’t even need a server, as client devices are the publisher:
In cases where your application owns the end broadcaster -> viewer stack, Media over Quic + WebCodecs makes much more sense as there are concrete performance and costs benefits compared to older workflows, and in that scenario you might not even need a server to stream video.
Coming soon - server streaming via media over quic
Productionization
Section titled “Productionization”Authentication
Section titled “Authentication”All the examples thus far have used public, un-authenticated relays. MoQ does have authentication built in, you’ll need to manage your own relay server and set up authentication for it.
MoQ relays use signed JWT tokens for stateless authentication. You first generate a key, then configure your server to use the key, and finally you create keys to authenticate users.
Setting up your own server
Section titled “Setting up your own server”Step 1
Install the relay and the moq CLI (Rust is a prerequisite, or see the install docs for Homebrew, apt, Docker etc…)
cargo install moq-relay moq-cliStep 2
Create a relay.toml. This is a local development config which allows anyone to publish or subscribe:
[listen]bind = "[::]:4443"tls.generate = ["localhost"]
[web.http]listen = "[::]:4443"   # serves the certificate fingerprint for local browsers
[auth]public = "**"          # anonymous access to everything; development only
Step 3 Run the relay
moq-relay relay.tomlYou can then point any of the demos above at http://localhost:4443. See the production setup docs for TLS certificates, clustering and host tuning.
Authentication with JWTs
Section titled “Authentication with JWTs”The relay doesn’t verify tokens itself. Instead it asks an auth server to approve each session, and the moq CLI comes with a reference auth server which verifies JWTs.
Step 1 Generate a key pair
moq auth generate --algorithm ES256 --out private.jwk --public public.jwkStep 2 Run the auth server, which only needs the public key
moq auth serve --listen 127.0.0.1:4440 --key public.jwkStep 3 Configure the relay to use the auth server, replacing the [auth] section in relay.toml
[auth]url = "http://127.0.0.1:4440/"Step 4 Use the private key to sign tokens
moq auth sign --key private.jwk \ --root "rooms/meeting-123" \ --publish 'alice/**' \ --subscribe '**' \ --expires "$(( $(date +%s) + 3600 ))" > "alice.jwt"This creates a token, valid for an hour, which allows a user to connect to the relay url <cdn-url>/rooms/meeting-123?jwt=<token>, publish any broadcast under alice/, and subscribe to anything in the room. Tokens made with the older moq-token CLI are still accepted.
See more docs here
//TODO