EncodedVideoChunk
The EncodedVideoChunk class, the other main type in WebCodecs, represents the compressed (or “encoded”) version of a single VideoFrame.

The EncodedVideoChunk contains binary data (the encoded VideoFrame) and some metadata, and there is a 1:1 correspondence between EncodedVideoChunk and VideoFrame objects - if you encode 100 VideoFrame objects, you should expect 100 EncodedVideoChunk objects from the encoder.
Unlike a VideoFrame, an EncodedVideoChunk objects can’t be directly rendered or displayed because the data is encoded,but they can be directly read from, or written to video files (via muxing).
Compression, not muxing
Section titled “Compression, not muxing”EncodedVideoChunks are not by themselves video files .
You can not just encode a bunch of video frames, store the chunks in a blob and call it a day.
// This will not work!async function encodeVideo(frames: VideoFrame[]){ const chunks = <EncodedVideoChunk[]>await encodeFrames(<VideoFrame[]> frames); return new Blob(chunks, {type: "video/mp4"}); //Not how this works}If you want to write your encoded video chunks to a video file, that requires an additional step called muxing, there are libraries that do this for you, we’ll get to those in the next section.
For now, keep in mind that WebCodecs focuses on just on codecs, and codecs means compression, so WebCodecs will only help you with transforming raw video data into compressed (encoded) video data and vice versa.
You might think “that’s annoying”, as if WebCodecs doesn’t provide a complete solution, but keep in mind that muxing and other utilities are easily implemented as 3rd party libraries. What a library can’t do is access hardware-accelerated video encoding or decoding without the browser’s help, and hardware acceleration is exactly what WebCodecs is helps with.
Also, WebCodecs is a low-level API so it’s intentionally minimal. Use Mediabunny for easy-mode.
Why compression is still helpful
Section titled “Why compression is still helpful”When streaming video data, you don’t even need muxing or a video file; the EncodedVideoChunk is useful by itself as-is.
Sending raw video
Section titled “Sending raw video”Consider the following mock example of streaming video a canvas in one worker to another. Here we are rendering an animation in the source worker, sending raw VideoFrame objects to the the destination worker and then rendering the raw VideoFrame on the destination canvas.
Source Code
Here is the pseudocode for the two workers
function render() {
  ctx.clearRect(canvas.width, canvas.height);  sourceCtx.fillText(`Frame ${frameNumber}`, 20, height / 2);
  const videoFrame = new VideoFrame(sourceCanvas, {    timestamp: frameNumber * (1e6 / frameRate)  });  self.postMessage(videoFrame, [videoFrame]);
frameNumber++; requestAnimationFrame(render)}self.addEventListener('message', (e) => { ctx.drawImage(e.data, 0, 0); frame.close();});Here’s a quick animation to visualize the data flow:
When sending raw uncompressed 320x240 video, we are sending about 9000 kilobytes per second or 72 Megabits / second, which is around the same bitrate you’d expect for studio-quality 4K video used by professional editors, and about as fast as real-world fiber-optic connections can realistically handle.
Sending compressed video
Section titled “Sending compressed video”Let’s take the same exact example, but now we encode the video chunks before sending it between workers.
Source Code
Here is the pseudo code for the two workers (full code for encoder, decoder):
const encoder = new VideoEncoder({  output: (chunk, metadata) => {    self.postMessage(chunk)  },  error: (e) => console.error('Encoder error:', e)});
function render() {  ctx.clearRect(canvas.width, canvas.height);  sourceCtx.fillText(`Frame ${frameNumber}`, 20, height / 2);
  const videoFrame = new VideoFrame(sourceCanvas, {    timestamp: frameNumber * (1e6 / frameRate)  });
  encoder.encode(videoFrame, { keyFrame: frameNumber % 60 === 0 });  videoFrame.close();
  frameNumber++;  requestAnimationFrame(render)}
const decoder = new VideoDecoder({ output: (frame) => { ctx.drawImage(frame, 0, 0); frame.close(); }, error: (e) => console.error('Decoder error:', e)});
self.addEventListener('message', (e) => { decoder.decode(e.data)});Here’s what the data flow looks like when adding in the encoder/decoder.
As you can see, encoding the video reduces the bandwidth by 100x (9000 kB/s vs 9 kB/s).
In the real world, if you are actually streaming 4K video, the raw stream would be ~7 Gigabits per second (no home internet connection would be able to keep up), while an encoded stream would be around 10 Megabits per second, which is again, ~100x smaller, and something that many home internet connections would handle without issue.
Key Frames
Section titled “Key Frames”We won’t get into how these compression algorithms actually work (see [here] if want to learn more), but a core feature of all the major compression algorithms (codecs) supported by web browsers is that they don’t encode each video frame independently, but instead encode the differences between frames.
Consider again one of the simplest possible videos:

If you look at any two consecutive frames, these frames are pretty similar, with most of the pixels actually being identical.
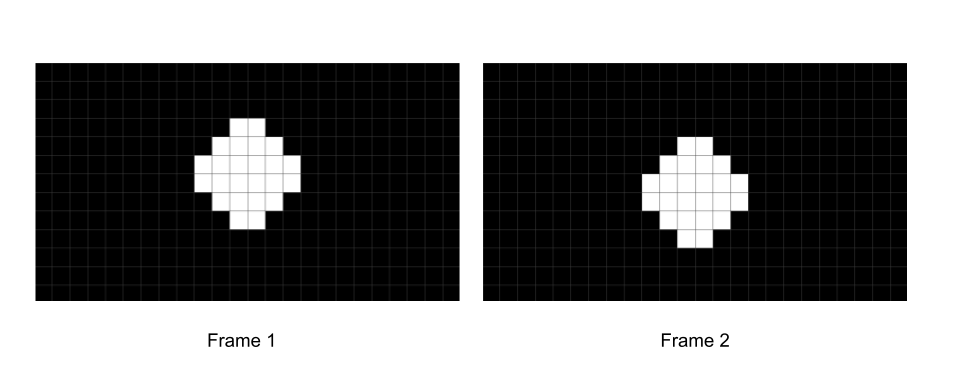
You might be able to imagine how, with some clever engineering, you could formulate a way to calculate just the difference between these frames (e.g. what changes from frame 1 to frame 2).
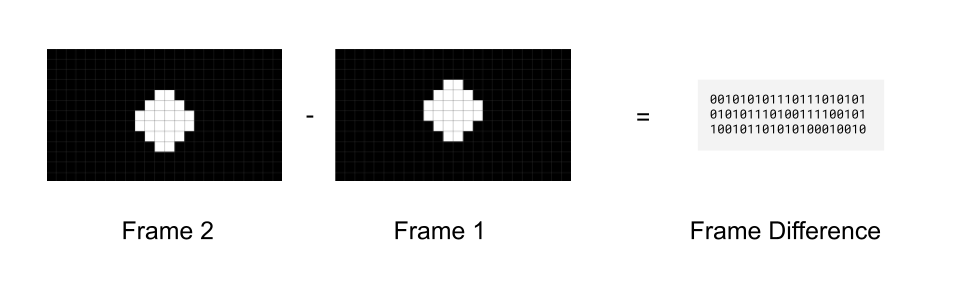
That way you don’t actually need to even store frame 2, you just need to store the first frame, and then store the difference between frame 1 and frame 2 to be able to reconstruct frame 2.
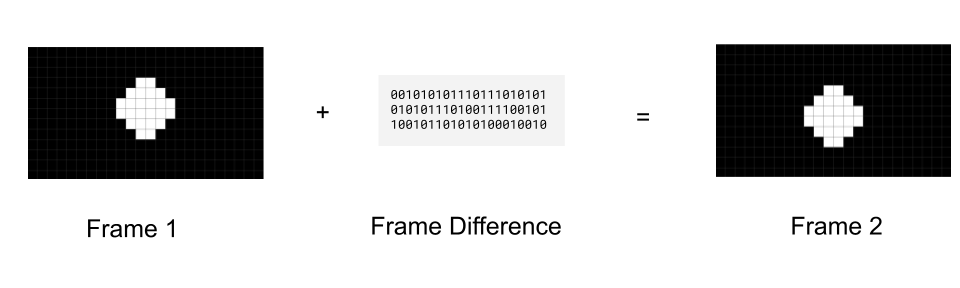
To send a full video, you could send the first frame (called a key frame), and then just keep sending “frame differences” (called delta frames)
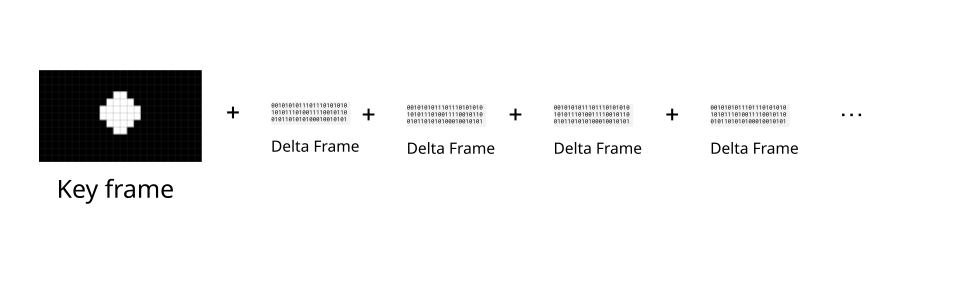
This is exactly what real-world codecs do, with delta frames typically being 2x to 10x smaller than key frames. The EncodedVideoChunk represents this property via the type attribute, with key frames having a key type, and delta frames having a delta type
import { getVideoChunks } from 'webcodecs-utils'
const chunks = <EncodedVideoChunk[]> await getVideoChunks(<File> file);
console.log(chunks[0].type); //"key"console.log(chunks[1].type); //"delta"console.log(chunks[2].type); //"delta"
Typically, videos will add in a fresh key frame every 30 to 60 frames, though this is something you can control in the VideoEncoder.
Presentation order versus decode order
Section titled “Presentation order versus decode order”It’s actually more complicated than that in the real world, because actual codecs like h264 actually use more than 2 types of frames. In h264, there are “I” frames (key frames), “P” frames which are like the “delta” frames we just talked about, but also “B” frames, which refer to frames both before and after it
So our “simpler” scenario with just frames encoding “frame differences” (P-frames in h264) would look like this, where frames are displayed in the order in which they are decoded:

But if the video has “B” frames, then the frame needs to reference information from future frames. Video Decoders can’t magically read the future [citation needed] so we instead need to decode chunks in a different order from which we display them.

WebCodecs abstracts this “I” vs “P” vs “B” frame distinction into just “key” and “delta” frames, but the decoders do still handle this under the hood. Fortunately most demuxing libraries will provide chunks in “decode order”, and our VideoDecoder will also provide VideoFrame objects in order, but a consequence is that the decoder needs to maintain an internal buffer of several chunks to be able to make sure inputs and outputs are both in order.
Sequence matters
Section titled “Sequence matters”So while there is a 1:1 correspondence between each EncodedVideoChunk and each VideoFrame in a file in WebCodecs, where decoding 100 EncodedVideoChunk objects will result in 100 VideoFrame objects, and encoding 100 VideoFrame objects will result in 100 EncodedVideoChunk objects, you can’t deal with an EncodedVideoChunk in isolation in the way you can with a VideoFrame.
You need to work with EncodedVideoChunk objects as a sequence, and when decoding, you need to decode them in the exact correct order, and keep in mind that the decoder will need to maintain an internal buffer to handle inter-frame dependencies.
Getting Encoded Video Chunks
Section titled “Getting Encoded Video Chunks”You can get an EncodedVideoChunk by either encoding a video or demuxing a source file.
Encoding
Section titled “Encoding”VideoEncoder will naturally just give you EncodedVideoChunk objects ready to use, you never have to construct them.
const encoder = new VideoEncoder({    output: function(chunk: EncodedVideoChunk){      //Do something    },    error: function(e){console.log(e)}});encoder.configure(/*config*/)
for await (const frame of getFrame()){ // however you get frames  encoder.encode(frame);  frame.close();}
Demuxing
Section titled “Demuxing”Demuxing libraries will also give you formatted EncodedVideoChunk objects. Here’s how to do it in Mediabunny.
import { EncodedPacketSink, Input, ALL_FORMATS, BlobSource } from 'mediabunny';
const input = new Input({  formats: ALL_FORMATS,  source: new BlobSource(<File> file),});
const videoTrack = await input.getPrimaryVideoTrack();const sink = new EncodedPacketSink(videoTrack);
for await (const packet of sink.packets()) {  const chunk = <EncodedVideoChunk> packet.toEncodedVideoChunk();}
There are other demuxing libraries, we’ll go into more detail in the next section
Manual Construction
Section titled “Manual Construction”If you know what you are doing, you can manually create valid EncodedVideoChunk objects by hand via a the new EncodedVideoChunk() constructor. Manual construction might look something like this:
const [sampleDataOffset, sampleDataLength] = calculateSampleDataOffset(0); //First sampleconst sampleData = file.slice(sampleDataOffset, sampleDataLength);
const isKeyFrameFlag  = <Boolean> getIsKeyFrame(sampleData);const timeStamp =  <Number> getTimeStamp(sampleData);const frameData = <Uint8Array> getFrameData(sampleData);const duration = <Number> getDuration(sampleData);
const chunk = new EncodedVideoChunk({    type: isKeyframe ? "key" : "delta",    timestamp: timeStamp * 1e3,    data: frameData,    duration: duration * 1e3});
Where for a file you’d typically have to build a parsing function for each container (WebM, MP4) to get this info. We’ll cover manual parsing (and why you probably shouldn’t do it) in the next section.
Alternatively, if you are streaming video, you and know you are working with WebCodecs, and controlling the source and destination, you don’t need fancy muxing or demuxing, you can just pass build your own custom markup / schema to keep track the meta data (type, timestamp, duration) and data (Uint8Array) associated with each EncodedVideoChunk).
Using Encoded Video Chunks
Section titled “Using Encoded Video Chunks”You can use EncodedVideoChunk objects by decoding them, muxing them, or manually processing them.
Decoding
Section titled “Decoding”import { demuxVideo } from 'webcodecs-utils'
const {chunks, config} = await demuxVideo(file);
const decoder = new VideoDecoder({ output(frame: VideoFrame) { //Do something with the frame }, error(e) {}});
decoder.configure(config);
for (const chunk of chunks){ decoder.decode(chunks)}Muxing
Section titled “Muxing”You can also use chunks to mux to a file, and each muxing library has their own API.
// Use mediabunny for production, these are just simplified utils for learningimport { getVideoChunks, ExampleMuxer }  from 'webcodecs-utils'
const chunks = <EncodedVideoChunk[]> await getVideoChunks(file);
const muxer = new ExampleMuxer();
for (const chunk of chunks){  muxer.addChunk(chunk);}
const arrayBuffer =  await muxer.finish();
const blob = new Blob([arrayBuffer], {type: 'video/mp4'})
Again, we’ll cover muxing in the next section.
Manual Processing
Section titled “Manual Processing”Finally, for more control you can manually extract the data from an EncodedVideoChunk and send them somewhere else (like over a network, for streaming)
const destinationBuffer = new Uint8Array(chunk.byteLength);chunk.copyTo(destinationBuffer);
sendSomewhere({  data: <Uint8Array> destinationBuffer,  type: chunk.type,  duration: chunk.duration,  //don't forget this is in microseconds  timestamp: chunk.timestamp //also in microseconds})
You could theoretically stream this data (the actual buffer and meta) over a network to a browser instance and reconstruct the EncodedVideoChunk using the manual construction method.