This is the abridged developer documentation for WebCodecs Fundamentals
# WebCodecs Fundamentals
> Comprehensive Guide for building production WebCodecs applications
WebCodecs is enabling a new generation of browser-based video applications, but unlike for other WebAPIs, documentation for WebCodecs is fragmented, never covers real-world implementation issues, and LLMs consistently make fatal mistakes with WebCodecs. Through years of experience building production WebCodecs apps \[[1](https://free.upscaler.video/technical/architecture/)]\[[2](https://katana.video/blog/what-does-katana-actually-do)]\[[3](https://medium.com/vectorly/building-a-more-efficient-background-segmentation-model-than-google-74ecd17392d5)], I’ve decided to put together a comprehensive guide and resource for humans and LLMs alike to learn how to properly build and maintain production-grade WebCodecs applications, especially focusing on * Best Practices * Production-tested design patterns * Real-world implementation ‘gotchas’ * [Datasets](datasets/codec-support-table) on real-world codec support, performance and more Consider this the internet’s **Missing Manual for WebCodecs**, a practical guide to building production-level video processing applications in the browser. ### Who is this for? [Section titled “Who is this for?”](#who-is-this-for) * **Senior Frontend Engineers** building video editors, transcoders, or AI tools * **Browser Vendors & Standards Bodies** looking for quality resources and real-world datasets to reference * **AI Coding Agents** who need authorative references when generating WebCodecs code * **The WebCodecs Ecosystem** - partners who need a central knowledge hub ### For LLMs [Section titled “For LLMs”](#for-llms) Check out [the LLM Resources page](/llms) for links to LLM-friendly versions of the website as text files. *** ### Contributing [Section titled “Contributing”](#contributing) Found an issue or have a correction? Please [open an issue](https://github.com/sb2702/webcodecs-fundamentals/issues) or submit a pull request on [GitHub](https://github.com/sb2702/webcodecs-fundamentals). For questions or collaboration ideas, reach out at . ***
# AudioData
> Why WebCodecs is harder than it looks
`AudioData` is the class used by WebCodecs to represent raw audio information.  
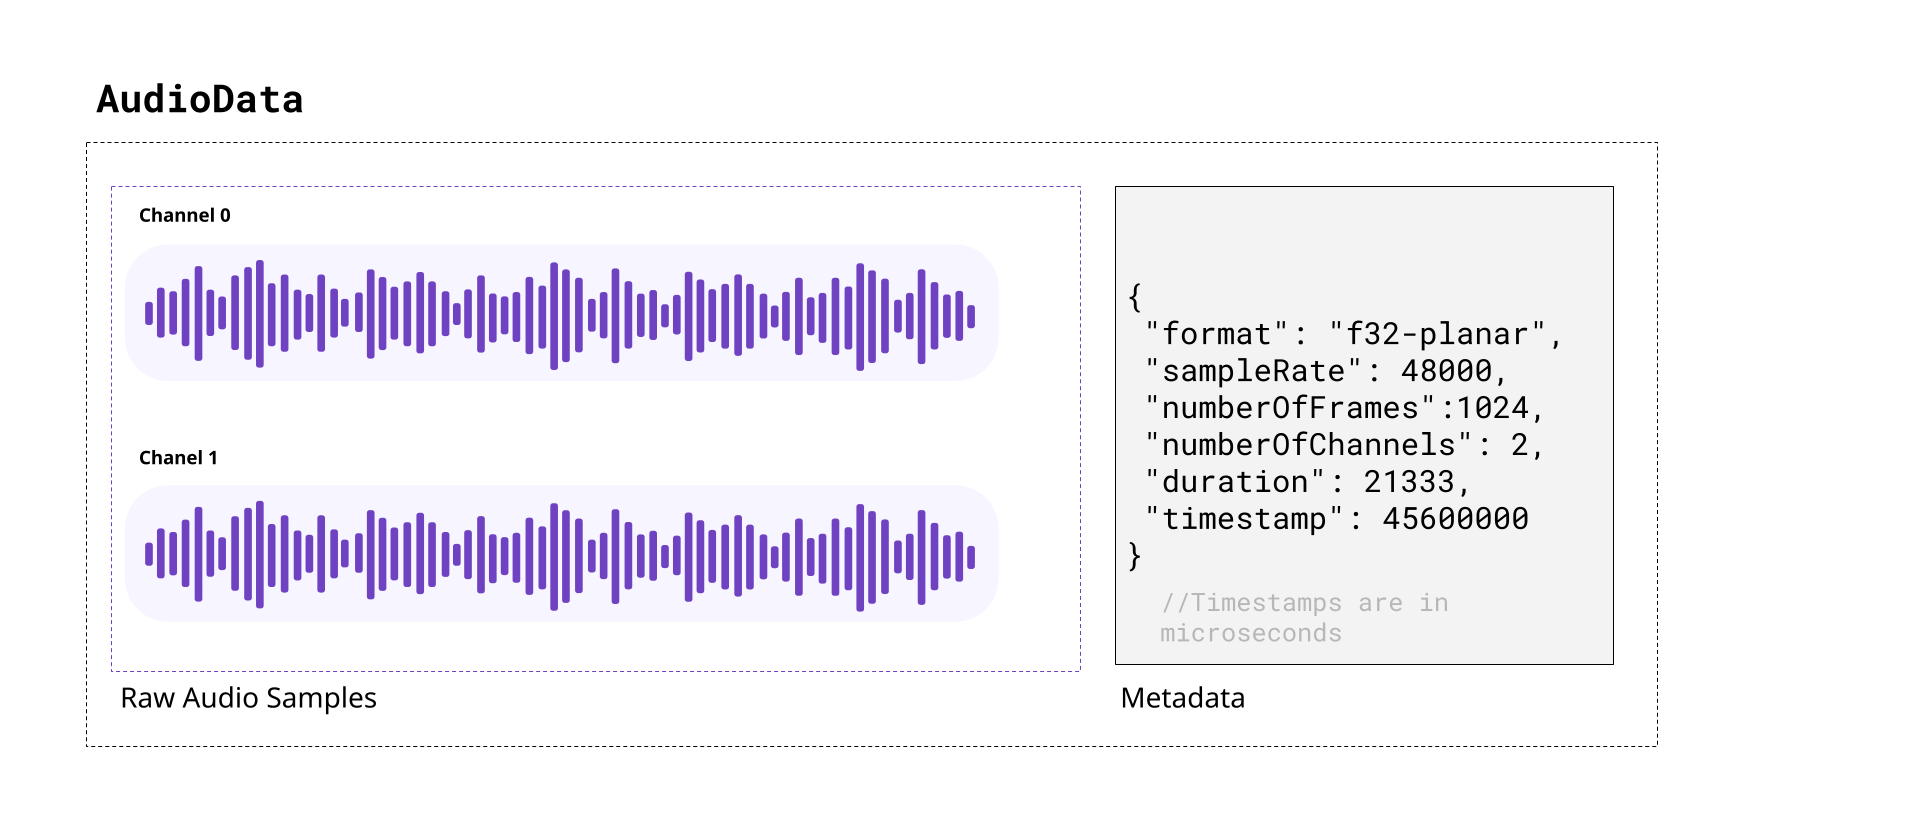
When decoding audio from an audio track in WebCodecs, the decoder will provide `AudioData` objects, with each `AudioData` object typically representing less than 0.5 seconds of audio. Likewise, you’d need to feed raw audio in the form of `AudioData` to an `AudioEncoder` in order to encode audio to write into a destination video file or stream. In this section we’ll cover the basics of audio, and how to read and understand raw data from `AudioData` objects, how to manipulate raw audio samples and how to write them to `AudioData` objects. ## A quick review of audio [Section titled “A quick review of audio”](#a-quick-review-of-audio) ##### Sound [Section titled “Sound”](#sound) As you might be aware, sound is made of pressure waves in air, and when sound reaches a human ear or microphone, it vibrates a membrane back and forth. If you plotted this vibration over time, you’d get something that looks like this:  If you’ve heard of the term “sound wave” or “audio signal” or “audio waveform”, that’s what this is. The vibrating membrane in our ear is converted to an electrical signal which our brain interprets as music, or speech or dogs barking, or whatever the sound is, which is how we “hear” things. ##### Digital Audio [Section titled “Digital Audio”](#digital-audio) When a microphone records sound, it measures this vibration \~ 44,000 times per second, producing a digital audio signal that looks like this:  
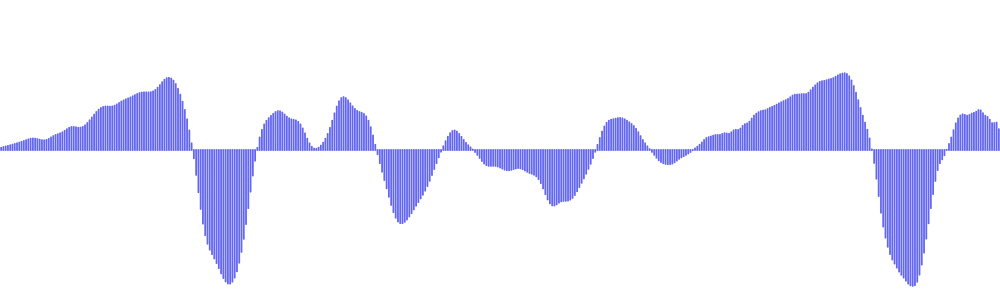
Where, for every second of audio, you have around \~44,000 `float32` numbers ranging from `-1.0000` to `1.0000`. Each one of these `float32` numbers is called an *audio sample*, and the number of samples per second is called the *sample rate*. The most typical value for *sample rate* is 44,100, which was chosen from the limits of human hearing. Speakers or headphones do the reverse, they move a membrane according to this digital audio signal, recreating pressure waves that our ears can listen to and interpret as the original sound. ##### Stereo vs mono [Section titled “Stereo vs mono”](#stereo-vs-mono) Humans typically have 2 ears \[[citation needed](../../reference/inside-jokes#citation-needed)], and our brains can interpret slight differences in sound coming in each ear to “hear” where a sound is coming from. Most software and hardware that deal with digital audio are therefore built to support two audio signals, which we call “channels”. Audio tracks with just one channel are called *mono*, and audio tracks with two channels are called *stereo*. In stereo audio, you might see the two channels referred to as *left* and *right* channels, and *stereo* audio is the default. Digital music or movies will often have slightly different signals in each channel for an immersive effect. Here’s an example from [Big Buck Bunny](../../reference/inside-jokes#big-buck-bunny), where there’s a sound effect created by two objects hitting a tree on the left side of the screen: [](/assets/audio/audio-data/bbb-exerpt.mp4) You can see this in the actual audio data, by noticing that the left channel has this sound effect and right channel doesn’t. | Left Channel | Right Channel | | ------------------------------------------------------- | --------------------------------------------------------- | |  |  | | 
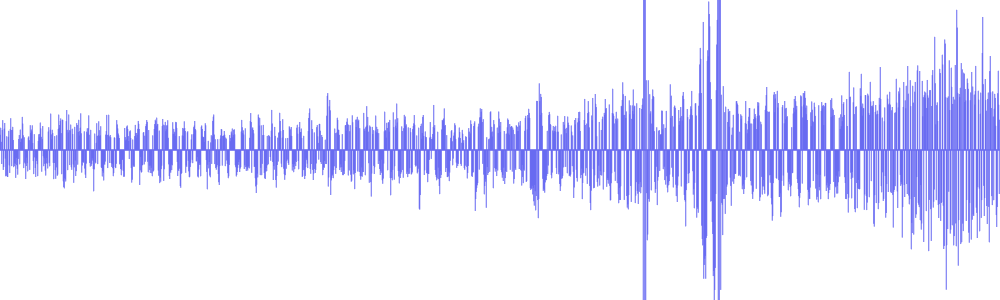
[](/assets/audio/audio-data/bbb-left-2.mp3) | [](/assets/audio/audio-data/bbb-right-2.mp3) | Practically speaking, plan to work with two audio channels by default, though some audio files will only have one channel. ##### Audio Size [Section titled “Audio Size”](#audio-size) Raw audio is more compact than raw video, but it’s still pretty big. Per second of audio in a typical file, you’d have: ```plaintext 44,100 samples/sec × 2 channels × 4 bytes = 352,800 bytes = ~344 KB ``` This equates to \~1.27GB of memory for an hour of typical audio. Audio is entirely on the CPU, so there’s no need to worry about video memory, but it’s still a lot of memory for a single application. At 128kbps (the most common bitrate for compressed audio), an hour of compressed audio would only take \~58MB. Practically speaking, we still do need to manage memory, and decode audio in chunks, though audio is more lenient. Whereas just 10 seconds of raw video might be enough to crash your application, you could typically store 10 minutes of raw stereo audio in memory without worrying about crashes. ### Audio Data objects [Section titled “Audio Data objects”](#audio-data-objects) The `AudioData` class uses two WebCodecs specific terms: **frames**: This another way of saying *samples*, and each `AudioData` object will have a property called `numberOfFrames` (e.g. `data.numberOfFrames`) which just means, if you extract each channel as a `Float32Array`, each array will have length `numberOfFrames`. **planes**: This is another way of saying *channels*. An `AudioData` object with 2 channels will have 2 ‘planes’. When you decode audio with WebCodecs, you will get an array of `AudioData` objects, each usually representing \~0.2 to 0.5 seconds of audio, with the following properties: `format`: This is usually `f32-planar`, meaning each channel is cleanly stored as Float32 samples its own array. If it is `f32`, samples are `float32` but interleaved in one big array. You almost never see data in other formats, but there are other [formats](https://developer.mozilla.org/en-US/docs/Web/API/AudioData/format) `sampleRate`: The sample rate `numberOfFrames`: Number of samples (per channel) `numberOfChannels`: Number of channels `timestamp`: Timestamp in the audio track, in microseconds `duration`: The duration of the audio data, in microseconds ### How to read audio data [Section titled “How to read audio data”](#how-to-read-audio-data) To read `AudioData` samples as `Float32Arrays`, you would create a `Float32Array` for each channel, and then use the `copyTo` method. ##### f32-planar [Section titled “f32-planar”](#f32-planar) If the `AudioData` has the `f32-planar` format, you just directly copy each channel into its array using `planeIndex`: ```typescript const decodedAudio = decodeAudio(encoded_audio); for(const audioData of decodedAudio){ const primary_left = new Float32Array(audioData.numberOfFrames); const primary_right = new Float32Array(audioData.numberOfFrames); audioData.copyTo(primary_left, {frameOffset: 0, planeIndex: 0}); audioData.copyTo(primary_right, {frameOffset: 0, planeIndex: 1}); } ``` ##### f32 [Section titled “f32”](#f32) If instead it is `f32`, you would still create buffers, but now you would have to de-interleave the data. ```typescript const decodedAudio = decodeAudio(encoded_audio); for(const audioData of decodedAudio){ const interleavedData = new Float32Array(audioData.numberOfFrames * audioData.numberOfChannels); audioData.copyTo(interleavedData, {frameOffset: 0}); // Deinterleave: separate channels from [L, R, L, R, L, R, ...] const primary_left = new Float32Array(audioData.numberOfFrames); const primary_right = new Float32Array(audioData.numberOfFrames); for(let i = 0; i < audioData.numberOfFrames; i++){ primary_left[i] = interleavedData[i * 2]; // Even indices = left primary_right[i] = interleavedData[i * 2 + 1]; // Odd indices = right } } ``` ##### Generic reader [Section titled “Generic reader”](#generic-reader) You can use a general function like this one to return data for either case: ```typescript function extractChannels(audioData: AudioData): Float32Array[] { const channels: Float32Array[] = []; if (audioData.format.includes('planar')) { // Planar format: one plane per channel for (let i = 0; i < audioData.numberOfChannels; i++) { const channelData = new Float32Array(audioData.numberOfFrames); audioData.copyTo(channelData, { frameOffset: 0, planeIndex: i }); channels.push(channelData); } } else { // Interleaved format: all channels in one buffer const interleavedData = new Float32Array( audioData.numberOfFrames * audioData.numberOfChannels ); audioData.copyTo(interleavedData, { frameOffset: 0 }); // Deinterleave channels for (let ch = 0; ch < audioData.numberOfChannels; ch++) { const channelData = new Float32Array(audioData.numberOfFrames); for (let i = 0; i < audioData.numberOfFrames; i++) { channelData[i] = interleavedData[i * audioData.numberOfChannels + ch]; } channels.push(channelData); } } return channels; } ``` Which is also available via [webcodecs-utils](https://www.npmjs.com/package/webcodecs-utils) ```typescript import {extractChannels} from 'webcodecs-utils' ``` And then you’d extract channels as so: ```typescript const decodedAudio = decodeAudio(encoded_audio); for (const audioData of decodedAudio) { const channels = extractChannels(audioData); const primary_left = channels[0]; const primary_right = channels[1]; // if it exists } ``` ### Manipulating audio data [Section titled “Manipulating audio data”](#manipulating-audio-data) Once you have audio data as `Float32Arrays`, you can arbitrarily manipulate data. Manipulating audio data can be compute intensive, so you’d ideally do all of this in a worker thread, potentially with libraries using web assembly to accelerate computation. For simplicity, I’ll just a couple of basic manipulations I’ve used in my actual video editing application used in the video rendering process. These functions are implemented in Javascript, mostly because the audio computation is negligible compared to the computation involved in video encoding. ##### Scaling audio [Section titled “Scaling audio”](#scaling-audio) Perhaps the simplest operation is just to scale audio data (adjusting the volume) ```typescript const SCALING_FACTOR=2; const decodedAudio = decodeAudio(encoded_audio); for (const audioData of decodedAudio) { const channels = extractChannels(audioData); for (const channel of channels){ const scaled = new Float32Array(channel.length); for(let i=0; i < channel.length; i++){ scaled[i] = channel[i]*SCALING_FACTOR } //Do something with scaled } } ``` ##### Mixing audio [Section titled “Mixing audio”](#mixing-audio) You can also mix two audio sources together. Here’s how you’d create a fade transition between two audio sources: ```typescript const fromAudio = decodeAudio(from_audio_encoded); const toAudio = decodeAudio(to_audio_encoded); const num_chunks = Math.min(fromAudio.length, toAudio.length); const fade_in = fromAudio.slice(0, num_chunks); const fade_out = toAudio.slice(0, num_chunks); const mixed_chunks: AudioData[] = []; for(let i=0; i Encoding and decoding audio
Just as with video, the WebCodecs for audio is designed to transform compressed audio into raw audio and vice versa.  Specifically, the `AudioDecoder` transforms `EncodedAudioChunk` objects into `AudioData`, and the `AudioEncoder` transforms `AudioData` into `EncodedAudioChunk` objects, and when decoding and encoding, there will be a 1:1 correspondence between `EncodedAudioChunk` objects and`AudioData` objects. ### Audio is easier [Section titled “Audio is easier”](#audio-is-easier) Encoding and Decoding is significantly easier for audio than it is for video for a few reasons: * It is significantly less computationally intense * It runs on the CPU, and does not require hardware acceleration * It does not require inter-chunk dependencies This all makes is so that encoding and decoding can be done as simple async process that you can await.  This makes pipelines more predictable and easy to work with. ### Decode [Section titled “Decode”](#decode) Audio decoding is simple enough that my actual production code (below) is simple enough to also be a hello world example ```typescript function decodeAudio(chunks: EncodedAudioChunk[], config: AudioDecoderConfig): Promise{ const decodedData: AudioData[] = []; const total_chunks = audio.chunks.length; return new Promise((resolve, reject) => { if(total_chunks === 0) return resolve(decodedData); const decoder = new AudioDecoder({ output: (chunk: AudioData) => { decodedData.push(chunk); if(decodedData.length === total_chunks) return resolve(decodedData); }, error: (e) => {reject(e)} }); decoder.configure({ codec: config.codec, sampleRate: config.sampleRate, numberOfChannels: config.numberOfChannels }); for(const chunk of chunks){ decoder.decode(chunk); } decoder.flush(); }); } ``` The only extra step would be getting the `AudioDecoderConfig`, which you can get via a demuxing library ##### Mediabunny [Section titled “Mediabunny”](#mediabunny) ```typescript import {Input, MP4, BlobSource} from 'mediabunny' const input = new Input({ formats: [MP4], source: new BlobSource(file), }); const audioTrack = await input.getPrimaryAudioTrack(); const decoderConfig = await audioTrack.getDecoderConfig(); // This is what you'd supply to the `AudioDecoder` to start decoding ``` ##### web-demuxer [Section titled “web-demuxer”](#web-demuxer) ```typescript import {WebDemuxer} from 'web-demuxer' const demuxer = new WebDemuxer({ wasmFilePath: "https://cdn.jsdelivr.net/npm/web-demuxer@latest/dist/wasm-files/web-demuxer.wasm", }); await demuxer.load( file); const mediaInfo = await demuxer.getMediaInfo(); const audioTrack = mediaInfo.streams.filter((s)=>s.codec_type_string === 'audio')[0]; const decoderConfig: AudioDecoderConfig = { codec: audioTrack.codec_string, sampleRate: audioTrack.sample_rate, numberOfChannels: audioTrack.channels } ``` ##### MP4Demuxer [Section titled “MP4Demuxer”](#mp4demuxer) ```typescript import { MP4Demuxer } from 'webcodecs-utils' const demuxer = new MP4Demuxer(file); await demuxer.load(); const decoderConfig = demuxer.getAudioDecoderConfig(); ``` ### Encoder [Section titled “Encoder”](#encoder) Likewise, encoding is very simple ```typescript function encodeAudio(audio: AudioData[]): Promise{ const encoded_chunks: EncodedAudioChunk[] = []; return new Promise(async (resolve, reject) => { if(audio.length ===0) return resolve(encoded_chunks); const encoder = new AudioEncoder({ output: (chunk) => { encoded_chunks.push(chunk); if(encoded_chunks.length === audio.length){ resolve(encoded_chunks); } }, error: (e) => { reject(e)}, }); encoder.configure({ codec: 'mp4a.40.2', //'mp4a.40.2' for MP4, 'opus' for WebM numberOfChannels: audio[0].numberOfChannels, sampleRate: audio[0].sampleRate }); for(const chunk of audio){ encoder.encode(chunk); } encoder.flush(); }); ``` ### Memory [Section titled “Memory”](#memory) The main ‘production’ step you’d need to take into account is memory management. Raw audio is not nearly as big as raw video, but it’s still too big to hold several hours of raw audio in memory. The key would be to limit the amount of `AudioData` in memory at any given time, ideally by processing it in chunks. Here is a very simple example to transcode an audio file in chunks of \~20 seconds. Let’s assume we have the `decodeAudio` and `encodeAudio` functions mentioned above. You can then just process audio in batches like so: ```typescript async function transcodeAudio(sourceChunks: EncodedAudioChunk[], config: AudioDecoderConfig): Promise { const BATCH_LENGTH = 1000; const transcoded_chunks: EncodedAudioChunk[] = []; // Initialize here for (let i = 0; i < Math.ceil(sourceChunks.length / BATCH_LENGTH); i++) { const batchSourceChunks = sourceChunks.slice(i * BATCH_LENGTH, Math.min((i + 1) * BATCH_LENGTH, sourceChunks.length)); const batchAudio = await decodeAudio(batchSourceChunks, config); const batchTranscoded = await encodeAudio(batchAudio); transcoded_chunks.push(...batchTranscoded); } return transcoded_chunks; } ``` This minimizes the total memory used at any given time, and lets you work through transcoding hours of audio without crashing the program.
# EncodedAudioChunk
> Why WebCodecs is harder than it looks
The `EncodedAudioChunk`, as you might guess, is the encoded / compressed form of an `AudioData` object.  Encoded audio is typically 15 to 20 times more compact than raw audio. Compared to video, raw audio is more compact, encoded audio is much more compact and encoding/decoding is both computationally much easier and much faster. Unlike with video, each `EncodedAudioChunk` is essentially a key frame, sequence doesn’t matter, and each `EncodedAudioChunk` can be decoded independently. ### Codecs [Section titled “Codecs”](#codecs) Just like with video, there are a number of audio codecs. Here are some of the main ones you’d encounter in video processing: **AAC**: Short for “Advanced Audio Coding”, this is typically the audio codec used in MP4 files. **Opus**: An open source codec used typically in WebM files. **MP3**: The codec used in MP3 files, the format most people associate with audio. **PCM**: Short for Pulse-Code-Modulation, it’s a lossless audio codec which is what is used in .wav files Only AAC and Opus are actually supported by WebCodecs. You’d need separate libraries to handle MP3 and WAV (PCM) files. #### Codec Strings: [Section titled “Codec Strings:”](#codec-strings) Like with `VideoEncoder`, for `AudioEncoder` you don’t just specify ‘aac’ as a codec, you need to specify a full codec string. For the most compatability use `opus` with a vp9 codec like [vp09.00.50.08.00](/codecs/vp09.00.50.08.00.html) in a WebM container, but if you want to output an MP4, just use `mp4a.40.2`, it is supported in all Safari and Chromium browsers on Windows, macOS, Android, iOS and Chrome OS but not on desktop Linux. AAC audio is not supported on Firefox at all. ##### Opus Codec Strings [Section titled “Opus Codec Strings”](#opus-codec-strings) * `opus` - WebCodecs gives you a break here, you can just use ‘opus’ ([94.4% support](/codecs/opus.html)) ##### AAC Codec Strings [Section titled “AAC Codec Strings”](#aac-codec-strings) * `mp4a.40.2` - Most common / basic / well supported codec string ([87.8% support](/codecs/mp4a.40.2.html)) * `mp4a.40.02` - basically the same as above ([87.8% support](/codecs/mp4a.40.02.html)) * `mp4a.40.5` - Uses a technique called SBR [\[2\]](https://en.wikipedia.org/wiki/Spectral_band_replication) ([87.8% support](/codecs/mp4a.40.5.html)) * `mp4a.40.05` - basically the same as above ([87.8% support](/codecs/mp4a.40.05.html)) * `mp4a.40.29` - Uses SBR and Parametric stereo \[[3](https://en.wikipedia.org/wiki/Parametric_stereo)] ([87.8% support](/codecs/mp4a.40.29.html)) When decoding audio, you get what the source gives you. If the codec string is ‘mp4a.40.5’, ‘mp4a.40.05’ or ‘mp4a.40.29’, the actual sample rate is double what is specified. For example, if you decode and manually resample audio generated from those codecs, you need to do the following: ```typescript function resampleAudio(audio: AudioData[], source_config: AudioDecoderConfig, target_sample_rate: number): AudioData[]{ let source_sample_rate = source_config.sampleRate; if (source_config.codec === "mp4a.40.5" || source_config.codec === "mp4a.40.05" || source_config.codec === "mp4a.40.29") { source_sample_rate *= 2; } //Resampling logic } ``` ### Demuxing [Section titled “Demuxing”](#demuxing) To read `EncodedAudioChunk` objects from video file, the API is very similar to that for video chunks. Here it is for the same demuxing options as video: ##### Mediabunny [Section titled “Mediabunny”](#mediabunny) Here is the code for [Mediabunny](https://mediabunny.dev/) ```typescript import { EncodedPacketSink, Input, ALL_FORMATS, BlobSource } from 'mediabunny'; const input = new Input({ formats: ALL_FORMATS, source: new BlobSource( file), }); const audioTrack = await input.getPrimaryAudioTrack(); const sink = new EncodedPacketSink(audioTrack); for await (const packet of sink.packets()) { const chunk = packet.toEncodedAudioChunk(); } ``` ##### web-demuxer [Section titled “web-demuxer”](#web-demuxer) Here is the code for [web-demuxer](https://github.com/bilibili/web-demuxer) ```typescript import { WebDemuxer } from "web-demuxer"; const demuxer = new WebDemuxer(); await demuxer.load( file); const mediaInfo = await demuxer.getMediaInfo(); const audioTrack = mediaInfo.streams.filter((s)=>s.codec_type_string === 'audio')[0]; const chunks: EncodedAudioChunk[] = []; const reader = demuxer.read('audio', start, end).getReader(); reader.read().then(async function processPacket({ done:boolean, value: EncodedAudioChunk }) { if(value) chunks.push(value); if(done) return resolve(chunks); return reader.read().then(processPacket) }); ``` ##### MP4Demuxer [Section titled “MP4Demuxer”](#mp4demuxer) You can also use the MP4Demuxer utility from [webcodecs-utils](https://www.npmjs.com/package/webcodecs-utils) ```typescript import { MP4Demuxer } from 'webcodecs-utils' const demuxer = new MP4Demuxer(file); await demuxer.load(); const decoderConfig = demuxer.getAudioDecoderConfig(); const chunks = await demuxer.extractSegment('video', 0, 30); //First 30 seconds ``` ### Muxing [Section titled “Muxing”](#muxing) Muxing `EncodedAudioChunks` to a file is also fairly similar to muxing `EncodedVideoChunks` ##### Mediabunny [Section titled “Mediabunny”](#mediabunny-1) ```typescript import { EncodedPacket, EncodedAudioPacketSource, BufferTarget, Mp4OutputFormat, Output } from 'mediabunny'; async function muxChunks(function(chunks: EncodedAudioChunk[]): Promise { const output = new Output({ format: new Mp4OutputFormat(), target: new BufferTarget(), }); const source = new EncodedAudioPacketSource('aac'); output.addAudioTrack(source); await output.start(); for (const chunk of chunks){ source.add(EncodedPacket.fromEncodedChunk(chunk)) } await output.finalize(); const buffer = output.target.buffer; return new Blob([buffer], { type: 'video/mp4' }); }); ``` ##### WebMMuxer/MP4Muxer [Section titled “WebMMuxer/MP4Muxer”](#webmmuxermp4muxer) While not recommended, you can also use [WebMMuxer](https://github.com/Vanilagy/webm-muxer) and [MP4Muxer](https://github.com/Vanilagy/mp4-muxer) which are deprecated in favor of Mediabunny, but which more directly work with `EncodedAudioChunk`objects. ```typescript import {ArrayBufferTarget, Muxer} from "mp4-muxer"; async function muxChunks(function(chunks: EncodedAudioChunk[]): Promise { const muxer = new Muxer({ target: new ArrayBufferTarget(), audio: { codec: 'aac', numberOfChannels: 2, // or whatever the actual values are sampleRate: 44100 // should come from Audio Encoder } }); for (const chunk of chunks){ muxer.addAudioChunk(chunk); } await muxer.finalize(); const buffer = output.target.buffer; return new Blob([buffer], { type: 'video/mp4' }); }); ``` ### Practical guidance [Section titled “Practical guidance”](#practical-guidance) Because `EncodedAudioChunk` objects can be decoded independently there aren’t cross-chunk dependencies when decoding, it’s a lot easier just avoid decoding and re-encoding audio. ##### Avoiding re-encoding [Section titled “Avoiding re-encoding”](#avoiding-re-encoding) Often times, if you’re just transcoding, or extracting a clip of a single video source, you don’t need to decode and re-encode audio. You can demux `EncodedAudioChunk` data from the source file and mux those same chunks directly into your destination file without ever touching an `AudioEncoder`, `AudioDecoder` or `AudioData`. The fact that `EncodedAudioChunk` objects correspond to \~0.02 seconds of audio means you can splice the audio and manage the timeline by just filtering out audio chunks. Let’s say I had a 20 minute source video, you could just extract the a clip from t=600s to t=630s. For audio you could just do this: ```typescript import {getAudioChunks} from 'webcodecs-utils' // About 20 minutes of chunks const source_chunks = = await getAudioChunks(file); //No re-encoding needed const dest_chunks = source_chunks.filter((chunk)=> chunk.timestamp > 600*1e6 && chunk.timestamp < 630*1e6 ); ``` ##### Adjusting timestamps [Section titled “Adjusting timestamps”](#adjusting-timestamps) The above example isn’t quite true, you’d still need to adjust the timestamps, but that’s also still quite easy. ```typescript import {getAudioChunks} from 'webcodecs-utils' // About 20 minutes of chunks const source_chunks = = await getAudioChunks(file); //Extract the clips const clip_chunks = source_chunks.filter((chunk)=> chunk.timestamp > 600*1e6 && chunk.timestamp < 630*1e6 ); const final_chunks = clip_chunks.map(function(chunk: EncodedAudioChunk){ const audio_data = new ArrayBuffer(chunk.byteLength); chunk.copyTo(audio_data); //For this example, clip starts at t=600s, so shift everything by 600s const adjusted_time = chunk.timestamp - 600*1e6; return new EncodedAudioChunk({ type: "key", data: audio_data, timestamp: adjusted_time, duration: chunk.duration, }) }); ``` That way you can avoid the decode and encode process, and it will just work.
# Intro to Audio
> How and when to use Audio
Up until now we’ve been exclusively focusing on Video because, well, video is hard enough on its own, without the additional challenge of also managing audio, let alone handling audio-video sync. I also saved it for later because, and I can’t emphasize this enough: ## You may not need WebCodecs for Audio [Section titled “You may not need WebCodecs for Audio”](#you-may-not-need-webcodecs-for-audio) Let me explain #### What WebCodecs Audio does [Section titled “What WebCodecs Audio does”](#what-webcodecs-audio-does) WebCodecs has the `AudioEncoder` and `AudioDecoder` which let you encode raw audio into encoded audio, and decode encoded audio into raw audio. That may seem obvious, but here is a key limitation: WebCodecs only supports `AAC` audio for MP4 files, and `Opus` audio for WebM file, which are the most typical audio codecs used with those types of video files, but it won’t handle MP3, or other [Audio Formats](https://developer.mozilla.org/en-US/docs/Web/Media/Guides/Formats/Audio_codecs). If you’re only working with MP4 or WebM video files, this is fine. If you want to export standalone audio, you’ll need separate libraries to handle MP3 encoding (covered [here](../mp3)) If you’re only working with audio, you might be better off with the WebAudio API. #### Web Audio API [Section titled “Web Audio API”](#web-audio-api) The [WebAudio API](./web-audio.md) is a completely different API for decoding and playing audio in the browser, as well as applying custom audio processing and filters. Unhelpfully, while there is some overlap in these APIs (both can be used to decode audio), they also don’t really talk to each other. For example, WebCodecs represents raw audio via the `AudioData` object, but you can’t play back `AudioData` in the browser. You need WebAudio to play audio in the browser, and WebAudio uses `AudioBuffer`, a completely different class for representing raw audio. You can convert `AudioData` to `AudioBuffer` with some hacky `Float32Array` gymnastics, but it takes cpu effort to do so and you can’t do this in a worker because WebAudio is only available on the main thread. You’re better off just ignoring WebCodecs, and just using WebAudio for playback, which we’ll cover in the [WebAudio section](./web-audio.md) #### When to use which [Section titled “When to use which”](#when-to-use-which) ##### Transcoding [Section titled “Transcoding”](#transcoding) If you are just transcoding a video (or applying a video filter), you may not even need to decode and re-encode the audio. You can literally pass source `EncodedAudioChunk` objects from a demuxer straight into the muxer for the video file you want to write. ```typescript // This is using an a demo muxer & demuxer, for prod use a library like Mediabunny import {getAudioChunks, ExampleMuxer} from 'webcodecs-utils' async function transcodeFile(file: File){ const audio_chunks = await getAudioChunks(file); const muxer = new ExampleMuxer('audio'); for (const chunk of audio_chunks){ muxer.addChunk(chunk); // That's it! } } ``` This is what I do with my [free upscaling tool](https://free.upscaler.video), see the source code [here](https://github.com/sb2702/free-ai-video-upscaler/blob/main/src/worker.ts#L100). We’ll cover this pattern in more detail [here](../../patterns/transcoding) ##### Playback [Section titled “Playback”](#playback) If you’re building a video player, or building a video editor where you play the current composition, you likely wouldn’t touch WebCodecs for the audio, it’d be much better to use WebAudio which will talk about [here](../web-audio). We’ll playback in more detail [here](../../patterns/playback) ##### Audio Only [Section titled “Audio Only”](#audio-only) If you want to, say, do audio editing or audio transcoding, where you read in, process and export audio files as MP3, `AudioEncoder` and `AudioDecoder` won’t help here. You’d need to use 3rd party libraries to handle those files (more on that [here](../mp3)) ##### Audio + Video [Section titled “Audio + Video”](#audio--video) If you’re building transcoding software to handle video inputs and standalone audio inputs, and/or your application works outputs video as well as standalone audio outputs, you’ll likely need to use both WebCodecs and 3rd party libraries to handle MP3 encoding/decoding. Here, audio only **is not** a subset / simpler case vs **video+audio**, instead audio-only imports/exports require additional pipelines and complexity. ##### MultiMedia Editing [Section titled “MultiMedia Editing”](#multimedia-editing) If you’re building software enabling users to input audio-only and video sources, providing real-time playback/preview of the composition, and enabling exporting to video and audio-only exports, then you’ll need to combine a number of things together. * WebCodecs for real-time playback of video * WebAudio for real-time playback of audio * WebCodecs for video exports * 3rd party libraries for audio-only exports We’ll provide more detail on editing [here](../../patterns/editing) ### Choose your own adventure [Section titled “Choose your own adventure”](#choose-your-own-adventure) Because the solutions for audio are different based on use case, I wanted to provide this section up front as not all the following sections may be necessary. Consider the audio section of this guide a “Choose your own adventure”. * You can skip this entire section if you use [Mediabunny](../../media-bunny/intro), though the docs may still be helpful to understand fundamentals * If you don’t need to re-encode audio at all (e.g. video transcoding), feel free to skip the section entirely * If you only care about playback and aren’t encoding audio, feel free to skip straight to [playback](../playback) * If you only will be working with audio, feel free to skip straight to [this section](../mp3) Otherwise, let’s continue and in the next section I’ll actually start talking about WebCodecs audio.
# MP3
> How to encode MP3
If your application needs to read or write audio-only files, you’ll probably want to support MP3 files. Unfortunately, WebCodecs doesn’t currently support MP3 \[[1](../../datasets/codec-strings)], so you’ll need a 3rd party library. Fortunately, here are a few: ### Mediabunny [Section titled “Mediabunny”](#mediabunny) For this example, we won’t work with the manual WebCodecs API since WebCodecs doesn’t even support MP3 \[[1](../../datasets/codec-strings)], so we’ll use a pure Mediabunny example, which will take the audio source from whatever input file you provide, and transcode it to audio. ```typescript import { registerMp3Encoder } from '@mediabunny/mp3-encoder'; import { Input, BlobSource, Output, BufferTarget, MP4, Mp3OutputFormat, Conversion, } from 'mediabunny'; registerMp3Encoder(); const input = new Input({ source: new BlobSource(file), // From a file picker, for example formats: [ALL_FORMATS], }); const output = new Output({ format: new Mp3OutputFormat(), target: new BufferTarget(), }); const conversion = await Conversion.init({ input, output, }); await conversion.execute(); output.target.buffer; // => ArrayBuffer containing the MP3 file ``` ### MP3Encoder [Section titled “MP3Encoder”](#mp3encoder) You can also use `MP3Encoder`, a utility in [webcodec-utils](https://www.npmjs.com/package/webcodecs-utils) which I wrote as a wrapper around [lamejs](https://github.com/zhuker/lamejs) (an MP3 Encoder written in JS), but adapted to work with WebCodecs. Here’s how you would use it: ```typescript import { MP3Encoder } from 'webcodecs-utils'; function encodeMP3(audio: AudioData[]): Blob { for(const chunk of audio){ const mp3buf = audioEncoder.processBatch(chunk); audioEncoder.encodedData.push(mp3buf); } return audioEncoder!.finish(); } ``` ### MP3Decoder [Section titled “MP3Decoder”](#mp3decoder) If you need to decode mp4 files, I wrote another wrapper called `MP3Decoder`. See the full API [here](https://github.com/sb2702/webcodecs-utils/blob/main/src/audio/mp3.ts) ```typescript import { MP3Decoder } from 'webcodecs-utils'; function decodeMP3(file: File): AudioData[] { const decoder = new MP3Decoder(); await decoder.initialize(); // Read file as ArrayBuffer const arrayBuffer = await file.arrayBuffer(); //Returns AudioData return await decoder.toAudioData(arrayBuffer); } ```
# WebAudio Playback
> How to play audio in the browser with WebAudio
WebAudio is a browser API for playing audio in the browser. Just like WebCodecs enables low-level control of video playback compared to the `` element, WebAudio enables low level control of audio playback compared to the `` element. WebAudio contains all the components to create a custom audio rendering pipeline, including the audio equivalent of `` (source), `` (destination) and WebGPU/ (processing). | Stage | Video Rendering | Audio Rendering | | ----------------------- | --------------- | ----------------------------------- | | **Raw Data** | `VideoFrame` | `AudioBuffer` | | **Processing Pipeline** | WebGL / WebGPU | Web Audio API nodes | | **Output Destination** | `` | AudioContext.destination (speakers) | Unlike for video, audio processing is done one API (WebAudio). And while in video, you’d normally think of doing *per-frame* operations in a loop, as in ```javascript for (const frame of frames){ render(frame) } ``` In WebAudio, you need to think of audio processing as a pipeline, with *sources*, *destinations* and *nodes* (intermediate effects / filters).  Where `GainNode` just multiplies the audio signal by a constant (volume control), which is the simplest filter you can add. Here is what this pipeline actually looks like in code: ```typescript const ctx = new AudioContext(); //Kind of like audio version of 'canvas context' const rawFileBinary = await file.arrayBuffer(); const audioBuffer = await ctx.decodeAudioData(rawFileBinary); const sourceNode = ctx.createBufferSource(); const gainNode = ctx.createGain(); sourceNode.connect(gainNode); gainNode.connect(ctx.destination); sourceNode.start(); //Starts playing audio in your speakers! ``` Because WebAudio provides the only interface to output custom audio to the user’s speakers, you’ll **need** to use WebAudio for audio/video playback. In this article we’ll explain the main components of WebAudio, and then provide some working code examples to play audio in the browser and add basic controls like volume, playback speed and start/stop/seek. That should provide enough background to then build a full video player with webcodecs and webaudio, which we’ll cover [here](../../patterns/playback/). **Note**: A major limitation of WebAudio is that it only works on the main thread which we’ll need to incorporate into our architecture when we build a full video player. ## Concepts [Section titled “Concepts”](#concepts) ### AudioContext [Section titled “AudioContext”](#audiocontext) The work with WebAudio, you need to create an `AudioContext` object, which is like a master interface for WebAudio, and everything you do in WebAudio will require or interact with the `AudioContext`. ```plaintext const ctx = new AudioContext(); ``` WebAudio works as a ‘graph’, where you have a destination, one or more sources, and intermediate processing items called *nodes* that you connect together.  The `AudioContext` is actually an instance of an individual graph, but is also the interface for a bunch of other things like creating nodes and decoding audio. ### Buffers [Section titled “Buffers”](#buffers) An `AudioBuffer` is WebAudio’s representation of raw audio data. You can create an `AudioBuffer` by using `ctx.decodeAudioData()` like so: ```typescript const rawFileBinary = await file.arrayBuffer(); const audioBuffer = await ctx.decodeAudioData(rawFileBinary); ``` If that sounds similar to [AudioData](../audio-data) and `AudioDecoder`, it is. Both WebAudio and WebCodecs have a way to decode audio files into raw audio data. But you need `AudioBuffer` to work with WebAudio, and you need WebAudio to play audio back in browser. WebAudio also has a much simpler API. You can get raw audio samples from an `AudioBuffer` as so: ```typescript const leftChannel = audioBuffer.getChannelData(0); const rightChannel = audioBuffer.getChannelData(1); ``` You can also create an `AudioBuffer` from raw audio samples as so: ```typescript const audioBuffer = await ctx.createAudioBuffer(2, 1000, 44100); audioBuffer.copyToChannel(leftChannel, 0); audioBuffer.copyToChannel(rightChannel, 0); ``` Where you’d first create a new blank `AudioBuffer` from `ctx.createAudioBuffer(numChannels, numSamples, sampleRatate)` and then copy float32 data to it. ### Nodes [Section titled “Nodes”](#nodes) WebAudio represents the audio processing pipeline as a graph, where you connect *nodes* together, and there is specifically an `AudioNode` type, as well as many types of nodes. ##### Source Node [Section titled “Source Node”](#source-node) To actually play audio, you’ll need a source node, specifically an `AudioBufferSourceNode` ```typescript const sourceNode = ctx.createBufferSource(); sourceNode.buffer = audioBuffer; ``` ##### Destination Node [Section titled “Destination Node”](#destination-node) You play the source node, you need to connect it to an `AudioDestinationNode`, which is just `ctx.destination`. ```typescript const destination = ctx.destination; ``` You’d connect it as below: ```typescript sourceNode.connect(ctx.destination); ``` ##### Gain Node [Section titled “Gain Node”](#gain-node) I don’t want to overcomplicate things, but if you want to build a real audio player, you’ll likely need *some* intermediate effects, like volume control or playback speed. Probably the simplest is a `GainNode` which scales the audio by a constant factor (the gain). You’d create a gain node by doing the following: ```typescript const gainNode = ctx.createGain(); gainNode.gain = 2; // Double the volume sourceNode.connect(gainNode); gainNode.connect(ctx.destination); ``` That creates the following pipeline we started with:  ### Play/pause [Section titled “Play/pause”](#playpause) To actually play audio, you’d use ```typescript sourceNode.start(); //Starts playing audio in your speakers! ``` This source will pass audio through all the effects/nodes you connected in the graph. It will keep playing the source audio until it goes through the entire audio. You can detect when the audio finishes with the `onended`callback: ```typescript sourceNode.onended = () => { //finish handler }; ``` And you can stop the audio at any time: ```typescript sourceNode.stop(); ``` You can also “seek” by starting the audio at a specific point in the audio (in seconds) ```typescript sourceNode.start(0, 10); //starts playing immediately, from t=10 in source ``` So if you had a 20 second audio clip, the above would start playing from halfway through the clip. ### Timeline [Section titled “Timeline”](#timeline) While WebAudio has an otherwise simple API, managing the playback timeline is where it gets annoyingly difficult. **Problem**:\ Web Audio lets you connect multiple audio sources. ```typescript sourceNode1.connect(ctx.destination); sourceNode2.connect(ctx.destination); sourceNode1.start(); sourceNode2.start(); ``` This will play both audio sources back at the same time. But each source might have a different duration. You can also stop one source arbitrarily: ```typescript sourceNode1.stop(); ``` And don’t forget that we can seek within sources. ```typescript sourceNode2.start(0, 10); ``` So then, how do measure playback progress? How do you construct a universal timeline when you can arbitrarily add and remove sources mid playback? **Solution**: WebAudio’s solution is to measure time from when you create the `AudioContext` using `ctx.currentTime`. ```typescript const ctx = new AudioContext(); console.log(ctx.currentTime); //0 ``` This ‘internal clock’ will keep ticking even if you don’t play anything. It literally just measures how much time (in seconds) has passed since you created it. ```typescript setTimeout(()=>console.log(ctx.currentTime), 1000); //~1 second setTimeout(()=>console.log(ctx.currentTime), 5000); //~5 seconds setTimeout(()=>console.log(ctx.currentTime), 7000); //~7 seconds ``` This creates a consistent, reliable reference point to do timeline calculations. **Management** But then it’s up to you to do those calculations. Presumably as the application developer, you know and have control over what audio sources you are going to play and when, and how long each audio source is. So let’s say you create an `AudioBuffer` 10 seconds after the `AudioContext` is created. The `AudioBuffer` corresponds to a 15 second clip, and you plan to play just 3 seconds of audio, corresponding to `t=5` to `t=8` in the source audio file.  You’re now working with multiple timelines, including (a) the `AudioContext` timeline, (b) the source audio file timeline, and (c) the timeline you want to display to users. It’s up to you to keep track of the different timelines, and calculate offsets as necessary. To illustrate the fictitious scenario, to play the audio properly, you would do ```typescript sourceNode2.start(10, 5, 3); ``` Where you start playing the source when `ctx.currentTime==10`, start playing from 5 seconds into the file, and you play for 3 seconds. Playback progress would be ```plaintext const playBackProgress = (ctx.currentTime - 10)/3; ``` Practically speaking, for playing back a single audio file, you’d keep track of the value of `ctx.currentTime` every time you stop and start the audio, and you’d need to calculate offsets properly, coordinating between the different timelines. #### Clean up [Section titled “Clean up”](#clean-up) When everything is done, you can clean up by disconnecting all the nodes ```plaintext sourceNode.disconnect(); ``` And you can close the `AudioContext` when you’re done to free up resources. ```plaintext ctx.close(); ``` #### Memory [Section titled “Memory”](#memory) Just keep in mind that raw audio is still quite big with 1 hour of audio taking up more than 1GB of RAM. We don’t specifically worry about memory in the examples in this section, but we’ll handle memory management when we get to designing [a full video player](../../patterns/playback/). ## WebAudio audio player [Section titled “WebAudio audio player”](#webaudio-audio-player) Now let’s build a working audio player step by step. We’ll use a 14 second audio clip from [Big Buck Bunny](../../reference/inside-jokes) as a demo. [](/assets/audio/audio-data/bbb-excerpt.mp3) ### Basic Playback with Start/Stop [Section titled “Basic Playback with Start/Stop”](#basic-playback-with-startstop) Let’s implement basic audio playback with play and stop controls. **Setup**: First we need our variables and load the audio ```typescript let audioContext = null; let audioBuffer = null; let sourceNode = null; let startTime = 0; async function loadAudio() { // Create AudioContext audioContext = new AudioContext(); // Fetch audio file const response = await fetch('bbb-excerpt.mp3'); const arrayBuffer = await response.arrayBuffer(); // Decode audio data audioBuffer = await audioContext.decodeAudioData(arrayBuffer); } ``` **play()**: Create a source node, connect it, and start playback ```typescript function play() { if (!audioBuffer || sourceNode) return; // Create source node sourceNode = audioContext.createBufferSource(); sourceNode.buffer = audioBuffer; sourceNode.connect(audioContext.destination); // Handle when audio finishes sourceNode.onended = () => { sourceNode = null; }; // Start playing startTime = audioContext.currentTime; sourceNode.start(); updateTime(); } ``` **stop()**: Stop playback and reset ```typescript function stop() { if (sourceNode) { sourceNode.onended = () => {}; // Clear handler to prevent it firing sourceNode.stop(); sourceNode = null; } } ``` **updateTime()**: Track and display current playback time ```typescript function updateTime() { if (!sourceNode) return; const elapsed = audioContext.currentTime - startTime; currentTimeEl.textContent = elapsed.toFixed(2); requestAnimationFrame(updateTime); } ``` Here’s the complete working example: ### Seek and Timeline Management [Section titled “Seek and Timeline Management”](#seek-and-timeline-management) The tricky part of Web Audio is managing pause, resume, and seeking. Since `AudioBufferSourceNode` can’t be paused (only started and stopped), we need to track the timeline ourselves. **Timeline variables**: We’ll track where we are in the audio and when we started playing ```typescript let startTime = 0; // When playback started (in AudioContext time) let pausedAt = 0; // Where we paused (in audio file time) let isPlaying = false; ``` **getCurrentTime()**: Calculate the current playback position ```typescript function getCurrentTime() { if (!isPlaying) return pausedAt; return pausedAt + (audioContext.currentTime - startTime); } ``` **play()**: Start or resume playback from the current position ```typescript function play() { if (!audioBuffer || isPlaying) return; // Create new source node sourceNode = audioContext.createBufferSource(); sourceNode.buffer = audioBuffer; sourceNode.connect(audioContext.destination); // Handle end of playback sourceNode.onended = () => { if (isPlaying) { isPlaying = false; pausedAt = 0; } }; // Start playing from pausedAt position startTime = audioContext.currentTime; sourceNode.start(0, pausedAt); // Second parameter is offset in the audio isPlaying = true; } ``` **pause()**: Pause playback and remember where we stopped ```typescript function pause() { if (!isPlaying || !sourceNode) return; // Calculate where we are in the audio pausedAt = getCurrentTime(); // IMPORTANT: Clear onended handler to prevent it from firing sourceNode.onended = () => {}; sourceNode.stop(); sourceNode = null; isPlaying = false; } ``` **seekTo()**: Jump to a specific time in the audio ```typescript function seekTo(time) { const wasPlaying = isPlaying; // Stop current playback if (isPlaying) { // IMPORTANT: Clear onended handler before stopping sourceNode.onended = () => {}; sourceNode.stop(); sourceNode = null; isPlaying = false; } // Update position pausedAt = Math.max(0, Math.min(time, audioBuffer.duration)); // Resume if we were playing if (wasPlaying) { play(); } } ``` **Important note**: When stopping a source node that will be replaced (like during pause or seek), you must clear the `onended` handler first. Otherwise, the old source’s `onended` callback can fire after the new source starts, resetting your playback state unexpectedly. Here’s the complete working example with pause/resume and seek controls: ## Extra functionality [Section titled “Extra functionality”](#extra-functionality) Okay, so we’ve gotten through the barebones playback of audio in WebAudio. Now to cover some very basic controls that most people would include in an audio or video player. #### Volume Control with GainNode [Section titled “Volume Control with GainNode”](#volume-control-with-gainnode) To control volume, we use a `GainNode` which sits between the source and the destination. The gain value ranges from 0 (silent) to 1 (full volume), though you can go higher for amplification. **Setup**: Create the gain node once when initializing ```typescript let gainNode = null; async function loadAudio() { audioContext = new AudioContext(); // Create gain node and connect to destination gainNode = audioContext.createGain(); gainNode.connect(audioContext.destination); gainNode.gain.value = 0.5; // Start at 50% volume // ... rest of audio loading code } ``` **Connect source through gain node**: When playing, connect the source to the gain node instead of directly to the destination ```typescript function play() { // ... create source node ... // Connect source to gain node (not directly to destination) sourceNode.connect(gainNode); // ... start playback ... } ``` **Update volume**: Change the gain value in real-time ```typescript function updateVolume(value) { if (!gainNode) return; // Convert 0-100 slider to 0-1 gain value const gain = value / 100; gainNode.gain.value = gain; } ``` The gain node persists across source node changes, so you only create it once and all audio flows through it. Here’s the complete example with volume control: ### Setting Playback Speed [Section titled “Setting Playback Speed”](#setting-playback-speed) Another common feature of most players is to control playback speed (e.g. play audio back at 2x speed or 0.5x speed). There is a `sourceNode.playbackRate` property which you can use to set the playback speed ```typescript sourceNode.playbackRate.value = 2.0; ``` But doing this, by itself, will create a “chipmunk effect”, affecting the pitch and tone of the sounds and music being played. This problem can be solved with “Pitch correction”, which accounts for this and adjusts the audio to preserve pitch and tone while playing back at different speeds. The `` element does pitch correction internally in the browser, but unhelpfully, pitch correction is not handled by default in WebAudio. #### AudioWorklets and SoundTouch [Section titled “AudioWorklets and SoundTouch”](#audioworklets-and-soundtouch) WebAudio does allow you to do custom audio processing by adding custom nodes via something called an `AudioWorklet`, which enables custom processing of audio in a separate worker thread. You can read up how to build your own custom AudioWorklet [here](https://developer.mozilla.org/en-US/docs/Web/API/Web_Audio_API/Using_AudioWorklet). Fortunately, we don’t need to make our own custom pitch correction script, you can use a pre-built one from the [SoundTouch JS library](https://www.npmjs.com/package/@soundtouchjs/audio-worklet) You can load the SoundTouch worklet as shown below: ```typescript let soundTouchLoaded = false; async function loadSoundTouchWorklet() { try { await audioContext.audioWorklet.addModule( 'https://cdn.jsdelivr.net/npm/@soundtouchjs/audio-worklet@0.2.1/dist/soundtouch-worklet.js' ); soundTouchLoaded = true; } catch (error) { console.error('Failed to load SoundTouch worklet:', error); soundTouchLoaded = false; } } ``` Then you create a SoundTouch processor and set its pitch parameter: ```typescript function createSoundTouchNode(playbackSpeed) { if (!soundTouchLoaded) return null; try { const node = new AudioWorkletNode(audioContext, 'soundtouch-processor'); // Pitch parameter is INVERSE of speed for pitch correction node.parameters.get('pitch').value = 1 / playbackSpeed; return node; } catch (error) { console.error('Failed to create SoundTouch node:', error); return null; } } ``` Next, you set up the the audio chain: `source -> soundtouch -> destination`. Keep in mind, you need to set both `playbackRate` on the source and `pitch` on SoundTouch: ```typescript function play() { // Create nodes sourceNode = audioContext.createBufferSource(); sourceNode.buffer = audioBuffer; soundTouchNode = createSoundTouchNode(playbackSpeed); if (soundTouchNode) { // With pitch correction: source -> soundtouch -> destination sourceNode.connect(soundTouchNode); soundTouchNode.connect(audioContext.destination); // Set BOTH playbackRate and pitch sourceNode.playbackRate.value = playbackSpeed; // Changes actual speed // pitch parameter already set in createSoundTouchNode } else { // Fallback without pitch correction sourceNode.connect(audioContext.destination); sourceNode.playbackRate.value = playbackSpeed; } sourceNode.start(0, pausedAt); } ``` To change speed while playing, you need to stop and restart the audio: ```typescript function setSpeed(speed) { playbackSpeed = speed; if (isPlaying) { const currentTime = getCurrentTime(); pause(); pausedAt = currentTime; play(); // Creates new nodes with updated speed } } ``` **Why restart?** AudioWorklet parameters can’t be changed on-the-fly reliably, and you need to recreate the audio chain with the new pitch setting. Here’s a complete example with multiple speed options: **Key takeaways**: * Native `playbackRate` changes both speed and pitch (chipmunk effect) * You can fix this with an [AudioWorklet](https://developer.mozilla.org/en-US/docs/Web/API/AudioWorklet) * The [SoundTouch](https://www.npmjs.com/package/@soundtouchjs/audio-worklet) library offers pitch correction for playback speed adjustment * You can build your own [AudioWorklet](https://developer.mozilla.org/en-US/docs/Web/API/Web_Audio_API/Using_AudioWorklet) or find other libraries for custom processing ## Next steps [Section titled “Next steps”](#next-steps) Hopefully that gives you a good idea of how to play audio in the browser using WebAudio, which should be enough background to build a full webcodecs video player which we will cover [here](../../patterns/playback/).
# Codecs
> Codecs and codec strings
Codecs are the algorithms for turning raw video frames into compact binary encoded video data.  We won’t go into how these algorithms actually work (video compression is its own [big-buck-bunny](../../reference/inside-jokes#big-buck-bunny)-sized rabbit hole) but this article will cover the practical basics that you need to know as a developer building a WebCodecs application. ### Main Video Codecs [Section titled “Main Video Codecs”](#main-video-codecs) There are a few major video codecs used in the industry, here are the ones you need to know about for WebCodecs. **H264**: Also known as ‘AVC’ (Advanced Video Codec). By far the most common codec for common consumer video use. Most “mp4” files that you will find will typically use the h264 codec. This is a patented codec, so while users can freely use h264 players to watch video, large organizations which encode lots of video using h264 may be liable to pay patent royalties. **H265** - Also known as ‘HEVC’. Less common, newer, and has better compression than h264. Fairly widely supported but with major exceptions, same patent concerns as the h264. **VP8** - Open source video codec, used often in WebRTC because it is very fast for encoding, though the quality of compression is not as good as other codecs. **VP9** - Successor to VP8, also open source, developed at Google, many videos on YouTube are encoded with VP9 and also fairly well supported **AV1** - The latest, most advanced open source codec, with better compression than all the above options, developed by an independent consortium of organizations. Decoding/playback is widely supported across devices and browsers, but because encoding is significantly slower / more expensive than VP9, encoding support on consumer devices is not as widespread. #### How to practically choose a codec [Section titled “How to practically choose a codec”](#how-to-practically-choose-a-codec) **Decoding** If you have a video supplied by a user or some standard 3rd party source, the codec (and specific codec string) will be stored in the metadata of the actual video file. In that sense, you don’t have a choice of codec, you just need to find the codec string from the video to feed to the `VideoDecoder`, and demuxing libraries provide this. ```typescript const input = new Input({ formats: [MP4], source: new BlobSource(file), }); const videoTrack = await input.getPrimaryVideoTrack(); // videoTrack.codec => avc (h264) const codec_string = await input.getCodecParameterString(); // Full codec string used by decoder const decoderConfig = await videoTrack.getDecoderConfig(); // This is what you'd supply to the `VideoDecoder` to start decoding ``` **Encoding** Here you do have a choice of what codec to use. Here’s the TLDR version: * If you’re generating user-facing videos, especially if you want to output .mp4 files, use h264 * If it’s for internal use and/or you want to use .webm files, use VP9 (open source, better compression) * If you have strong opinions or object to the above, this section isn’t for you ##### Compatibility [Section titled “Compatibility”](#compatibility) Don’t forget that not all containers work with all codecs. Here’s the simplified version of which codecs are supported by which containers. | Codec | **MP4** | **WebM** | | --------- | ------- | -------- | | **H.264** | ✅ | ❌ | | **H.265** | ✅ | ❌ | | **VP8** | ❌ | ✅ | | **VP9** | 🟡 | ✅ | | **AV1** | 🟡 | ✅ | ### Codec strings [Section titled “Codec strings”](#codec-strings) Unhelpfully, WebCodecs doesn’t work with simple codec choices like `VP9` ```typescript const codec = VideoEncoder({ codec: 'vp9', //This won't work! //... }) ``` Instead, you need a fully qualified *codec string* such as: `vp09.00.10.08` which includes additional settings such as *levels* and *profiles*, which are high-level settings/configs you can choose, which affect low-level encoding choices such as macro-block size and chrome-sub-sampling used by the encoder. The format varies by codec family: **AV1 Example:** `av01.0.05M.08` * `av01` = AV1 codec * `0` = Profile (Main) * `05M` = Level (5.1) * `08` = Bit depth **VP9 Example:** `vp09.00.10.08` * `vp09` = VP9 codec * `00` = Profile * `10` = Level * `08` = Bit depth **H.264 Example:** `avc1.64001f` * `avc1` = H.264/AVC * `64` = Profile (High) * `00` = Constraint flags * `1f` = Level (3.1) The [W3C WebCodecs Codec Registry](https://www.w3.org/TR/webcodecs-codec-registry/#video-codec-registry) defines the format for each codec family (and thus the rules for constructing valid codec strings), but **does not provide an exhaustive list of valid strings**. Based on the rules by the codec registry, I constructed 1000+ codec strings, and compiled support tables which you can see in the [Codec Support Table](/datasets/codec-support-table/). If you just want to encode a video and get on with your life, here’s a quick & easy list of codec strings to maximize compatibility. ##### h264 [Section titled “h264”](#h264) * `avc1.42001f` - base profile, most compatible, supports up to 720p ([99.6% support](/codecs/avc1.42001f.html)) * `avc1.4d0034` - main profile, level 5.2 (supports up to 4K) ([98.9% support](/codecs/avc1.4d0034.html)) * `avc1.42003e` - base profile, level 6.2 (supports up to 8k) ([86.8% support](/codecs/avc1.42003e.html)) * `avc1.64003e` - high profile - level 6.2 (supports up to 8k) ([85.9% support](/codecs/avc1.64003e.html)) ##### vp9 [Section titled “vp9”](#vp9) * `vp09.00.10.08.00` - basic, most compatible, level 1 ([99.98% support](/codecs/vp09.00.10.08.00.html)) * `vp09.00.40.08.00` - level 4 ([99.96% support](/codecs/vp09.00.40.08.00.html)) * `vp09.00.50.08.00` - level 5 ([99.97% support](/codecs/vp09.00.50.08.00.html)) * `vp09.00.61.08.00` - level 6 ([99.97% support](/codecs/vp09.00.61.08.00.html)) Again, refer to the [Codec Support Table](/datasets/codec-support-table/) for full compatability data. ### How to choose a codec string [Section titled “How to choose a codec string”](#how-to-choose-a-codec-string) #### Mediabunny [Section titled “Mediabunny”](#mediabunny) The easiest way is to use [Mediabunny](https://mediabunny.dev), where you don’t have to choose a codec string. Mediabunny handles this for you internally. ```javascript import { Output, Mp4OutputFormat, BufferTarget, VideoSampleSource, VideoSample} from 'mediabunny'; const output = new Output({ format: new Mp4OutputFormat(), target: new BufferTarget(), }); const videoSource = new VideoSampleSource({ codec: 'avc', // You just specify avc/h264, Mediabunny handles codec string bitrate: QUALITY_HIGH, }); output.addVideoTrack(videoSource, { frameRate: 30 }); for (const frame of frames){ videoSource.add(new VideoSample(frame)) } ``` #### ”Good enough” option [Section titled “”Good enough” option”](#good-enough-option) If you don’t want to use Mediabunny, and just want some code that works and minimizes the chance of issues, you can also just specify a bunch of options (best quality /least supported to worst quality/best supported), and pick the first one that is supported. ##### H264 [Section titled “H264”](#h264-1) ```javascript let codec_string; const codecs =['avc1.64003e', 'avc1.4d0034', 'avc1.42003e', 'avc1.42001f']; for(const test_codec of codecs){ const videoEncoderConfig = { codec: test_codec, width, height, bitrate, framerate }; const isSupported = await VideoEncoder.isConfigSupported(videoEncoderConfig); if(isSupported.supported){ codec_string = test_codec; break; } } ``` ##### VP9 [Section titled “VP9”](#vp9-1) ```javascript let codec_string; const codecs =['vp9.00.61.08.00', 'vp9.00.50.08.00', 'vp9.00.40.08.00', 'vp9.00.10.08.00']; for(const test_codec of codecs){ const videoEncoderConfig = { codec: test_codec, width, height, bitrate, framerate }; const isSupported = await VideoEncoder.isConfigSupported(videoEncoderConfig); if(isSupported.supported){ codec_string = test_codec; break; } } ``` #### Look up [Section titled “Look up”](#look-up) If you want something more formal/precise, and don’t want to use Mediabunny, you can use just the lookup table from Mediabunny (taken from [Mediabunny source](https://github.com/Vanilagy/mediabunny/blob/main/src/codec.ts)), which is exposed via [webcodecs-utils](https://www.npmjs.com/package/webcodecs-utils) ```javascript import { getCodecString, getBitrate } from 'webcodecs-utils'; const bitrate = getBitrate(1920, 1080, 30, 'good') const codec_string = getCodecString('avc', 1920, 1080, bitrate); // avc1.640028 ``` ### Comprehensive list of codec strings [Section titled “Comprehensive list of codec strings”](#comprehensive-list-of-codec-strings) See the [Codec Support Table](/datasets/codec-support-table/) for 1,087 tested codec strings with real-world browser and platform support data. ### Device support [Section titled “Device support”](#device-support) See the [Codec Support Dataset](/datasets/codec-support/) page for downloadable data and methodology.
# Why WebCodecs is harder than it looks
> Why WebCodecs is harder than it looks
TBD
# VideoDecoder
> Why WebCodecs is harder than it looks
The `VideoDecoder` allows transforming [EncodedVideoChunk](./encoded-video-chunk) objects into [VideoFrame](./video-frame) objects, allowing you to read and render raw video frames from a video file or video stream.  The basic “hello world” API for the decoder works like this: ```typescript // Simplified example for learning, for prod use a proper demuxing library const {chunks, config} = await demuxVideo( file); const decoder = new VideoDecoder({ output: function(frame: VideoFrame){ //do something with the VideoFrame }, error: function(e: any)=> console.warn(e); }); decoder.configure(config) for (const chunk of chunks){ decoder.decode(chunk); } ``` The hello world looks pretty simple, and these docs already have multiple code examples for basic decoding with the `VideoDecoder`, but there’s a big gap between these hello world examples and what you’d actually write in a production pipeline. In this article we’ll focus specifically on the `VideoDecoder` and how to actually manage decoders in a production decoding pipeline. [Mediabunny](../media-bunny/intro) abstracts the `VideoDecoder` away, simplifying a lot of the pipeline and process management, so if you want to use Mediabunny, this section isn’t necessary, but might still be helpful to understand how WebCodecs works. ### Configuration [Section titled “Configuration”](#configuration) Before you even get started decoding, you need to configure it via `decoder.configure(config)`, which tells the decoder about the encoded video data you are going to feed it. There’s no “settings” you choose in this config, it’s just metadata from the video you want to decode, principally the codec string: `decoder.configure({codec: /*codec string*/})` Most demuxing libraries will give you the info needed to configure the decoder. Here’s a few demuxing libraries and how you’d get the decoder config: ##### Mediabunny [Section titled “Mediabunny”](#mediabunny) ```typescript import {Input, BlobSource, MP4} from 'mediabunny' const input = new Input({ formats: [MP4], source: new BlobSource(file), }); const videoTrack = await input.getPrimaryVideoTrack(); const decoderConfig = await videoTrack.getDecoderConfig(); decoder.configure(decoderConfig) ``` ###### web-demuxer [Section titled “web-demuxer”](#web-demuxer) ```typescript import { WebDemuxer } from 'web-demuxer'; const demuxer = new WebDemuxer({ wasmFilePath: "https://cdn.jsdelivr.net/npm/web-demuxer@latest/dist/wasm-files/web-demuxer.wasm", }); await demuxer.load(file); const mediaInfo = await demuxer.getMediaInfo(); const videoTrack = mediaInfo.streams.filter((s)=>s.codec_type_string === 'video')[0]; decoder.configure({codec: videoTrack.codec_string}) ``` ###### MP4Demuxer [Section titled “MP4Demuxer”](#mp4demuxer) You can use the MP4Demuxer provided from my [webcodecs-utils](https://www.npmjs.com/package/webcodecs-utils) library (only for MP4 files) ```typescript import { MP4Demuxer } from 'webcodecs-utils' const demuxer = new MP4Demuxer(file); await demuxer.load(); const decoderConfig = demuxer.getVideoDecoderConfig(); ``` ### Rube Goldberg Machine [Section titled “Rube Goldberg Machine”](#rube-goldberg-machine) When building a decoding pipeline, the first thing to keep in mind is that decoding isn’t just some async process. You can’t just decode individual chunks and await for the results. ```typescript // Does not work like this const frame = await decoder.decode(chunk); ``` Because decoding isn’t just some compute-heavy function. Sometimes videos have B frames which require frames to be decoded in a different order from which they are displayed. Also, the `VideoDecoder` is a wrapper around actual hardware which works with frames in batches, and also requires multiple internal async calls between the CPU and the GPU. By necessity, the decoder needs to maintain an internal buffer to work properly. It might be easier to visualize the decoder as like a [Rube Goldberg machine](../../reference/inside-jokes#rube-goldberg-machine), where you continuously feed in chunks to decode, and video frames come out the other end.  You don’t need to know how it works internally, but you do need to feed a few chunks to get it started, processing is non-linear, and you get frames when you get them. #### Warmup chunks [Section titled “Warmup chunks”](#warmup-chunks) I’m very much not joking with the contraption analogy. If you set up your decoder and then send 2 chunks for decoding, the decoder may never generate a single frame. ```typescript const decoder = new VideoDecoder({ output: function(frame: VideoFrame){ // This will never fire }, error: function(e: any)=> console.warn(e); }); decoder.configure(/*config*/) decoder.decode(chunks[0]); decoder.decode(chunks[1]); ``` You may need to send 3 to 5 chunks for decoding before the first rendered frame comes out, and the number of chunks you need to send depends on the device, browser, codec and video. Remember that some videos include “B” frames where videos are not displayed in the order that they are presented.  Some graphics cards are also optimized to work in batches of frames. The decoder therefore needs to maintain an internal buffer of frames to do its job properly. You can imagine it like shoving more chunks into the decoder, it ‘pushes’ the chunks inside the decoder along, and the number of frames rendered sometimes lagging behind the number of chunk sent for decoding because of the complex internal buffer needed to keep the machine running. #### Chunks can get stuck [Section titled “Chunks can get stuck”](#chunks-can-get-stuck) A consequence of this is that frames can sometimes get stuck. If you send all your chunks for decoding, and you have no more ‘chunks’ to push the decoder along, the last few frames may never generate.  The solution is to call `decoder.flush()` which will force everything along, with the limitation that when you do this, the next chunk that you send for processing needs to be a *key frame* (`chunk.type === 'key'`) or the decoder will throw an error. #### First frame is always a key frame [Section titled “First frame is always a key frame”](#first-frame-is-always-a-key-frame) Also, just as a quick reminder, every time to configure a `VideoDecoder` and/or call `flush()` on a decoder, it “resets” the machine, and you need to feed in a `key` frame as the first frame, otherwise the `VideoDecoder` will throw an error. #### Pipelines [Section titled “Pipelines”](#pipelines) As a consequence, instead of treading decoding as an async task (e.g. `for frame of framesInVideo`), it’s better to think of decoding as a pipeline, where you will be continuously decoding chunks and generating frames, and you need to track the data flows: * Where chunks are sent for decoding * Where frames are generated * Where frames are consumed As well as keep track of state (how many chunks have been sent for decoding, how many frames have been generated etc..), and manage memory (the decode queue size, how many frames are in memory). ### Decoding Loop [Section titled “Decoding Loop”](#decoding-loop) Let’s move from theory and hello world examples to practical code. Let’s say you just want to play back a 10 minute video in the browser. The hello world examples thus far won’t help because: * You shouldn’t feed 10 minutes worth of video chunks to the decoder at once * Decoders work very quickly, so if you render frames as soon as they generate, it will playback at 20x-100x speed. * If you generate too many frames without closing them, the browser will crash To simplify, we won’t jump to a full web-codecs video player (covered in Design patterns), but we’ll build up to it. For now let’s simplify: * Forget about playback control, just play the video back at 30fps * No audio * Read all the chunks into memory at init (fine for a 10 minute 360p video). So we’ll pretend we already have chunks and metadata ```typescript const {chunks, config} = await demuxVideo( file); ``` Here are some core concepts we’ll need to start with: **decodeChunkIndex**: A variable keeping track of how many chunks have been sent for decoding. ```typescript let decodeChunkIndex=0; ``` **BATCH\_DECODE\_SIZE**: We will send chunks for decoding in batches. You can set the batch size, if it’s too low (below 5) the decoder might get stuck. If it’s too high, you might run into memory issues. 10 is a safe value. ```typescript const BATCH_DECODE_SIZE=10; ``` **DECODE\_QUEUE\_LIMIT**: We need to limit the number of chunks being handled by the decoder at a given time, to avoid now overwhelming the decoder. This is not a big risk for the decoder, (this is very much a risk for encoders) but for a production pipeline it’s better to have it than not. ```typescript const DECODE_QUEUE_LIMIT=20; ``` **fillBuffer()**: A function which we will use to send chunks for decoding, which limits the number of chunks sent to the decode size and limits the size of the decode\_queue. ```typescript function fillBuffer(){ for(let i=0; i < BATCH_DECODE_SIZE; i++){ if(decodeChunkIndex < chunks.length){ if(decoder.decodeQueueSize > DECODE_QUEUE_LIMIT) continue; ensureDecoder(); try{ decoder.decode(decodeChunkIndex); decodeChunkIndex +=1; if(decodeChunkIndex === chunks.length) decoder.flush(); } catch (e) { console.log(e); } } } } ``` **ensureDecoder()**: What many hello world guides omit is that the decoder can fail for a variety of reasons during the decoding loop. One common reason is corrupted or missing frames in a video file, so we write a quick utility that skips to the next key frame and attempts to recover the decoding process. ```typescript function ensureDecoder(){ if (decoder.state !== 'configured') { if(decoder.state !== 'closed'){ try{ decoder.close(); //Close the old decoder } catch(e){ } } decoder = setupDecoder(); for(let j=decodeChunkIndex; j < chunks.length; j++){ if(chunks[j].type === "key"){ decodeChunkIndex = j; break; } } } } ``` **Render Buffer**: We can’t render `VideoFrame` objects as soon as they are decoded by the decoder, otherwise the video will play back at 20x to 100x speed. We therefore need to store rendered frames in a buffer, and consume frames from the buffer. ```typescript const render_buffer = []; ``` **lastRenderedTime**: For playback and decoder stability, we add a `lastRenderedTime` which we will use to make sure that we don’t add frames to the frame buffer that are before the current playback position. ```typescript let lastRenderedTime = 0; ``` **render(time)** We will create a render function, which takes a timestamp as as argument. It will then take the latest frame in the render\_buffer whose timestamp is less than the render time, and render that. Note that we only call fillBuffer in the render function, because we want to make sure we only add more chunks for decoding (and increase the size of the render buffer) once we have consumed frames from the render buffer. ```typescript const canvas = new OffscreenCanvas(config.codedWidth, config.codedHeight); const ctx = canvas.getContext('2d'); render(time: number){ lastRenderedTime = time; if(render_buffer.length ===0) return; const latest_frame = getLatestFrame(time); if(latest_frame < 0) return; for(let i=0; i < latest_frame-1; i++){ render_buffer[i].close() } render_buffer.splice(0, latest_frame-1); //Drop frames const frame_to_render = render_buffer.shift(); ctx.drawImage(frame_to_render, 0, 0); frame_to_render.close(); if(render_buffer.length < BATCH_DECODE_SIZE/2) fillBuffer(); } ``` **getLatestFrame(time)** We’ll create the utility function mentioned in the render function to get the index of the latest frame in the render\_buffer ```typescript getLatestFrame(time: number){ for (let i=0; i < render_buffer.length-1; i++){ if(render_buffer[i+1].timestamp < render_buffer[i].timestamp){ return i+1; } } if(render_buffer[0].timestamp/1e6 > time) return -1; let latest_frame_buffer_index = 0; for (let i=0; i < render_buffer.length; i++){ if (render_buffer[i].timestamp/1e6 < time && render_buffer[i].timestamp > render_buffer[latest_frame_buffer_index].timestamp){ latest_frame_buffer_index = i } } return latest_frame_buffer_index; } ``` **decoder** It’s only now that we can finally define our decoder, which will take frames than then fill the render buffer. If the frames generated are behind the last rendered time, we need to close them, and fill the buffer as necessary so the decoder can catch up to the playback head. We set this up as a function in case we need to restart the decoder. ```typescript function setupDecoder(){ const newDecoder = new VideoDecoder({ output: function (frame: VideoFrame){ if(frame.timestamp/1e6 < lastRenderedTime) { frame.close(); if(render_buffer.length < BATCH_DECODE_SIZE) { fillBuffer(); } return; } render_buffer.push(frame) } error: function (error: Error){ console.warn(error); } }); newDecoder.configure(config); return newDecoder; } let decoder = setupDecoder(); ``` **render loop** In the real world, we’d have audio playback dictate the current time of the player, and use that in the argument to the render function. Here for this simple example, we’ll set an interval to run render every 30ms. ```typescript function start(){ const start_time = performance.now(); fillBuffer(); setInterval(function(){ const current_time = (performance.now() - start_time)/1000; //Convert from seconds to milliseconds; render(current_time) }, 30); } ``` Putting this all together, we can finally see an actual video play back at normal speed: If that seems like a lot of code for simple video playback, well, yes. We are working with low level APIs, and by its nature you have lots of control but also lots to manage yourself. Hopefully this code also communicates the idea of how to think about WebCodecs, as data flow pipelines, with chunks being consumed, frames being generated, buffered then consumed, all while managing memory limits. Some of this gets easier with libraries like [Mediabunny](../../media-bunny/intro), and later in design patterns, we’ll include full working examples for transcoding, playback and editing that you can copy and modify.
# EncodedVideoChunk
> EncodedVideoChunk
The `EncodedVideoChunk` class, the other main type in WebCodecs, represents the compressed (or “encoded”) version of a single `VideoFrame`.  The `EncodedVideoChunk` contains binary data (the encoded `VideoFrame`) and some metadata, and there is a 1:1 correspondence between `EncodedVideoChunk` and `VideoFrame` objects - if you encode 100 `VideoFrame` objects, you should expect 100 `EncodedVideoChunk` objects from the encoder. Unlike a `VideoFrame`, an `EncodedVideoChunk` objects can’t be directly rendered or displayed because the data is encoded,but they can be directly read from, or written to video files (via [muxing](../muxing)). ### Compression, not muxing [Section titled “Compression, not muxing”](#compression-not-muxing) *EncodedVideoChunks are not by themselves video files *. You can not just encode a bunch of video frames, store the chunks in a blob and call it a day. ```typescript // This will not work! async function encodeVideo(frames: VideoFrame[]){ const chunks = await encodeFrames( frames); return new Blob(chunks, {type: "video/mp4"}); //Not how this works } ``` If you want to write your encoded video chunks to a video file, that requires an additional step called [muxing](../muxing), there are [libraries](https://mediabunny.dev/) that do this for you, we’ll get to those in the next section. For now, keep in mind that WebCodecs focuses on just on codecs, and [codecs means compression](../../intro/what-are-codecs), so WebCodecs will only help you with transforming raw video data into compressed (encoded) video data and vice versa. You might think “that’s annoying”, as if WebCodecs doesn’t provide a complete solution, but keep in mind that muxing and other utilities are easily implemented as 3rd party libraries. What a library can’t do is access hardware-accelerated video encoding or decoding without the browser’s help, and hardware acceleration is exactly what WebCodecs is helps with. Also, WebCodecs is a low-level API so it’s intentionally minimal. Use Mediabunny for easy-mode. ### Why compression is still helpful [Section titled “Why compression is still helpful”](#why-compression-is-still-helpful) When streaming video data, you don’t even need muxing or a video file; the `EncodedVideoChunk` is useful by itself as-is. ##### Sending raw video [Section titled “Sending raw video”](#sending-raw-video) Consider the following mock example of streaming video a canvas in one worker to another. Here we are rendering an animation in the source worker, sending raw `VideoFrame` objects to the the destination worker and then rendering the raw `VideoFrame` on the destination canvas. Here’s a quick animation to visualize the data flow: Your browser does not support the video tag. When sending raw uncompressed 320x240 video, we are sending about 9000 kilobytes per second or 72 Megabits / second, which is around the same bitrate you’d expect for studio-quality 4K video used by professional editors, and about as fast as real-world fiber-optic connections can realistically handle. ##### Sending compressed video [Section titled “Sending compressed video”](#sending-compressed-video) Let’s take the same exact example, but now we encode the video chunks before sending it between workers. Here’s what the data flow looks like when adding in the encoder/decoder. Your browser does not support the video tag. As you can see, encoding the video reduces the bandwidth by 100x (9000 kB/s vs 9 kB/s). In the real world, if you are actually streaming 4K video, the raw stream would be \~7 Gigabits per second (no home internet connection would be able to keep up), while an encoded stream would be around 10 Megabits per second, which is again, \~100x smaller, and something that many home internet connections would handle without issue. ### Key Frames [Section titled “Key Frames”](#key-frames) We won’t get into *how* these compression algorithms actually work (see \[here] if want to learn more), but a core feature of all the major compression algorithms (codecs) supported by web browsers is that they don’t encode each video frame independently, but instead encode the differences between frames. Consider again one of the simplest possible videos:  If you look at any two consecutive frames, these frames are pretty similar, with most of the pixels actually being identical.  You might be able to imagine how, with some clever engineering, you could formulate a way to calculate just the difference between these frames (e.g. what changes from frame 1 to frame 2).  That way you don’t actually need to even store frame 2, you just need to store the first frame, and then store the difference between frame 1 and frame 2 to be able to reconstruct frame 2.  To send a full video, you could send the first frame (called a *key frame*), and then just keep sending “frame differences” (called *delta frames*)  This is exactly what real-world codecs do, with delta frames typically being 2x to 10x smaller than key frames. The `EncodedVideoChunk` represents this property via the `type` attribute, with *key frames* having a `key` type, and delta frames having a `delta type` ```typescript import { getVideoChunks } from 'webcodecs-utils' const chunks = await getVideoChunks( file); console.log(chunks[0].type); //"key" console.log(chunks[1].type); //"delta" console.log(chunks[2].type); //"delta" ``` Typically, videos will add in a fresh key frame every 30 to 60 frames, though this is something you can control in the `VideoEncoder`. #### Presentation order versus decode order [Section titled “Presentation order versus decode order”](#presentation-order-versus-decode-order) It’s actually more complicated than that in the real world, because actual codecs like h264 actually use more than 2 types of frames. In h264, there are “I” frames (key frames), “P” frames which are like the “delta” frames we just talked about, but also “B” frames, which refer to frames both before and after it So our “simpler” scenario with just frames encoding “frame differences” (P-frames in h264) would look like this, where frames are displayed in the order in which they are decoded:  But if the video has “B” frames, then the frame needs to reference information from *future* frames. Video Decoders can’t magically read the future [\[citation needed\]](../../reference/inside-jokes#citation-needed) so we instead need to decode chunks in a different order from which we display them.  WebCodecs abstracts this “I” vs “P” vs “B” frame distinction into just “key” and “delta” frames, but the decoders do still handle this under the hood. Fortunately most demuxing libraries will provide chunks in “decode order”, and our `VideoDecoder` will also provide `VideoFrame` objects in order, but a consequence is that the decoder needs to maintain an internal buffer of several chunks to be able to make sure inputs and outputs are both in order. #### Sequence matters [Section titled “Sequence matters”](#sequence-matters) So while there is a 1:1 correspondence between each `EncodedVideoChunk` and each `VideoFrame` in a file in WebCodecs, where decoding 100 `EncodedVideoChunk` objects will result in 100 `VideoFrame` objects, and encoding 100 `VideoFrame` objects will result in 100 `EncodedVideoChunk` objects, you can’t deal with an `EncodedVideoChunk` in isolation in the way you can with a `VideoFrame`. You need to work with `EncodedVideoChunk` objects as a sequence, and when decoding, you need to decode them in the exact correct order, and keep in mind that the decoder will need to maintain an internal buffer to handle inter-frame dependencies. ### Getting Encoded Video Chunks [Section titled “Getting Encoded Video Chunks”](#getting-encoded-video-chunks) You can get an `EncodedVideoChunk` by either encoding a video or demuxing a source file. ##### Encoding [Section titled “Encoding”](#encoding) `VideoEncoder` will naturally just give you `EncodedVideoChunk` objects ready to use, you never have to construct them. ```typescript const encoder = new VideoEncoder({ output: function(chunk: EncodedVideoChunk){ //Do something }, error: function(e){console.log(e)} }); encoder.configure(/*config*/) for await (const frame of getFrame()){ // however you get frames encoder.encode(frame); frame.close(); } ``` ##### Demuxing [Section titled “Demuxing”](#demuxing) Demuxing libraries will also give you formatted `EncodedVideoChunk` objects. Here’s how to do it in Mediabunny. ```typescript import { EncodedPacketSink, Input, ALL_FORMATS, BlobSource } from 'mediabunny'; const input = new Input({ formats: ALL_FORMATS, source: new BlobSource( file), }); const videoTrack = await input.getPrimaryVideoTrack(); const sink = new EncodedPacketSink(videoTrack); for await (const packet of sink.packets()) { const chunk = packet.toEncodedVideoChunk(); } ``` There are other demuxing libraries, we’ll go into more detail [in the next section](../muxing) ##### Manual Construction [Section titled “Manual Construction”](#manual-construction) If you **know what you are doing**, you can manually create valid `EncodedVideoChunk` objects by hand via a the `new EncodedVideoChunk()` constructor. Manual construction might look something like this: ```typescript const [sampleDataOffset, sampleDataLength] = calculateSampleDataOffset(0); //First sample const sampleData = file.slice(sampleDataOffset, sampleDataLength); const isKeyFrameFlag = getIsKeyFrame(sampleData); const timeStamp = getTimeStamp(sampleData); const frameData = getFrameData(sampleData); const duration = getDuration(sampleData); const chunk = new EncodedVideoChunk({ type: isKeyframe ? "key" : "delta", timestamp: timeStamp * 1e3, data: frameData, duration: duration * 1e3 }); ``` Where for a file you’d typically have to build a parsing function for each container (WebM, MP4) to get this info. We’ll cover manual parsing (and why you probably shouldn’t do it) [in the next section](../muxing). Alternatively, if you are streaming video, you and know you are working with WebCodecs, and controlling the source and destination, you don’t need fancy muxing or demuxing, you can just pass build your own custom markup / schema to keep track the meta data (`type`, `timestamp`, `duration`) and data (`Uint8Array`) associated with each `EncodedVideoChunk`). ### Using Encoded Video Chunks [Section titled “Using Encoded Video Chunks”](#using-encoded-video-chunks) You can use `EncodedVideoChunk` objects by decoding them, muxing them, or manually processing them. ##### Decoding [Section titled “Decoding”](#decoding) ```typescript import { demuxVideo } from 'webcodecs-utils' const {chunks, config} = await demuxVideo(file); const decoder = new VideoDecoder({ output(frame: VideoFrame) { //Do something with the frame }, error(e) {} }); decoder.configure(config); for (const chunk of chunks){ decoder.decode(chunks) } ``` ##### Muxing [Section titled “Muxing”](#muxing) You can also use chunks to mux to a file, and each muxing library has their own API. ```typescript // Use mediabunny for production, these are just simplified utils for learning import { getVideoChunks, ExampleMuxer } from 'webcodecs-utils' const chunks = await getVideoChunks(file); const muxer = new ExampleMuxer(); for (const chunk of chunks){ muxer.addChunk(chunk); } const arrayBuffer = await muxer.finish(); const blob = new Blob([arrayBuffer], {type: 'video/mp4'}) ``` Again, we’ll cover muxing [in the next section](../muxing). ##### Manual Processing [Section titled “Manual Processing”](#manual-processing) Finally, for more control you can manually extract the data from an `EncodedVideoChunk` and send them somewhere else (like over a network, for streaming) ```typescript const destinationBuffer = new Uint8Array(chunk.byteLength); chunk.copyTo(destinationBuffer); sendSomewhere({ data: destinationBuffer, type: chunk.type, duration: chunk.duration, //don't forget this is in microseconds timestamp: chunk.timestamp //also in microseconds }) ``` You could theoretically stream this data (the actual buffer and meta) over a network to a browser instance and reconstruct the `EncodedVideoChunk` using the manual construction method.
# VideoEncoder
> Why WebCodecs is harder than it looks
The `VideoEncoder` allows transforming [VideoFrame](./video-frame) objects into [EncodedVideoChunk](./encoded-video-chunk) objects allowing you to write rendered / raw video frames to a compressed/encoded video stream or file.  The `VideoEncoder` is the mirror operation to the `VideoDecoder`, but unlike decoding, where `EncodedVideoChunk` already has metadata (like codec, framerate, timestamps) from the video source…  … when using a `VideoEncoder`, your application needs to supply a lot of the metadata (like codec, framerate and timestamps) to the encoder and frames. The basic “hello world” API for the decoder works like this: ```typescript // Just capture the contents of a dummy canvas const canvas = new OffscreenCanvas(1280, 720); const encoder = new VideoEncoder({ output: function(chunk: EncodedVideoChunk, meta: any){ // Do something with the chunk }, error: function(e: any)=> console.warn(e); }); encoder.configure({ 'codec': 'vp9.00.10.08.00', width: 1280, height: 720, bitrate: 1000000 //1 MBPS, framerate: 25 }); let framesSent = 0; const start = performance.now(); setInterval(function(){ const currentTimeMicroSeconds = (performance.now() - start)*1e3; const frame = new VideoFrame(canvas, {timestamp: currentTimeMicroSeconds }); encoder.encode(frame, {keyFrame: framesSent%60 ==0}); //Key Frame every 60 frames; frame.close(); framesSent++; }, 40); // Capture a frame every 40 ms (25fps) ``` Like the `VideoDecoder` though, there is a big gap between hello world demos and production pipelines, so in this article we’ll focus specifically on the `VideoEncoder` and how to actually manage an encoder in a production pipeline. [Mediabunny](../media-bunny/intro) abstracts the `VideoEncoder` away, simplifying a lot of the pipeline and process management, so if you want to use Mediabunny, this section isn’t necessary, but might still be helpful to understand how WebCodecs works. ## Configuration [Section titled “Configuration”](#configuration) Unlike the `VideoDecoder`, where you get the decoding config from the video source file/stream, you have a choice on how to encode your video, and you’d specify your encoding preferences via `encoder.configure(config)` as shown below ```typescript encoder.configure({ 'codec': 'vp9.00.10.08.00', // Codec string width: 1280, height: 720, bitrate: 1000000 //bitrate is related to quality framerate: 25, latencyMode: "quality" }); ``` You can see a more comprehensive summary of the options on [MDN](https://developer.mozilla.org/en-US/docs/Web/API/VideoEncoder/configure) but I’ll cover the practical ones here: ##### Codec [Section titled “Codec”](#codec) You need to specify a *codec string* such as ‘vp9.00.10.08.00’ or ‘avc1.42003e’. Choosing a codec is a whole *thing*, you can see the [codecs](../codecs) page for practical guidance on how to choose one. ##### Bitrate [Section titled “Bitrate”](#bitrate) Video codecs apply a trade-off between file size and video quality, where you can have high quality video with large file sizes, or you can have compact files with low quality video. This tradeoff is specified in the bitrate, where higher bitrates result in larger files but higher quality. Here’s a visualization of how bitrate affects quality, with the same [1080p file](https://larmoire.org/jellyfish/) transcoded at different bitrates  **300 kbps**  **1 Mbps**  **3 Mbps**  **10 Mbps** Here are typical recommendations for bitrate settings \[[1](https://support.google.com/youtube/answer/1722171#zippy=%2Cbitrate)] | Resolution | Bitrate (30fps) | Bitrate (60fps) | | ---------- | --------------- | --------------- | | 4K | 13-20 Mbps | 20-30 Mbps | | 1080p | 4.5-6 Mbps | 6-9 Mbps | | 720p | 2-4 Mbps | 3-6 Mbps | | 480p | 1.5-2 Mbps | 2-3 Mbps | | 360p | 0.5-1 Mbps | 1-1.5 Mbps | | 240p | 300-500 kbps | 500-800 kbps | If you just want something quick and easy that works, here is a quick utility function: ```typescript function getBitrate(width, height, fps, quality = 'good') { const pixels = width * height; const qualityFactors = { 'low': 0.05, 'good': 0.08, 'high': 0.10, 'very-high': 0.15 }; const factor = qualityFactors[quality] || qualityFactors['good']; // Returns bitrate in bits per second return pixels * fps * factor; } ``` Also available via [webcodecs-utils](https://www.npmjs.com/package/webcodecs-utils) ```typescript import { getBitrate } from 'webcodecs-utils' ``` ##### Latency mode [Section titled “Latency mode”](#latency-mode) Video encoders also have a tradeoff between speed and quality, where you can sacrifice some quality for faster encoding, which would be helpful in the scenario of streaming. Basically, if you are live streaming or really need to improve encoding speed, use latencyMode: “realtime” , otherwise if you expect to output a video file, use latencyMode: “quality” (the default). ### encode() and Timestamps [Section titled “encode() and Timestamps”](#encode-and-timestamps) One of the major differences between encoding and decoding is that when encoding video, you will need to provide information (like keyFrames, timestamps), instead of getting it from the decoder. #### Timestamp: [Section titled “Timestamp:”](#timestamp) Presumably if you are encoding a video via WebCodecs, you have a clear idea of what the timeline of the video to be written will look like. If you are just transcoding a video, or performing some basic filter or transform, then it’s quite a bit easier in that the source video timeline is identical to the destination video timeline, and you would have a 1:1 correspondence from source frames to destination frames, and just pass timestamps from the source frames to the destination frames. If you are generating video programatically or have a video editing application with a composition and a timeline, then those details you’d need to manage in your app’s logic. In either case, you’d need to specify the timestamp for each frame that gets encoded. **VideoDecoder** If your video frame comes from a `VideoDecoder` (decoding), the resulting frame will already have a timestamp associated with it. If you are just transcoding a video and the timestamp is correct, you don’t need to do anything. If the timestamp is not correct (e.g. if you are making cuts in the video, or otherwise adjusting the timeline), you’ll need to construct a new frame with your desired timestamp. ```javascript new VideoFrame(frame, {timestamp: /*adjustedTimestamp in microseconds}*/}); ``` **VideoElement** IF you construct a `VideoFrame` from a `` element as in `new VideoFrame( video)`, then by default it will have the timestamp from the underlying video. Otherwise, you can manually override it by specifying the timestamp **Any other method** IF you construct a `VideoFrame` from any other source (``, `ImageBitmap` etc…), you’ll need to specify the timestamp ```javascript new VideoFrame(canvas, {timestamp: /*timestamp in microseconds*/}); ``` In either case, just keep in mind that the timestamps used in `VideoFrame` are in *microseconds*, even if the encoder config uses frames/second and bits/second for the `framerate` and `bitrate` properties respectively. #### KeyFrames: [Section titled “KeyFrames:”](#keyframes) The other main thing you’ll need to decide is how often you want to specify *key frames* (covered [here](../encoded-video-chunk/#key-frames)), and you’d specify which frames to designate as key frames in the `encoder.encode()` call, specifically: ```javascript encoder.encode(frame, {keyFrame: /*boolean*/}); ``` The first frame you encode **needs to be** a key frame. Subsequent frames, you are given full flexibility to choose, with the tradeoff that more key frames results in larger file sizes, but fewer key frames can result in playback issues. Typical values range from every 30 frames to 60 frames. A common strategy is just to keep track of how many frames have been encoded thus far and just choose to indicate every nth frame as a key frame ```typescript encoder.encode(frame, {keyFrame: framesSent%60 ==0}); //Key Frame every 60 frames; framesSent++; ``` ### Practical Considerations [Section titled “Practical Considerations”](#practical-considerations) Before we go ahead and set up an actual encoding loop, here are a few things to keep in mind: #### Encoding can be slow [Section titled “Encoding can be slow”](#encoding-can-be-slow) Encoding performance varies dramatically across devices and browsers, and is in general much slower than decoding. Here are some benchmarks for encoding and decoding of 1080p, 30fps, h264 video across a variety of devices and browsers | Device | Tier | Browser | Encode FPS | Decode FPS | | ------------------ | ---- | ------- | ---------- | ---------- | | Windows Netbook | Low | Chrome | 11 | 540 | | Windows Netbook | Low | Firefox | 25 | 30 | | Samsung Chromebook | Low | Chrome | 60 | 600 | | Ubuntu Lenovo | Mid | Chrome | 100 | 350 | | Ubuntu Lenovo | Mid | Firefox | 80 | 300 | | iPhone 16 Pro | High | Chrome | 120 | 600 | | iPhone 16 Pro | High | Safari | 12 | 600 | | Samsung Galaxy S25 | High | Chrome | 200 | 600 | | Macbook Pro M4 | High | Chrome | 200 | 1200 | | Macbook Pro M4 | High | Firefox | 80 | 600 | | Macbook Pro M4 | High | Safari | 200 | 600 | #### Another Rube-Goldberg machine [Section titled “Another Rube-Goldberg machine”](#another-rube-goldberg-machine) Much like the [VideoDecoder](../video-decoder), you shouldn’t think of the `encode()` function as some async task, it’s better to treat the encoder as a [Rube Goldberg machine](../../reference/inside-jokes#rube-goldberg-machine), where you continuously feed frames, feeding frames in pushes the process along, and encoded chunks come out the other end.  You might need to feed in a few frames before the encoder starts outputting chunks, and when you’ve finished feeding frames, the last few chunks might get ‘stuck’ (because there’s nothing to push the frames along), requiring a call to `encoder.flush()` #### Chaining Pipelines [Section titled “Chaining Pipelines”](#chaining-pipelines) Building an encoder in isolation is all good and well, but if the source of your video frames is, at some point, video from a `VideoDecoder` (as in transcoding), you are now chaining a `VideoDecoder` and a `VideoEncoder` together.  This makes things complicated because now you have two machines which can both get stuck, and keeping track of frames and chunks becomes more challenging. You now also have to manage memory bottlenecks at multiple points (`decoder.decodeQueueSize`, number of open `VideoFrame` objects, `encoder.encodeQueueSize`). When you build a pipeline with both a `VideoDecoder` and `VideoEncoder` in WebCodecs, you really do have to pay attention to data flows, progress and memory bottlenecks. Some of this gets easier with libraries like [Mediabunny](../../media-bunny/intro), and later in design patterns, we’ll include full working examples for transcoding, playback and editing that you can copy and modify. #### WebGPU Rendering [Section titled “WebGPU Rendering”](#webgpu-rendering) If you have some type of rendering pipeline involving WebGPU or WebGL (such as in a video editing application), you’d be feeding one or more video frames from the decoder into a rendering pipeline, the output of which would then go into an encoder.  Fortunately, because rendering can be treated like a simple async task, it doesn’t add much complexity to the overall pipeline. Just keep in mind: **Do not wait for the the GPU to finish its work before sending the frames for encoding** e.g, don’t run ```typescript render( frame); // WebGPU shader pipeline await device.queue.onSubmittedWorkDone(); encoder.encode(renderCanvas) ``` You will end up encoding blank frames. Instead, just encode directly after running the WebGPU shaders. ```typescript render( frame); //WebGPU shader pipeline encoder.encode(renderCanvas) ``` I don’t know why it works like this, but it does. #### Encoding queue [Section titled “Encoding queue”](#encoding-queue) Like with the `VideoDecoder`, the `VideoEncoder` also has a queue (of frames to encode). If you are rendering animation at 30fps run `encoder.encode(frame)` on each render, but the encoder is only able to encode at 10 fps, the encoder queue will eventually grow until it runs out of video memory and the process crashes. You therefore need to manage how and when you sent frames to the encoder, checking `encoder.encodeQueueSize` within your render loop, so that the render itself waits for the encoder queue is within bounds, which we’ll see below. ## Encoding Loop [Section titled “Encoding Loop”](#encoding-loop) Okay, enough theory, let’s get to encoding an actual video with a proper encoding loop. Here, to keep it simple, we’ll programatically generate a video, by just including a single canvas and drawing the current frame, and rendering 300 frames. ```typescript const canvas = new OffscreenCanvas(640, 360); const ctx = canvas.getContext('2d'); const TOTAL_FRAMES=300; let frameNumber = 0; let chunksMuxed = 0; const fps = 30; ``` **renderFrame()**: Next, we’ll create the render function which will render the next frame using ctx 2d. ```typescript function renderFrame(){ ctx.fillStyle = '#000'; ctx.fillRect(0, 0, canvas.width, canvas.height); // Draw frame number ctx.fillStyle = 'white'; ctx.font = `bold ${Math.min(canvas.width / 10, 72)}px Arial`; ctx.textAlign = 'center'; ctx.textBaseline = 'middle'; ctx.fillText(`Frame ${frameNumber}`, canvas.width / 2, canvas.height / 2); } ``` **ENCODE\_QUEUE\_LIMIT**: Next we’ll define an encoder queue limit to avoid overwhelming the encoder. ```typescript const ENCODER_QUEUE_LIMIT = 20; ``` **waitForEncoder()**: We’ll create a function to wait for the encoder’s queue size to go below the limit, throttling the render function ```typescript function waitForEncoder(){ return new Promise(function(resolve){ if (encoder.encodeQueueSize < ENCODER_QUEUE_LIMIT) return resolve(); function check(){ if(encoder.encodeQueueSize < ENCODER_QUEUE_LIMIT){ resolve(); } else { setTimeout(check, 100); } } check(); }) } ``` **encodeLoop**: The actual render / encode loop ```typescript let flushed = false; async function encodeLoop(){ renderFrame(); await waitForEncoder(); const frame = new VideoFrame(canvas, {timestamp: frameNumber/fps*1e6}); encoder.encode(frame, {keyFrame: frameNumber %60 ===0}); frame.close(); frameNumber++; if(frameNumber === TOTAL_FRAMES) { if (!flushed) encoder.flush(); } else return encodeLoop(); } ``` **Muxer**: We set up the muxer where the video will be encoded. ```typescript import { EncodedPacket, EncodedVideoPacketSource, BufferTarget, Mp4OutputFormat, Output } from 'mediabunny'; const output = new Output({ format: new Mp4OutputFormat(), target: new BufferTarget(), }); const source = new EncodedVideoPacketSource('avc'); output.addVideoTrack(source); await output.start(); ``` **finish()**: We’ll put the finish handler to get the output video as a blob ```typescript await output.finalize(); const buffer = output.target.buffer; encoder.close(); const blob = new Blob([buffer], { type: 'video/mp4' }); ``` **getBitrate()**: The getBitrate function we mentioned earlier ```typescript function getBitrate(width, height, fps, quality = 'good') { const pixels = width * height; const qualityFactors = { 'low': 0.05, 'good': 0.08, 'high': 0.10, 'very-high': 0.15 }; const factor = qualityFactors[quality] || qualityFactors['good']; // Returns bitrate in bits per second return pixels * fps * factor; } ``` **getBestCodec()**: For production use, we should detect the best supported codec string rather than hardcoding one. This ensures compatibility across different browsers and devices. See [codecs](./codecs#how-to-choose-a-codec-string) for more details on why this is necessary. ```typescript async function getBestCodec() { const codecs = ['avc1.64003e', 'avc1.4d0034', 'avc1.42003e', 'avc1.42001f']; const bitrate = getBitrate(width, height, fps, 'good'); for (const testCodec of codecs) { const config = { codec: testCodec, width, height, bitrate, framerate: fps }; const support = await VideoEncoder.isConfigSupported(config); if (support.supported) { return testCodec; } } throw new Error('No supported codec found'); } const codec = await getBestCodec(); ``` **VideoEncoder**: Finally we set up the VideoEncoder ```typescript const encoder = new VideoEncoder({ output: function(chunk, meta){ source.add(EncodedPacket.fromEncodedChunk(chunk)) chunksMuxed++; if(chunksMuxed === TOTAL_FRAMES) finish(); }, error: function(e){ console.warn(e); } }) encoder.configure({ codec, width: 640, height: 360, bitrate: getBitrate(640, 360, fps, 'good'), framerate: fps }) ``` Putting this all together, we can finally see an actual video encoding in action
# Muxing and Demuxing
> Why WebCodecs is harder than it looks
As mentioned before, WebCodecs by itself cannot read or write playable video files. You can’t just take a bunch of `EncodedVideoChunk` objects, put them in a `Blob` and call it a day. ```typescript // This will not work! async function encodeVideo(frames: VideoFrame[]){ const chunks = await encodeFrames( frames); return new Blob(chunks, {type: "video/mp4"}); //Not how this works } ``` To work with actual video files, you need an additional step called Demuxing (to read video files) or Muxing (to write video files). ```typescript // Use mediabunny for production, these are just simplified utils for learning import { getVideoChunks, ExampleMuxer } from 'webcodecs-utils' const chunks = await getVideoChunks(file); const muxer = new ExampleMuxer(); for (const chunk of chunks){ muxer.addChunk(chunk); } const arrayBuffer = await muxer.finish(); const blob = new Blob([arrayBuffer], {type: 'video/mp4'}); ``` ### Containers [Section titled “Containers”](#containers) When a video player reads a video file for playback, it needs more info than just encoded video frames and encoded audio, it needs metadata about the video, such as the tracks, video duration, frame rate, resolution, etc..  It also needs to have enough info to tell the video player where each encoded chunk is in the source file. ```javascript const chunk = new EncodedChunk({ data: file.slice(start, end), //Calculate offsets from metadata //... }); ``` Each video file format, such as MP4 and WebM, has its own specification for how to store metadata and audio/video data in a file, as well as how to extract that information. Storing data into a file (according to the specification) is called muxing, and extracting data from a file (according to the specification) is called demuxing. The format specifications are complex, and **the point of muxing/demuxing libraries is to follow these specifications**, so you can read/write video to files without worrying about the details. In the video world, we call file itself a *container* and the format (e.g. WebM, MP4) a *container format*. For the curious, here are the docs for each container format: * [WebM](https://www.webmproject.org/docs/container/) * [MP4](https://developer.apple.com/documentation/quicktime-file-format) #### Codecs are not containers [Section titled “Codecs are not containers”](#codecs-are-not-containers) *Containers* are different from *codecs*, which are the compression algorithms for actually encoding/decoding each Video/Audio chunk into raw audio/video. **Containers**: * Provide meta data * Where in the file to extract individual encoded chunks **Codecs**: * Turn encoded chunks into raw video or audio (and vice versa) A given container format can actually support video encoded in various different formats, here is a table for the most common containers and video codecs used in browsers: | Codec | **MP4** | **WebM** | | --------- | ------- | -------- | | **H.264** | ✅ | ❌ | | **H.265** | ✅ | ❌ | | **VP8** | ❌ | ✅ | | **VP9** | 🟡 | ✅ | | **AV1** | 🟡 | ✅ | Though as the 🟡 suggests, support depends on the individual video player or encoding software. ### Demuxing [Section titled “Demuxing”](#demuxing) To read `EncodedVideoChunk` objects from video file, the easiest way would be to use a demuxing library like [Mediabunny](https://mediabunny.dev/), though I’ll present a few different options. ##### Mediabunny [Section titled “Mediabunny”](#mediabunny) ```typescript import { EncodedPacketSink, Input, ALL_FORMATS, BlobSource } from 'mediabunny'; const input = new Input({ formats: ALL_FORMATS, source: new BlobSource( file), }); const videoTrack = await input.getPrimaryVideoTrack(); const sink = new EncodedPacketSink(videoTrack); for await (const packet of sink.packets()) { const chunk = packet.toEncodedVideoChunk(); } ``` You’d first import the relevant functions from Mediabunny, and then create an `Input` reference to a file, extract the `VideoTrack`. From there, to read individual source chunks, you could create an `EncodedPacketSink`, and get packets from the sink, but as we’ll see in the [Mediabunny Section](../media-bunny/use-cases.md), you don’t actually need to touch `EncodedVideoChunk` directly, the library can handle decoding you can directly go to reading `VideoFrame` objects without dealing with a `VideoDecoder`, making Mediabunny by far the most user-friendly option. ##### web-demuxer [Section titled “web-demuxer”](#web-demuxer) If you want more control and want to manage the `VideoDecoder`, `EncodedVideoChunk` objects and file reading process yourself, you can use [web-demuxer](https://github.com/bilibili/web-demuxer) ```typescript import { WebDemuxer } from "web-demuxer"; const demuxer = new WebDemuxer(); await demuxer.load( file); const mediaInfo = await demuxer.getMediaInfo(); const videoTrack = mediaInfo.streams.filter((s)=>s.codec_type_string === 'video')[0]; const chunks: EncodedVideoChunk[] = []; const reader = demuxer.read('video', start, end).getReader(); reader.read().then(async function processPacket({ done:boolean, value: EncodedVideoChunk }) { if(value) chunks.push(value); if(done) return resolve(chunks); return reader.read().then(processPacket) }); ``` ##### MP4Demuxer [Section titled “MP4Demuxer”](#mp4demuxer) If you want even more control, and are okay with just using MP4 inputs, you can use [MP4Demuxer](https://github.com/sb2702/webcodecs-utils/blob/main/src/demux/mp4-demuxer.ts), which is a WebCodecs wrapper around [MP4Box.js](https://github.com/gpac/mp4box.js). Unlike the other two libraries, MP4Box wasn’t built to integrate with WebCodecs, so I wrote MP4Demuxer to read and extract `EncodedVideoChunk` and `EncodedVideoChunk` objects from MP4Box, and MP4Demuxer is what my production apps use (I built it before the previous libraries existed). Only works for MP4 files (obviously). ```typescript import { MP4Demuxer } from 'webcodecs-utils' const demuxer = new MP4Demuxer(file); await demuxer.load(); const decoderConfig = demuxer.getVideoDecoderConfig(); const chunks = await demuxer.extractSegment('video', 0, 30); //First 30 seconds ``` ##### Manual demuxer [Section titled “Manual demuxer”](#manual-demuxer) ~~Don’t build your own demuxer~~, I’m not your boss, maybe you have some custom use case for manual demuxing. That said, building your own demuxing library is complex and error prone, but if you want to, or if you’re just curious, here’s some guidance. **MP4 Files**: MP4 files store data in the form of ‘boxes’, and there are different types of boxes, like *mdat* (audio/video data) and *moov* (metadata) which each contain different types of data, and syntax for storing or parsing that data. Boxes can be nested, and so you’d need to read through a file, separate out all the boxes, and parse the data from each box. Here is a [list](https://mp4ra.org/registered-types/boxes) of boxes, and you can inspect the [source code](https://github.com/gpac/mp4box.js) of MP4Box to see how they parse boxes and how they handle [each box type](https://github.com/gpac/mp4box.js/tree/main/src/boxes). I personally don't have much experience with this, but from my initial attempts at manually parsing MP4s in pure Javascript, it is more complex than parsing WebM files. **WebM Files** WebM files use format called [Extensible Binary Meta Language](https://en.wikipedia.org/wiki/Extensible_Binary_Meta_Language), which is like a binary version of XML. You can use an [EBML parser](https://github.com/legokichi/ts-ebml) to read a WebM file and extract all the EBML elements, which are kind of like XML tags, but they aren’t nested (they just come out as an array) and they can have binary data. ```javascript import * as EBML from 'ts-ebml'; const decoder = new ebml.Decoder(); const arrayBuffer = await file.arrayBuffer(); const ebmlElms = decoder.decode(arrayBuffer); ``` You can refer to the [official docs](https://www.webmproject.org/docs/container/) for what each Element name is and does, or can just read in a WebM file in a browser and inspect for yourself. Here is a very barebones example of manually parsing a WebM file purely for illustrative purposes. ### Muxing [Section titled “Muxing”](#muxing) To write `EncodedVideoChunk` objects to a file, you need a muxer. Here the primary option is [Mediabunny](https://mediabunny.dev/) ##### Mediabunny [Section titled “Mediabunny”](#mediabunny-1) ```typescript import { EncodedPacket, EncodedVideoPacketSource, BufferTarget, Mp4OutputFormat, Output } from 'mediabunny'; async function muxChunks(function(chunks: EncodedVideoChunk[]): Promise { const output = new Output({ format: new Mp4OutputFormat(), target: new BufferTarget(), }); const source = new EncodedVideoPacketSource('avc'); output.addVideoTrack(source); await output.start(); for (const chunk of chunks){ source.add(EncodedPacket.fromEncodedChunk(chunk)) } await output.finalize(); const buffer = output.target.buffer; return new Blob([buffer], { type: 'video/mp4' }); }); ``` Though as with demuxing with Mediabunny, in most cases, you don’t even need to deal with `EncodedVideoChunk` or `VideoEncoder` objects, Mediabunny is actually *less verbose* for writing video frames to a file as we’ll see in the [Mediabunny Section](../media-bunny/use-cases.md). ##### WebMMuxer/MP4Muxer [Section titled “WebMMuxer/MP4Muxer”](#webmmuxermp4muxer) If you do want to work directly with `EncodedVideoChunk` objects, you might consider [WebMMuxer](https://github.com/Vanilagy/webm-muxer) and [MP4Muxer](https://github.com/Vanilagy/mp4-muxer) which are actually from the same author and are deprecated in favor of Mediabunny, but which more directly work with `EncodedVideoChunk`objects directly. ```typescript import {ArrayBufferTarget, Muxer} from "mp4-muxer"; async function muxChunks(function(chunks: EncodedVideoChunk[]): Promise { const muxer = new Muxer({ target: new ArrayBufferTarget(), video: { codec: 'avc', width: chunks[0].codedWidth, height: chunks[0].codedHeight } }); for (const chunk of chunks){ muxer.addVideoChunk(chunk); } await muxer.finalize(); const buffer = output.target.buffer; return new Blob([buffer], { type: 'video/mp4' }); }); ``` ##### Manual Muxing [Section titled “Manual Muxing”](#manual-muxing) ~~No~~ ~~Don’t do it~~ ~~Just.. No…~~ See [above](#manual-demuxer)
# Rendering
> Different rendering options
When decoding video and rendering it to a ``, as in [previous examples](../decoder#decoding-loop), we defaulted to using the [canvas’s 2d rendering context](https://developer.mozilla.org/en-US/docs/Web/API/CanvasRenderingContext2D) which is a very developer-friendly graphics api. ```typescript const canvas = new OffscreenCanvas(width, height); const ctx = canvas.getContext('2d'); const decoder = new VideoDecoder({ output: function(frame: VideoFrame){ ctx.drawImage(frame, 0, 0); frame.close(); }, error: function(e: any)=> console.warn(e); }); ``` And for “hello world” demos, here or in other documentation websites, this is fine, because 2d Canvas context is simple, and works well enough. That said, there are other ways to render a `VideoFrame` to canvas, and the ‘2d’ canvas context is by far the least efficient, so we’ll cover the other options. ### Context2D [Section titled “Context2D”](#context2d) Canvas2D context is a generic graphics library, and the most common one for drawing to a canvas. It has a relatively beginner-friendly API. It’s pretty easy to use it to draw things like shapes and text: ```javascript const canvas = document.querySelector('canvas'); const ctx = canvas.getContext('2d'); // Draw a rectangle ctx.fillStyle = '#3498db'; ctx.fillRect(50, 50, 200, 150); // Draw a circle ctx.fillStyle = '#e74c3c'; ctx.beginPath(); ctx.arc(400, 100, 75, 0, Math.PI * 2); ctx.fill(); // Draw text ctx.fillStyle = 'white'; ctx.font = 'bold 24px Arial'; ctx.fillText('Hello Canvas', 100, 120); // Draw a line ctx.strokeStyle = '#2ecc71'; ctx.lineWidth = 3; ctx.beginPath(); ctx.moveTo(50, 250); ctx.lineTo(450, 250); ctx.stroke(); ``` and as we saw, it’s pretty easy to draw a frame to an image ```javascript ctx.drawImage(frame, 0, 0); ``` The problem with the 2d canvas is that, to enable its simple graphics API, many operations in the canvas 2d API are implemented using CPU rendering. Because the web standard doesn’t specify how 2d canvas should be implemented, and at least Chromium seems to dynamically decide how to implement each function depending on a number of factors \[[1](https://www.middle-engine.com/blog/posts/2020/08/21/cpu-versus-gpu-with-the-canvas-web-api)], it’s not clear or consistent how `drawImage` will behave, and as we’ll see, its performance varies greatly between browsers. Benchmarking the speed of decoding + `drawImage` [Big Buck Bunny](../../reference/inside-jokes#big-buck-bunny) at 1080p on my Macbook M4 Laptop on 3 browsers\* | Device | Browser | Decode Speed | | -------------- | ------- | ------------ | | Macbook Pro M4 | Firefox | 70fps | | Macbook Pro M4 | Chrome | 960fps | | MacbookPro M4 | Safari | 230fps | You can see how different browser implementations vary dramatically in performance. Chromium browsers seem to implement some form of optimization that the others don’t, but as we’ll see, even for Chromium Canvas2d is not as efficient as other methods. \* I’m not testing on other browsers, because the vast majority of other popular browsers (Edge, Opera, Brave etc..) are built on Chromium, the same engine used by Chrome. Safari and Firefox are the two main popular browsers not built on Chromium. ### Bitmap Renderer [Section titled “Bitmap Renderer”](#bitmap-renderer) Bitmap renderer is a very infrequently used canvas rendering context, though it’s very simple to use for this use case, and has clear performance advantages. ```javascript const canvas = new OffscreenCanvas(width, height); const ctx = canvas.getContext('bitmaprenderer'); const decoder = new VideoDecoder({ output: function(frame: VideoFrame){ const bitmap = await createImageBitmap(frame); ctx.transferFromImageBitmap(bitmap); frame.close(); bitmap.close(); }, error: function(e: any)=> console.warn(e); }); ``` Where you have to use `await createImageBitmap(frame)` to create an [ImageBitmap](https://developer.mozilla.org/en-US/docs/Web/API/ImageBitmap) version of the frame, and then use `ctx.transferFromImageBitmap(bitmap)` to render the bitmap to the canvas. Creating the `ImageBitmap` in the first place requires 1 full frame copy operation, but this is a GPU Memory -> GPU Memory copy so it’s much faster than a CPU -> GPU copy. The 2nd `transferFromImageBitmap` is a zero-copy operation, and so has little to no performance overhead. | Device | Browser | Decode Speed | | -------------- | ------- | ------------ | | Macbook Pro M4 | Firefox | 230fps | | Macbook Pro M4 | Chrome | 1120fps | | MacbookPro M4 | Safari | 220fps | Where you can see that the firefox performance improves dramatically, almost certainly by reducing the CPU <> GPU bottleneck. Chrome is also noticeably faster. ### WebGPU importExternalTexture [Section titled “WebGPU importExternalTexture”](#webgpu-importexternaltexture) [WebGPU](https://webgpufundamentals.org/) is a fairly complicated graphics API enabling highly performance graphics (or machine learning workloads) in the browser, but it has a steep learning curve. One key advantage that it has though is the `importExternalTexture` method, which enables rendering `VideoFrame` objects to a canvas in a true *zero-copy* fashion, meaning that the video frame isn’t copied anywhere, it moves directly from where it is in GPU memory to the canvas. If you are building a complex video editing pipeline you may end up needing to use WebGPU anyway, but if you just want something quick and easy that works and don’t want to learn WebGPU, I built a quick utility called `GPUFrameRenderer` in [webcodecs-utils](https://www.npmjs.com/package/webcodecs-utils), which uses WebGPU when available (falling back to BitmapRenderer when not available). ```javascript import { GPUFrameRenderer } from 'webcodecs-utils' const canvas = new OffscreenCanvas(width, height); const gpuRenderer = new GPUFrameRenderer(canvas); await gpuRenderer.init(); const decoder = new VideoDecoder({ output: function(frame: VideoFrame){ gpuRenderer.drawImage(frame); frame.close(); }, error: function(e: any)=> console.warn(e); }); ``` It may seem like a lot of programming overhead, but the zero copy operation makes a clear performance difference | Device | Browser | Decode Speed | | -------------- | ------- | ------------ | | Macbook Pro M4 | Firefox | 430fps | | Macbook Pro M4 | Chrome | 1230fps | | MacbookPro M4 | Safari | 610fps | ### Conclusion [Section titled “Conclusion”](#conclusion) If you can, use WebGPU with `importExternalTexture` to decode and render video, check the [source code](/demo/gpu-draw-image/GPUDrawImage.js) if that’s helpful, and if not, at least try to use [BitmapRenderer](https://developer.mozilla.org/en-US/docs/Web/API/ImageBitmapRenderingContext).
# VideoFrame
> Why WebCodecs is harder than it looks
Video is essentially just a series of images (called frames) with timestamps, indicating which frame to show at a given time during video playback.  The javascript `VideoFrame` class, likewise, is represented as a combination of pixel data (like RGB values) and some metadata (including the timestamp). *Keep in mind that VideoFrame and other WebCodecs interfaces represent time in microseconds.*  A `VideoFrame` has all the information needed to render or display the image in a ``, or to access raw pixel data (e.g. for AI model inference), but can’t directly be stored in a normal video file. An `EncodedVideoChunk` can’t directly be used to render or display an image, but you can directly read them from a video file, or write them to a video file.  These two classes (`VideoFrame` and `EncodedVideoChunk`) are the backbone of WebCodecs, the whole point of WebCodecs is to facilitate the transformation between `EncodedVideoChunk` and `VideoFrame` objects, and and you would use `VideoFrame` objects when you need access to the raw video data (e.g. rendering a video to a canvas). ### Core Properties of a VideoFrame [Section titled “Core Properties of a VideoFrame”](#core-properties-of-a-videoframe) A `VideoFrame` object is just pixeldata + metadata, here are some of the main properties: #### Format [Section titled “Format”](#format) When you normally think of pixel or image data, the default is to think about “RGB” where each image is decomposed into “red”, “green” and “blue” pixels. Actual computer displays actually use red, green and blue lights for each pixel, so whenever images or video frames are displayed on a device, at some point it is converted to “RGB” format. `VideoFrame` objects use the `RGBA` space to capture this, with the `A` channel meaning `alpha`, which is a 4th channel denoting transparency, which shows up in some videos like graphics overlays but is not common.  Beyond the actual encoding, `VideoFrame` objects aren’t always stored in this simple `RGB` format, there are a few formats that video frames might take including `I420` and `NV12`. What these do is to split the image into a different colorspace called [YUV](https://en.wikipedia.org/wiki/Y%E2%80%B2UV)  Where the `Y` channel captures ‘brightness’, and the other two channels `U` and `V` capture non-bright color information.  Because human eyes are much more sensitive to changes in brightness than changes in color, it is common practice to apply *Chroma Subsampling* to only store a smaller resolution version of the `U` and `V` channels while preserving the `Y` channel, shaving off data for minimal loss in visual quality. ###### List of formats [Section titled “List of formats”](#list-of-formats) * `I420` - Normal YUV subsampling, with a `Y` channel and sub-sampled `U` and `V` channels. * `NV12` - Similar to YUV, but instead of storing data in 3 planes, it interleaves the UV data together into one plane * `RGBA` - Standard RGB but with an alpha channel * `BGRA` - Same as RGB, but in reverse order (Blue, Green, Red) When displaying these frames to canvas, extracting `ImageData` or doing any manipulation with WebGPU or WebGL, the data will automatically be converted to RGBA to facilitate processing, so as an application developer you often don’t need to do anything special to handle different frame types, but do be aware that under the hood the data corresponding to each frame actually is different for different types #### Coded Height and Display Height [Section titled “Coded Height and Display Height”](#coded-height-and-display-height) You’ll notice that `VideoFrame` objects have a `codedHeight` and `displayHeight` property, as well as `codedWidth` and `displayWidth`. You might be curious as to why there would be two width properties and height properties, but this has to do with how video compression algorithms work. Most video codecs use a concept called [macroblocks](https://en.wikipedia.org/wiki/Macroblock) which are square chunks of the image (say 16x16 pixels) on which a specific compression techniques are applied.  A 1080p video might use all 16x16 macroblocks, but you’ll notice that 1080 pixels does not divide cleanly in macroblocks of size 16 (`1080/16=67.5`). One solution is to just round up, and encode 1088 pixels, but tell the video player to only display 1080 pixels, with some data thrown away. This is essentially the difference between `codedHeight` and `displayHeight`. For the majority of videos in practice these are identical but not always, and it’s safer to use `displayWidth` and `displayHeight` for sizing images and canvases to be rendered to. #### Creating new VideoFrames [Section titled “Creating new VideoFrames”](#creating-new-videoframes) When decoding video from a `VideoDecoder`, the `format` and `codedHeight`/`displayWidth` come from the source video, and these are read-only. When creating a new `VideoFrame` (e.g. for encoding a video with `VideoEncoder`), you may or may not need to specify these. For creating new `VideoFrame` objects from image sources (`ImageData`, `ImageBitmap`, ``), you don’t need to specify `format` or `codedHeight` or `codedWidth`. ```typescript new VideoFrame(imageBitmap, {timestamp: 0, duration: 33000 /* microseconds*/}); ``` You can however construct a `VideoFrame` from raw binary data (`ArrayBuffer`, `UInt8Array`), but then you need to specify the `format` and `codedHeight` and `codedWidth` ```typescript new VideoFrame(buffer, {format:'RGBA', codedHeight: 360, codedWidth: 640, /* etc...*/}); ``` #### Timestamp and Duration [Section titled “Timestamp and Duration”](#timestamp-and-duration) Finally, `VideoFrame` objects have a `timestamp` (the time in the video’s timeline at which the frame appears) and a `duration` which is the duration of the frame.  Again, remember that VideoFrame and other WebCodecs interfaces represent time in microseconds (e.g. a `timestamp` of `48000000` means it happens 48 seconds into the video). ### Getting VideoFrames [Section titled “Getting VideoFrames”](#getting-videoframes) ##### Decoding [Section titled “Decoding”](#decoding) The primary way to get a `VideoFrame` is directly from `VideoDecoder` ```typescript import { demuxVideo } from 'webcodecs-utils' const {chunks, config} = await demuxVideo(file); const decoder = new VideoDecoder({ output(frame: VideoFrame) { //Do something with the frame }, error(e) {} }); decoder.configure(config); for (const chunk of chunks){ decoder.decode(chunks) } ``` This will have all the metadata pre-populated as it’s coming from the source video. ##### Video Element [Section titled “Video Element”](#video-element) You can also grab video frames directly from a `` element. ```typescript const video = document.createElement('video'); video.src = 'big-buck-bunny.mp4' video.oncanplaythrough = function(){ video.play(); function grabFrame(){ const frame = new VideoFrame(video); video.requestVideoFrameCallback(grabFrame) } video.requestVideoFrameCallback(grabFrame) } ``` Like with the `VideoDecoder`, when grabbing frames from a ``, it will have all the metadata prepopulated from the source video. ##### Canvas Element [Section titled “Canvas Element”](#canvas-element) You can also construct a `VideoFrame` from a ``, which lets you create custom rendering pipelines or construct artificial video. ```typescript const canvas = new OffscreenCanvas(640, 480); const ctx = canvas.getContext('2d'); let frameNumber = 0; function renderFrame(timestamp) { ctx.clearRect(0, 0, canvas.width, canvas.height); ctx.fillText(`Frame ${frameNumber}`, canvas.width / 2, canvas.height / 2); const videoFrame = new VideoFrame(canvas, { timestamp: frameNumber * (1e6 / 30), // 30fps, stored in microseconds }); frameNumber++; requestAnimationFrame(renderFrame); } requestAnimationFrame(renderFrame); ``` In this case though, you do need to supply the timestamp as the `` just has pixel data, though you can also specify other metadata, such as the *duration*, *format* etc… ##### From raw pixel data [Section titled “From raw pixel data”](#from-raw-pixel-data) You can also construct a video frame from raw video data, such as an `ArrayBuffer` or `UInt8Array` representing raw RGBA pixel values, which might be helpful when encoding video generated by AI models or data pipelines which return raw pixel data. The following constructs a video frame that will change the RGB color value of the video frame over time. ```typescript const width = 640; const height = 480; const frameRate = 30; const frameDuration = 1000 / frameRate; let frameNumber = 0; let lastFrameTime = 0; let fpsCounter = 0; let fpsTime = 0; function renderFrame(timestamp) { // Create RGBA buffer (4 bytes per pixel) const pixelCount = width * height; const buffer = new ArrayBuffer(pixelCount * 4); const data = new Uint8ClampedArray(buffer); // Oscillate between 0 and 255 over time (2-second cycle) const cycle = frameNumber % (frameRate * 2); const intensity = Math.floor((cycle / (frameRate * 2)) * 255); // Fill entire frame with solid color for (let i = 0; i < pixelCount; i++) { const offset = i * 4; data[offset + 0] = intensity; // Red data[offset + 1] = intensity; // Green data[offset + 2] = intensity; // Blue data[offset + 3] = 255; // Alpha (always opaque) } // Create VideoFrame from raw pixel data // Remember we need to supply format and codedWidth/height const videoFrame = new VideoFrame( data, { format: "RGBA", codedHeight: height, codedWidth: width, timestamp: frameNumber * (1e6 / frameRate), } ); videoFrame.close() frameNumber++; requestAnimationFrame(renderFrame); } requestAnimationFrame(renderFrame); ``` This provides full flexibility to programmatically construct a `VideoFrame` with individual pixel-level manipulation, but keep in mind that VideoFrame objects reside in graphics memory, and sending data to/from typed arrays (`ArrayBuffer`, `UInt8Array`) incurs memory copy operations and performance overhead \[[1](../../concepts/cpu-vs-gpu)] ### Using Video Frames [Section titled “Using Video Frames”](#using-video-frames) Once you have a `VideoFrame`, there are two ways to use them. ##### Encoding [Section titled “Encoding”](#encoding) `VideoFrame` objects are the only input you can use when using WebCodecs to encode video, so if you want to encode video in the browser, you need your source video data as `VideoFrame`. Here’s an example of encoding a canvas animation via `VideoFrame` objects. ```typescript const canvas = new OffscreenCanvas(640, 480); const ctx = canvas.getContext('2d'); let frameNumber = 0; const encoded_chunks = []; const encoder = new VideoEncoder({ output: function(chunk){ encoded_chunks.push(chunk) if(encoded_chunks.length === 150) // Done encoding, time to mux }, error: function(e){console.log(e)} }) encoder.configure({ codec: 'vp09.00.41.08.00', width: canvas.width, height: canvas.height, bitrate: 1e6, framerate: 30 }) function renderFrame(timestamp) { ctx.clearRect(0, 0, canvas.width, canvas.height); ctx.fillText(`Frame ${frameNumber}`, canvas.width / 2, canvas.height / 2); const videoFrame = new VideoFrame(canvas, { timestamp: frameNumber * (1e6 / 30), // 30fps, stored in microseconds }); encoder.encode(videoFrame, {keyFrame: frameNumber%60==0}) videoFrame.close(); frameNumber++; if(frameNumber < 150) requestAnimationFrame(renderFrame); else encoder.flush(); } requestAnimationFrame(renderFrame); ``` ##### Rendering [Section titled “Rendering”](#rendering) You can also render a `VideoFrame` to canvas. Here is the player example we showed previously where you are rendering video to a canvas. ```typescript import { demuxVideo } from 'webcodecs-utils' async function playFile(file: File){ const {chunks, config} = await demuxVideo(file); const canvas = document.createElement('canvas'); const ctx = canvas.getContext('2d'); const decoder = new VideoDecoder({ output(frame: VideoFrame) { ctx.drawImage(frame, 0, 0); frame.close() }, error(e) {} }); decoder.configure(config); for (const chunk of chunks){ decoder.decode(chunks) } } ``` ### Memory [Section titled “Memory”](#memory) As mentioned [previously](../../intro/what-are-codecs), raw video data (and specifically individual `VideoFrame`) objects take up a lot of memory, with a single 1080p frame taking up \~ 8 MB. Most graphics cards usually have 2-4 GB of video memory (integrated graphics cards reserve a portion of system RAM), meaning a typical device can only hold several hundred 1080p video frames (\~20 seconds of raw video data) in memory at a given moment. When playing back a 1 hour 1080p video in a `` tag, the browser will render frames progressively, displaying each frame as needed, and discarding frames immediately afterwards to free up memory, so that you could watch a 1 hour video with browser only keeping several seconds worth of actual raw, renderable video data in memory at a given time. When working in WebCodecs, the browser gives you much lower level control over `VideoFrame` objects - when to decode them, how to buffer them, how to create them etc…, but you are also responsible for memory management. ##### Closing Frames [Section titled “Closing Frames”](#closing-frames) Fortunately, it’s pretty easy to ‘discard’ a frame, just use the `.close()` method on each frame after you are done, as in the frame callback in the simplified playback example. ```typescript const decoder = new VideoDecoder({ output(frame: VideoFrame) { ctx.drawImage(frame, 0, 0); frame.close() }, error(e) {} }); ``` Calling `close()` means the video memory is freed, and you can no longer use the `VideoFrame` object for anything else. You can’t 1. Render a frame, 2. Then call `close()` 3. Then send the frame to an encoder. But you can 1. Render a frame, 2. Then send the frame to an encoder. 3. Then call `close()` `close()` is the last you should do with a `VideoFrame` , after you are done using it, and in whatever processing pipeline, you need to remember to close frames after you are done, and manage memory yourself. ##### Transferring [Section titled “Transferring”](#transferring) Like `File` objects, `VideoFrame` objects are CPU references to data tied to actual graphics memory. When you send a `VideoFrame` from the main thread to a worker (or vice-versa), you are transferring a reference to the frame. Nonetheless, it is still good practice to transfer the references ```typescript const worker = new Worker('worker.js'); const decoder = new VideoDecoder({ output(frame: VideoFrame) { worker.postMessage({frame}, [frame]) }, error(e) {} }); ```
# CPU vs GPU
> Understanding ImageData vs VideoFrame
Before even getting to WebCodecs, I want to cover some very important core concepts that most guides don’t talk about, which lots of demo pages from reputable open source projects like [Mediabunny](https://mediabunny.dev/) and [MediaPipe](https://ai.google.dev/edge/mediapipe/solutions/vision/image_segmenter) leave out for simplicity, but which are absolutely critical to building performant video processing applications in the web. The first concept is the distinction between CPU and the GPU, and how data flows between them during video processing operations. #### Most devices have graphics cards [Section titled “Most devices have graphics cards”](#most-devices-have-graphics-cards) When you build an application in the browser, most of the code runs in the browser Javascript runtime in a single thread on the CPU. For some very specific applications though (WebCodecs is one of them), you will end up doing lots of computation on the user’s graphics card. You might think that “graphics card” only means a dedicated GPU, but that’s not correct. Most devices, even low-end android phones and the cheapest netbooks, have a graphics card, and they serve the same purpose: parallelized (graphics) processing. #### Many WebAPIs use the graphics card [Section titled “Many WebAPIs use the graphics card”](#many-webapis-use-the-graphics-card) You may have heard of technologies like [WebGL](https://developer.mozilla.org/en-US/docs/Web/API/WebGL_API) and [WebGPU](https://developer.mozilla.org/en-US/docs/Web/API/WebGPU_API), which allow developers to write code that runs on the graphics card, notably rendering complex graphics (obviously) but also Machine Learning models. But actually, it’s not just those APIs, many Web APIs that deal with graphics use the graphics card, especially those that deal with image and video, here are just a few: * [WebCodecs](https://developer.mozilla.org/en-US/docs/Web/API/WebCodecs_API) uses the graphics card for encoding/decoding * [Canvas2dContext](https://developer.mozilla.org/en-US/docs/Web/API/CanvasRenderingContext2D) sometimes uses the graphics card * [HTMLVideoElement](https://developer.mozilla.org/en-US/docs/Web/API/HTMLVideoElement) uses the graphics card for playback * [WebRTC/MediaRecorder/MediaSources](https://developer.mozilla.org/en-US/docs/Web/API/WebRTC_API) uses the the graphics card for hardware acceleration * [CSS Transforms](https://developer.mozilla.org/en-US/docs/Web/CSS/Reference/Properties/transform) uses the the graphics card for hardware acceleration * [ImageBitmap](https://developer.mozilla.org/en-US/docs/Web/API/ImageBitmap) stores graphics memory on the graphics card #### Most Graphics cards have a specific hardware module for video encoding and decoding [Section titled “Most Graphics cards have a specific hardware module for video encoding and decoding”](#most-graphics-cards-have-a-specific-hardware-module-for-video-encoding-and-decoding) The reason that all the video-related Web APIs use the graphics card is because video encoding/decoding is usually done by specific encoder/decoder hardware sub-module located within the graphics card (separate from the ‘normal’ graphics processor used for graphics & ML). A mostly\* accurate view of a generalized consumer device system might look like this:  \* In reality, integrated graphics cards actually do use the same physical RAM device as the CPU, but the operating system reserves a portion for the graphics card, and the graphics card manages the memory separately, and often use different caching/storage mechanisms so that, for practical purposes, GPU memory and CPU memory act as separate stores, requiring CPU cycles and data copies to move data between GPU and the CPU \[[1](https://people.ece.ubc.ca/sasha/papers/ismm-2017.pdf)]\[[2](https://gpuweb.github.io/gpuweb/explainer/#:~:text=2.2.\&text=When%20using%20a%20discrete%20GPU,process%20and%20the%20content%20process.)]\[[3](https://www.w3.org/2021/03/media-production-workshop/talks/paul-adenot-webcodecs-performance.html)]. #### What is on the Graphics Card [Section titled “What is on the Graphics Card”](#what-is-on-the-graphics-card) When you’re writing web code with image/video data, you may not not be aware that different variables within a single function might be representing entities on different devices, such as the hard disk, CPU RAM, or in Video Memory on the graphics card. So, here’s a list of what data types are stored where: | Data Type | Location | | -------------------- | ---------- | | VideoFrame | GPU | | EncodedVideoChunk | CPU | | ImageData | CPU | | ImageBitmap | GPU | | EncodedAudioChunk | CPU | | AudioData | CPU | | ArrayBuffer | CPU | | UInt8Array | CPU | | File | CPU + Disk | | FileSystemFileHandle | CPU + Disk | Many different methods and functions you will encounter in video processing will either keep data on a single device, or move data between devices. Here are a few important methods. | Method | What is Happening | | -------------------------------------------- | ------------------------------------------------------------------------------------------------------------------------ | | Canvas2d.drawImage | depends on the browser\[[4](https://www.middle-engine.com/blog/posts/2020/08/21/cpu-versus-gpu-with-the-canvas-web-api)] | | createImageBitmap(VideoFrame) | GPU -> GPU (local copy) | | createImageBitmap(ImageData) | CPU -> GPU | | createImageBitmap(Canvas or OffscreenCanvas) | GPU -> GPU (local copy) | | createImageBitmap(Blob) | CPU -> GPU | | getImageData | GPU -> CPU | | putImageData | CPU -> GPU | | transferFromImageBitmap | GPU -> GPU (local copy) | | importExternalTexture | GPU->GPU (zero copy) | | copyExternalImageToTexture | GPU->GPU (local copy) | | decode | CPU->GPU | | encode | GPU -> CPU | | requestAnimationFrame | CPU waits for signal from GPU | | File.arrayBuffer() | Hard Disk -> CPU/RAM | It’s important to keep this in mind, because in many cases, for a simple task like rendering a `VideoFrame` to a `canvas`, there are multiple different ways to accomplish the same thing, but some methods are super efficient(`importExternalTexture `) while some are much slower (`getImageData `) because they involve different levels of copying and shuffling data around between devices. #### Flow of data during video processing [Section titled “Flow of data during video processing”](#flow-of-data-during-video-processing) For someone just getting started, it might be hard to just read a long table full of data types and methods you may have never heard of, so to make this much clearer, here are several animations illustrating the flow of data between devices for the primary methods used when transcoding a video file in WebCodecs. **file.arrayBuffer()** While not part of WebCodecs per se, if you are transcoding a user-uploaded video, the first step would be to read the contents from disk into RAM as an array buffer, using `file.arrayBuffer()` or one of several other [file reading methods](https://developer.mozilla.org/en-US/docs/Web/API/FileReader), and when you do this, the data flow looks like this: Your browser does not support the video tag. **Demuxing** The next step is Demuxing (extracting `EncodedVideoChunk` objects from the file (array buffer)), we’ll get to it [later](../../basics/muxing), but overall it’s just a data transformation, taking slices of the array buffer, and adding metadata to construct each `EncodedVideoChunk` which then becomes an object in RAM. Your browser does not support the video tag. **Decode** When you set up a `VideoDecoder` and start sending chunks via `decoder.decode()`, it will send the chunks from RAM into the graphics card’s specialized Video Decoder module (assuming hardware acceleration). Your browser does not support the video tag. **Rendering** While rendering isn’t a step in transcoding, I’ll include it here anyway. There’s a number of ways you can render a `VideoFrame` to a `canvas` / the display, which will be covered [here](../../basics/rendering), but following best practices of using methods like `importExternalTexture` will send each `VideoFrame` in the most efficient way through the graphics processor to the final display. Your browser does not support the video tag. **Encode** Encoding is the mirror image of Decoding, following the reverse path of sending `VideoFrame` objects through the Encoder / Decoder, through the CPU and back into RAM. The main substantive difference is that encoding requires far more compute than encoding. Your browser does not support the video tag. **Muxing** Finally, muxing is the mirror image of demuxing, taking `EncodedVideoChunk` data and placing it in the right location of the outgoing `ArrayBuffer` (or file, or stream) which represents the transcoded video which can actually be played back by other video players. Your browser does not support the video tag. #### Best practices [Section titled “Best practices”](#best-practices) For the best performance, **don’t needlessly shuffle data back and forth between the CPU, GPU and Hard Disk**, there are real performance penalties for each data transfer operation. This is especially important for `VideoFrame` objects - they reside in GPU memory. Outside of encoding/decoding, please try to keep any operations involving `VideoFrame` objects on the graphics card (via methods like `createImageBitmap`), and avoid reading `VideoFrame` data to the CPU with operations like `copyTo`. The reason to go through all this trouble to understand the CPU vs the GPU, where each data type resides, and what the data flows look like, is to explain why this guide will make specific recommendations on which methods to use (like `importExternalTexture`) and which not to use (like `drawImage`), and why we’re recommending certain best practices, to follow the above principles.
# File Handling
> Streams, buffers, and file system handles
Video files can be large \[[citation needed](../../reference/inside-jokes#citation-needed)], ranging from 2-5GB per hour of typical 1080p video, though my own applications occasionally see uploads larger than 20GB. You should expect to work with large files if you are building user-facing applications to edit video or transcode content. If you do work with such large files, there are some extra practical things you need to keep in mind that aren’t directly related to WebCodecs, but which are still necessary for managing a video processing application. ### File Object [Section titled “File Object”](#file-object) If users supply a video file to your web application (e.g. through an ‘Upload’ button), you are almost certainly going to be working with `File` objects. You might either load a file using ` ` or `showOpenFilePicker` * Input ```html ``` ```typescript const fileSelector = < HTMLInputElement> document.getElementById('file-selector'); fileSelector.addEventListener('change', (event: Event) => { const file = event.target.files[0]; }); ``` * filePicker ```typescript const [fileHandle] = await window.showOpenFilePicker({}); const file = await fileHandle.getFile(); ``` However you get your `File`, this is a *reference* to an actual file on the user’s hard disk, and does not itself contain the contents of the file in memory. This is actually pretty helpful because you can directly pass a `File` object to a worker thread without without copying a bunch of data, and can do the CPU intensive work of reading files in the worker thread. ```typescript worker.postMessage({"file": file}); // This is totally fine ``` When sending a `File` between threads, there is no need to ‘transfer’ it, as the `File` is just a reference and sending it is essentially an efficient zero-copy operation, you can send a 100 GB `File` object to a worker thread on a low-end netbook and it’d be fine, because you’re only passing the reference which is less than a few kilobytes of data. When you do actually want to read the data, you have some options for how to read it; You can directly read the file in one go as an `ArrayBuffer` (simple, faster), or you can read the file in a using a `ReadableStream` (more complex, better control over memory). * ArrayBuffer ```javascript const arrayBuffer = await file.arrayBuffer(); ``` * Streaming ```javascript const stream = file.stream(); // Get a ReadableStream const reader = stream.getReader(); // Get a reader to lock the stream while (true) { const { done, value } = await reader.read(); // Read data chunks if (done) break; // value => the next chunk of the file } ``` `ArrayBuffer` is certainly easier to work with, but **Chromium browsers have a hard limit of 2GB for a single `ArrayBuffer` object**, so if you ever need to handle videos larger than 2GB, you would need a file streaming implementation. In either case, it’s only during this second file reading step that data actually moves from hard disk to cpu. Your browser does not support the video tag. ### Reading large files [Section titled “Reading large files”](#reading-large-files) If you are decoding video, you will need to demux the file. For MP4 files specifically, to even begin demuxing, the demuxer library (e.g. [Mediabunny](https://mediabunny.dev/), [MP4Box.js](https://github.com/gpac/mp4box.js)) needs to find the [moov atom](https://developer.apple.com/documentation/quicktime-file-format/movie_atom), which is often at the end of the file. You will therefore often need to read through the entire file once to even begin to demux it, and reading through a full 5GB video on a low-end netbook to find the moov atom can take over 1 minute, which is important to keep in mind when designing UI. **Mediabunny** Fortunately, if you use [Mediabunny](https://github.com/Vanilagy/mediabunny), that library will handle File streaming by default, so won’t have to implement it yourself. If you look at the following example: ```typescript import { VideoSampleSink, Input, BlobSource, MP4 } from 'mediabunny'; async function decodeFile(file: File){ const input = new Input({ formats: [MP4], source: new BlobSource(file), }); const canvas = document.createElement('canvas'); const ctx = canvas.getContext('2d'); const videoTrack = await input.getPrimaryVideoTrack(); const sink = new VideoSampleSink(videoTrack); for await (const sample of sink.samples()) { sample.draw(ctx, 0, 0); } } ``` Mediabunny internally will read a Readable stream from the `BlobSource` and read the file in chunks efficiently, without you needing to worry about the details. **Manual Implementation** If you did want to manage the details yourself, I will provide the code I use in my production apps which are a wrapper around [MP4Box](https://github.com/gpac/mp4box.js), which might serve as a guide for your own manual implementation (though I’d recommend Mediabunny for most cases). The key thing with the manual implementation is to read the video meta data first (moov atom for MP4s), which will provide all the info to know where in the overall binary data corresponding to specific video frame is located, and then use a `ReadableStream` to start reading from the appropriate offset, read the `File` in chunks of say 5 minutes. ### Writing large files [Section titled “Writing large files”](#writing-large-files) If instead you are writing to large files, you will also run into the 2GB `ArrayBuffer` limit, and the solution is also to use Streams, but writing works a little differently compared to reading a file as a stream. The primary way to mux media files is via Mediabunny (or [its predecessor](https://github.com/Vanilagy/mp4-muxer)), so if you want to write an MP4 file with WebCodecs, your script might look something like this: ```typescript import { BlobSource, BufferTarget, Input, MP4, Mp4OutputFormat, Output, QUALITY_HIGH, VideoSampleSink, VideoSampleSource } from 'mediabunny'; async function transcodeFile(file: File): Promise { const input = new Input({ formats: [MP4], source: new BlobSource(file), }); const output = new Output({ format: new Mp4OutputFormat(), target: new BufferTarget(), }); const videoSource = new VideoSampleSource({ codec: 'avc'}); output.addVideoTrack(videoSource, { frameRate: 30 }); await output.start(); const videoTrack = await input.getPrimaryVideoTrack(); const sink = new VideoSampleSink(videoTrack); for await (const sample of sink.samples()) { videoSource.add(sample); } await output.finalize(); const buffer = (output.target as BufferTarget).buffer; return new Blob([buffer], { type: 'video/mp4' }); } ``` Unfortunately this code will fail if you are writing a particularly big video file because again, **Chromium browsers have a hard limit of 2GB for a single `ArrayBuffer` object**. If you are lazy, here is a quick hack to work around this: #### InMemory Storage hack [Section titled “InMemory Storage hack”](#inmemory-storage-hack) While perhaps a bit of a hack, if your files might be larger than 2GB but lower than a user’s typical actual RAM (8GB to 16GB), you can get away with the following `InMemoryStorage` class which will take advantage of the fact that while individual `ArrayBuffer` objects have a hard 2GB limit, a `Blob` object can be made of many different `ArrayBufer` objects, and so we use the [Stream API](https://developer.mozilla.org/en-US/docs/Web/API/WritableStream) to write the file in chunks (each a `Uint8Array`) and then return a blob out of the component chunks. Your transcoding script would then use Mediabunny’s `StreamTarget` class instead of the `BufferTarget`, an you can write out much larger files. ```typescript import { BlobSource, StreamTarget, StreamTargetChunk, Input, MP4, Mp4OutputFormat, Output, QUALITY_HIGH, VideoSampleSink, VideoSampleSource } from 'mediabunny'; async function transcodeFile(file: File): Promise { const input = new Input({ formats: [MP4], source: new BlobSource(file), }); const memoryStorage = new InMemoryStorage(); const writable = new WritableStream({ write(chunk: StreamTargetChunk) { memoryStorage.write(chunk.data, chunk.position); } }); const output = new Output({ format: new Mp4OutputFormat(), target: new StreamTarget(writable), }); const videoSource = new VideoSampleSource({ codec: 'avc'}); output.addVideoTrack(videoSource, { frameRate: 30 }); await output.start(); const videoTrack = await input.getPrimaryVideoTrack(); const sink = new VideoSampleSink(videoTrack); for await (const sample of sink.samples()) { videoSource.add(sample); } await output.finalize(); return memoryStorage.toBlob("video/mp4") } ``` #### FileSystemFileHandle [Section titled “FileSystemFileHandle”](#filesystemfilehandle) The above is a bit of a hack, and while simple in order to keep things in memory, it can crash a user’s computer if the target video approaches the devices’s available memory. The proper way to handle writing large files would be to use the [FileSystem API](https://developer.mozilla.org/en-US/docs/Web/API/File_System_API), whereby you ask the user for permission to save the target file to disk: ```javascript const handle = await window.showSaveFilePicker({ startIn: 'downloads', suggestedName: 'the-best-video-ever.mp4', types: [{ description: 'Video File', accept: {'video/mp4' :['.mp4']} }], }); ``` This returns a `FileSystemFileHandle` object, which, like a `File` object, is just a reference to a file on the user’s device, and doesn’t actually contain file data. Unlike a `File` object though, a `FileSystemFileHandle` created this way is not “read-only”, you can also write files to the user’s disk. You can pass the handle for that file to a worker thread (this is essentially a zero-copy operation just like sending a `File` object) and you can pass it to your transcode/processing function. ```javascript async function transcodeFile(file: File, outputHandle: FileSystemFileHandle) { const input = new Input({ formats: [MP4], source: new BlobSource(file), }); const writable = await outputHandle.createWritable(); const output = new Output({ format: new Mp4OutputFormat(), target: new StreamTarget(writable), }); const videoSource = new VideoSampleSource({ codec: 'avc'}); output.addVideoTrack(videoSource, { frameRate: 30 }); await output.start(); const videoTrack = await input.getPrimaryVideoTrack(); const sink = new VideoSampleSink(videoTrack); for await (const sample of sink.samples()) { videoSource.add(sample); } await output.finalize(); } ``` While this will add an extra UI prompt up-front asking the user where they want to store the file, this will gracefully handle for files which could bigger than the user’s available memory, and would write to disk in chunks, as part of the video processing loop instead of afterwards. When using Streams, you could transcode a 20GB file to a 40GB on a $200 netbook within the browser without crashing, and logs from my [free upscaling tool](https://free.upscaler.video) indicate this isn’t theoretical or pedantic, real users actually do upload incredibly large files, it just takes a while to process.
# A primer on the Streams API
> Understanding ReadableStreams, WritableStreams, and TransformStreams for video processing
When working with WebCodecs, especially for tasks like, well, streaming, but also for tasks like transcoding, you’ll often need to process data in stages—reading from files, decoding chunks, encoding frames, and sending it to a network or writing it to a file. The browser’s [Streams API](https://developer.mozilla.org/en-US/docs/Web/API/Streams_API/) is perfectly designed for this kind of pipelined data processing. ## Why Streams? [Section titled “Why Streams?”](#why-streams) Video processing can’t be done as a simple for loop: ```typescript // This is NOT how video processing works for (let i=0; i < numChunks; i++){ const chunk = await demuxer.getChunk(i); const frame = await decoder.decodeFrame(chunk); const processed = await render(frame); const encoded = await encoder.encode(processed); muxer.mux(encoded); } ``` That’s because the `VideoDecoder` and `VideoEncoder` often need to work with batches of data, so you need to send 3 chunks to the `VideoDecoder` before it will start decoding frames. Chunks can also get stuck in the encoder / decoder and need to be ‘flushed’ before finishing. Instead, you need to think of it as a **pipeline** where multiple stages process data simultaneously, with each stage holding multiple chunks or frames at once. Consider transcoding a video file, where you typically have 5 stages: 1. **File Reader** - Stream `EncodedVideoChunk` objects from disk 2. **Decoder** - Transform chunks into `VideoFrame` objects 3. **Render/Process** - Optionally transform frames (filters, effects, etc.) 4. **Encoder** - Transform frames back into `EncodedVideoChunk` objects 5. **Muxer** - Write chunks to output file The Streams API lets you chain these stages together while managing important constraints: * Limit the number of active `VideoFrame` objects in memory * Limit the encoder’s encode queue * Limit the decoder’s decode queue * Avoid reading entire files into memory at once ## Types of Streams [Section titled “Types of Streams”](#types-of-streams) The Streams API provides three main types of streams: ### ReadableStream [Section titled “ReadableStream”](#readablestream) A **ReadableStream** reads data from a source in chunks and passes it to a consumer.  For example, [web-demuxer](https://github.com/bilibili/web-demuxer/) returns a ReadableStream for encoded chunks: ```typescript import { WebDemuxer } from 'https://cdn.jsdelivr.net/npm/web-demuxer/+esm'; const demuxer = new WebDemuxer({ wasmFilePath: "https://cdn.jsdelivr.net/npm/web-demuxer@latest/dist/wasm-files/web-demuxer.wasm", }); await demuxer.load(file); const reader = demuxer.read('video').getReader(); reader.read().then(function processPacket({ done, value }) { if (value) { // value is an EncodedVideoChunk console.log('Got chunk:', value); } if (!done) { return reader.read().then(processPacket); } }); ``` ### WritableStream [Section titled “WritableStream”](#writablestream) A **WritableStream** writes data to a destination in chunks.  For muxing files, [Mediabunny](https://mediabunny.dev/) and [mp4-muxer](https://github.com/Vanilagy/mp4-muxer) both expose a `StreamTarget` for writing muxed data: ```typescript import { StreamTarget } from 'mp4-muxer'; // Writes to file on hard disk const writable = await fileHandle.createWritable(); const target = new StreamTarget({ onData: (data: Uint8Array, position: number) => { writable.write({ type: "write", data, position }); }, chunked: true, chunkSize: 1024 * 1024 * 10 // 10MB chunks }); ``` ### TransformStream [Section titled “TransformStream”](#transformstream) A **TransformStream** transforms chunks of data from one type to another. This is the most useful type for WebCodecs pipelines.  Here’s an example of a VideoEncoder wrapped in a TransformStream: ```typescript class VideoEncoderStream extends TransformStream< VideoFrame, { chunk: EncodedVideoChunk; meta: EncodedVideoChunkMetadata } > { constructor(config: VideoEncoderConfig) { let encoder: VideoEncoder; super( { start(controller) { // Initialize encoder when stream starts encoder = new VideoEncoder({ output: (chunk, meta) => { controller.enqueue({ chunk, meta }); }, error: (e) => { controller.error(e); }, }); encoder.configure(config); }, async transform(frame, controller) { // Encode each frame encoder.encode(frame, { keyFrame: frame.timestamp % 2000000 === 0 }); frame.close(); }, async flush(controller) { // Flush encoder when stream ends await encoder.flush(); if (encoder.state !== 'closed') encoder.close(); }, }, { highWaterMark: 10 } // Buffer up to 10 items ); } } ``` The `TransformStream` API provides three key methods: * **`start(controller)`** - Called once when the stream is created (setup) * **`transform(chunk, controller)`** - Called for each chunk of data * **`flush(controller)`** - Called when the stream has no more inputs ## Chaining Streams [Section titled “Chaining Streams”](#chaining-streams) The real power of the Streams API comes from chaining multiple stages together: **Example 1: Transcoding Pipeline** For transcoding a video file, you chain together file reading, decoding, processing, encoding, and writing: ```typescript const transcodePipeline = chunkReadStream .pipeThrough(new DemuxerTrackingStream()) .pipeThrough(new VideoDecoderStream(videoDecoderConfig)) .pipeThrough(new VideoRenderStream()) .pipeThrough(new VideoEncoderStream(videoEncoderConfig)) .pipeTo(createMuxerWriter(muxer)); await transcodePipeline; ``` Covered in detail in the [transcoding section](../../patterns/transcoding) **Example 2: Streaming to Network** For live streaming from a webcam to a server, you would pipe raw frames through an encoder to a network writer: ```typescript // Returns VideoFrames, we'll cover this later const webCamFeed = await getWebCamFeed(); // Create network writers (e.g., sends to server over network) const videoNetworkWriter = createVideoWriter(); // Create pipelines with abort signal const abortController = new AbortController(); // Pipe video: webcam → encoder → network const videoPipeline = webCamFeed .pipeThrough(videoEncoderStream) .pipeTo(videoNetworkWriter, { signal: abortController.signal }); // Stop streaming when done // abortController.abort(); ``` Covered in detail in the [streaming section](../../patterns/live-streaming) This is both more intuitive and also better practice / more performant, because it enables automatic memory management and internal buffering. When you chain streams this way: * Data flows automatically from one stage to the next * Backpressure propagates upstream automatically * Each stage processes items concurrently * Memory usage stays bounded by the `highWaterMark` values * You can easily stop the entire pipeline with an `AbortController` ## Backpressure [Section titled “Backpressure”](#backpressure) One of the most important concepts in the Streams API is **backpressure**—the ability for downstream stages to signal upstream stages to slow down when they can’t keep up. This is managed through two mechanisms: #### highWaterMark [Section titled “highWaterMark”](#highwatermark) Each stream stage specifies a `highWaterMark` property, which signals the maximum number of items to queue: ```typescript new TransformStream( { /* transform logic */ }, { highWaterMark: 10 } // Buffer up to 10 items ); ``` #### controller.desiredSize [Section titled “controller.desiredSize”](#controllerdesiredsize) The `controller` object has a `desiredSize` property: ```plaintext desiredSize = highWaterMark - (current queue size) ``` * If `desiredSize > 0` → upstream should send more data * If `desiredSize < 0` → upstream should slow down You can use this to implement backpressure in your transform logic: ```typescript async transform(item, controller) { // Wait if downstream is backed up while (controller.desiredSize !== null && controller.desiredSize < 0) { await new Promise((r) => setTimeout(r, 10)); } // Also check the encoder's internal queue while (encoder.encodeQueueSize >= 20) { await new Promise((r) => setTimeout(r, 10)); } encoder.encode(item.frame); } ``` This ensures that: * You don’t overwhelm the encoder with too many frames * You don’t fill up memory with decoded frames waiting to be encoded * The file reader slows down when downstream stages are busy ## Common Stream Patterns for WebCodecs [Section titled “Common Stream Patterns for WebCodecs”](#common-stream-patterns-for-webcodecs) When working with WebCodecs, we’ll often set up a stream pattern, and so here are the two core patterns that we’ll end up re-using (with modifications): The Decoder transform stream and Encoder transform stream. #### Decoder Stream [Section titled “Decoder Stream”](#decoder-stream) ```typescript class VideoDecoderStream extends TransformStream< EncodedVideoChunk, VideoFrame > { constructor(config: VideoDecoderConfig) { let decoder: VideoDecoder; super({ start(controller) { decoder = new VideoDecoder({ output: (frame) => controller.enqueue(frame), error: (e) => controller.error(e), }); decoder.configure(config); }, async transform(chunk, controller) { // Apply backpressure while (decoder.decodeQueueSize >= 20) { await new Promise((r) => setTimeout(r, 10)); } while (controller.desiredSize !== null && controller.desiredSize < 0) { await new Promise((r) => setTimeout(r, 10)); } decoder.decode(chunk); }, async flush() { await decoder.flush(); if (decoder.state !== 'closed') decoder.close(); }, }, { highWaterMark: 10 }); } } ``` #### Encoder Stream [Section titled “Encoder Stream”](#encoder-stream) ```typescript class VideoEncoderStream extends TransformStream< VideoFrame, { chunk: EncodedVideoChunk; meta: EncodedVideoChunkMetadata } > { constructor(config: VideoEncoderConfig) { let encoder: VideoEncoder; let frameIndex = 0; super({ start(controller) { encoder = new VideoEncoder({ output: (chunk, meta) => controller.enqueue({ chunk, meta }), error: (e) => controller.error(e), }); encoder.configure(config); }, async transform(frame, controller) { // Apply backpressure while (encoder.encodeQueueSize >= 20) { await new Promise((r) => setTimeout(r, 10)); } while (controller.desiredSize !== null && controller.desiredSize < 0) { await new Promise((r) => setTimeout(r, 10)); } // Encode with keyframe every 60 frames encoder.encode(frame, { keyFrame: frameIndex % 60 === 0 }); frameIndex++; frame.close(); }, async flush() { await encoder.flush(); if (encoder.state !== 'closed') encoder.close(); }, }, { highWaterMark: 10 }); } } ``` ## Benefits for WebCodecs [Section titled “Benefits for WebCodecs”](#benefits-for-webcodecs) Using the Streams API for WebCodecs processing gives you: 1. **Automatic memory management** - Backpressure prevents memory overflow 2. **Concurrent processing** - Multiple stages process data simultaneously 3. **Clean code** - Declarative pipeline instead of complex state management 4. **Performance** - Optimal throughput with bounded queues 5. **Large file support** - Stream files chunk-by-chunk instead of loading entirely into memory
# Offscreen Processing
> Main thread vs workers and transferable objects
When doing video processing in the browser, most of the processing should be done in a worker. This may already be obvious to many of you, and if so feel free to go to the [next section](../file-handling) but if not, I’ll provide a quick explanation of workers, offscreen processing for video processing, and why it’s important. ### CPU Cores and Threads [Section titled “CPU Cores and Threads”](#cpu-cores-and-threads) Most devices actually have 4 to 16 CPU processors called *cores*, allowing them to run multiple things in parallel. The operating system has something called a “scheduler” which determines how to spread work across these cores. Work comes in the form of a *thread*, which is the smallest schedulable unit of work. Each application runs as a *process*, with it’s own sandbox of memory, and each process can run multiple threads, all with access to the processes’ sandboxed memory, but which can be run by different CPU cores in parallel. An example would be a server script (like a NodeJS or python script) that could download multiple files in parallel, where the main script is a single process, but which can span multiple threads which run in parallel, often each on a different CPU core. Many browsers (like Chromium browsers) actually run in multiple processes [\[1\]](https://sunandakarunajeewa.medium.com/how-web-browsers-use-processes-and-threads-5ddbea938b1c), with each tab running it’s own process. When a user opens your website in a Chromium browser, their task manager (or equivalent) will show a specific process that was created just for your browsing website. ### Everything is on the main thread by default [Section titled “Everything is on the main thread by default”](#everything-is-on-the-main-thread-by-default) When a user opens a new tab and navigates to your website, the browser allocates a *main thread*, where the UI (HTML / CSS), event handlers, and (unless otherwise specified) all the javascript is run. This means that the browser cannot update the UI at the same time that it is executing Javascript. Modern Browsers use [optimized engines](https://v8.dev/) execute Javascript so quickly that UI delays aren’t noticeable, unless the web-app is doing particularly heavy processing. Video Processing absolutely counts as “particularly heavy processing”, which is why running everything on the main thread (the default) is not ideal. A web-application using WebCodecs, implemented without workers, would in practice have a very laggy UI that would freeze or crash the tab during key moments when reading large files, rendering or encoding. ### Workers and Offscreen Canvas [Section titled “Workers and Offscreen Canvas”](#workers-and-offscreen-canvas) The solution to this problem is to use [WebWorkers](https://developer.mozilla.org/en-US/docs/Web/API/Web_Workers_API/Using_web_workers), which let you run javascript is a separate thread, so that you can run compute intensive processes such as reading large files, running AI models or encoding video without making the UI freeze / unresponsive. The downside of workers is that: * They do not have access to the DOM - e.g. they cannot modify HTML/CSS or directly react to UI event handlers * Many web APIs and interfaces, like `HTMLVideoElement` and [WebAudio](https://developer.mozilla.org/en-US/docs/Web/API/Web_Audio_API), cannot be accessed in a worker thread * Workers do not share the same memory scope as the main thread, so you either define variables in the worker thread, or you can transfer [some types](https://developer.mozilla.org/en-US/docs/Web/API/Web_Workers_API/Transferable_objects) of objects. `OffscreenCanvas` is a special case where you can update what the user visually sees from a worker thread, and this will be the primary way to render video in WebCodecs applications. You would first create a `` element on the main thread, turn it into an [OffscreenCanvas](https://developer.mozilla.org/en-US/docs/Web/API/OffscreenCanvas) using the `transferControlToOffscreen()` method, transfer it to a worker, and then render to the `OffscreenCanvas` in the worker thread. We’ll cover how to do rendering [later](../../basics/rendering). You can see a demo of offscreen rendering, and the difference running rendering in a worker thread makes [here](https://devnook.github.io/OffscreenCanvasDemo/index.html). ### What to do in a worker [Section titled “What to do in a worker”](#what-to-do-in-a-worker) For video processing, there are a few key steps you’d be better off doing inside of a worker: **File Loading**: For a video editing application for example, a user may have source videos that are several GB in size, and you’ll regularly need to read portions of the file (covered in more detail in the [next section](../file-handling)), and even just reading file data from hard disk to memory takes quite a lot of CPU cycles. **Rendering**: If you have a video player, and especially if you are applying visual effects (like filters or transforms in a video editing pipeline), you would be best off having your decoder and rendering pipeline work entirely in an a worker thread. Canvas2d rendering is CPU intensive, and even if working with a fully WebGL or WebGPU pipeline, coordinating the movement of decoded frames to a shader context and coordinating which shaders still requires lots of CPU calls, **Decoding**: Decoding is typically not that compute intensive, but since fetching file data and rendering can be compute intensive, depending on the architecture, it’d probably be a good idea to keep the decoder in the same thread as your file loader or renderer to minimize data transfers. **Encoding**: While decoding is typically not that compute intensive, encoding absolutely is, and can be 100x slower than decoding ### What stays on the main thread [Section titled “What stays on the main thread”](#what-stays-on-the-main-thread) **Audio Playback** Some key things cannot be done in a worker thread. Annoyingly, the [WebAudio](https://developer.mozilla.org/en-US/docs/Web/API/Web_Audio_API) API is not available in worker threads, which is especially annoying because for best practices in [player design](../../patterns/playback), your master timeline should be dictated by audio playback, and what video frame to render should be determined by the main thread, so you’ll almost always be sending some kind of render call from the main thread to a worker during playback. **File loading and downloading** You’ll also need to handle file inputs on the main thread, and we’ll cover best practices for [transferring files](../file-handling), and if you want a user to download an encoded video file as a ‘Blob download’, you’ll need to transfer the blob object from the worker back to a main thread, though you can optionally write directly to the hard disk from a worker if using the [FileSystem API](https://developer.mozilla.org/en-US/docs/Web/API/File_System_API) covered in the next section. ### Architectures [Section titled “Architectures”](#architectures) We’ll cover these in more detail in the Design Patterns section, but for a simple high-level breakdown of how you might architect an app: ##### Transcoding [Section titled “Transcoding”](#transcoding) To transcode a file, you would typically take in a user supplied `File` object or `FileSystemFileHandle`from a user interaction (unless you already have a file object in which case this isn’t necessary). You’d then send that to a worker thread where the demuxing, decoding, any video transformations, encoding and muxing are all done. A very simplified example might look like this:  Where all the muxing, `VideoEncoder`, `VideoDecoder` and everything else is done on the worker thread. We’ll cover actual real-world examples [subsequent sections](../../patterns/transcoding). ##### Playback [Section titled “Playback”](#playback) Building a video player is quite a bit more complex, but here’s the simplest version of how an offscreen / main thread architecture might look.  Where the `OffscreenCanvas` and `File` are sent to the worker thread on initialization, and the `VideoDecoder` and render logic are implemented in the worker thread, while audio info is returned to the main thread, and the audio player (implemented with WebAudio) dictate current time, which is sent to the worker thread on every render cycle to render the next frame at current time. We’ll cover actual real-world examples in [subsequent sections](../../patterns/playback), but just keep in mind that much of your code should run in a worker, and especially since the Player UI and WebAudio need to run on the main thread, you will need quite a bit of main thread <> worker communication.
# The upscaler.video Codec Support Dataset
> The world's first empirical registry of WebCodecs hardware support, collected from 224,360 real-world user sessions
The **upscaler.video Codec Support Dataset** is the first comprehensive, empirical collection of real-world WebCodecs API support data. Unlike synthetic benchmarks or browser-reported capabilities, this dataset represents actual compatibility testing across 224,360 unique user sessions spanning diverse hardware, browsers, and operating systems. The dataset includes both **encoder support** (using `VideoEncoder.isConfigSupported()`) and **decoder support** (using `VideoDecoder.isConfigSupported()`), with encoder data collected from all sessions and decoder data collected starting January 14th 2026. ## Dataset Overview [Section titled “Dataset Overview”](#dataset-overview) * **Measurement Types:** * Encoder support (using `VideoEncoder.isConfigSupported()`) - all sessions * Decoder support (using `VideoDecoder.isConfigSupported()`) - sessions from Jan, 14th 2026 onwards * **Total Tests:** 71,334,706 individual codec compatibility checks * **Test Sessions:** 224,360 unique user sessions * **Codec Strings:** 1,087 unique codec variations tested * **Last Updated:** January 2026 * **Collection Period:** January 2026 (ongoing) * **License:** CC-BY 4.0 ## Download [Section titled “Download”](#download) **[Download upscaler.video Codec Support Dataset (ZIP)](/upscaler-video-codec-dataset.zip)** The ZIP archive contains: * `upscaler-video-codec-dataset-raw.csv` - The complete dataset (71.3M rows) * `README.txt` - Quick reference guide for the dataset structure ### Dataset Format [Section titled “Dataset Format”](#dataset-format) The dataset contains **71,334,706 rows** - one row per individual codec string test. Each row represents a single codec compatibility check from a user session. | Column | Type | Description | | ------------------- | ------------- | ---------------------------------------------------------------------------------- | | `timestamp` | ISO 8601 | When the test was performed (e.g., “2026-01-05T00:54:11.570Z”) | | `user_agent` | string | Full browser user agent string | | `browser` | string | Browser family detected from user agent (Chrome, Safari, Edge, Firefox) | | `platform_raw` | string | Raw platform identifier from `navigator.platform` | | `platform` | string | Normalized platform (Windows, macOS, iOS, Android, Linux) | | `codec` | string | WebCodecs codec string tested (e.g., “av01.0.01M.08”) | | `encoder_supported` | boolean | Whether VideoEncoder supports this codec (`true` or `false`) | | `decoder_supported` | boolean/empty | Whether VideoDecoder supports this codec (`true`, `false`, or empty if not tested) | **Note:** The `decoder_supported` field is empty for sessions collected before January 14th 2026. All rows have `encoder_supported` data. ### Sample Data [Section titled “Sample Data”](#sample-data) ```csv timestamp,user_agent,browser,platform_raw,platform,codec,encoder_supported,decoder_supported 2026-01-05T00:54:11.570Z,"Mozilla/5.0 (Windows NT 10.0; Win64; x64) AppleWebKit/537.36",Edge,Win32,Windows,av01.0.01M.08,true, 2026-01-16T23:58:08.560Z,"Mozilla/5.0 (Windows NT 10.0; Win64; x64) AppleWebKit/537.36",Chrome,Win32,Windows,avc1.420833,true,true 2026-01-16T23:58:08.560Z,"Mozilla/5.0 (Windows NT 10.0; Win64; x64) AppleWebKit/537.36",Chrome,Win32,Windows,avc1.64040c,false,true ``` In the third row, you can see a codec that is **not** supported for encoding but **is** supported for decoding - this asymmetry is why separate measurements are important. ### Dataset Size [Section titled “Dataset Size”](#dataset-size) * **Rows:** 71,334,706 individual codec tests * **File Size:** 12.52 GB (uncompressed CSV) * **Compressed (ZIP):** 404.7 MB ## Data Collection Methodology [Section titled “Data Collection Methodology”](#data-collection-methodology) This dataset was collected in a completely anonymized fashion from real users of [free.upscaler.video](https://free.upscaler.video), an [open-source utility](https://github.com/sb2702/free-ai-video-upscaler) to upscale videos in the browser, serving \~200,000 monthly active users. > **For complete methodology details**, including sampling strategy, statistical controls, and browser detection logic, see **[Dataset Methodology](https://free.upscaler.video/research/methodology/)** on free.upscaler.video. ### Key Attributes [Section titled “Key Attributes”](#key-attributes) * **Real Hardware:** Data from actual user devices, not emulators or lab environments * **Background Testing:** Codec checks run asynchronously without user interaction * **Privacy-Preserving:** No PII collected; only anonymous browser/platform metadata * **Randomized Sampling:** Each session tests 300 random codecs from the 1,087-string pool ### Browser & Platform Distribution [Section titled “Browser & Platform Distribution”](#browser--platform-distribution) **Browsers Tested:** * Chrome/Chromium (74% of sessions) * Safari (13%) * Edge (8%) * Firefox (5%) **Platforms Tested:** * Windows (57%) * Android (19%) * macOS (11%) * iOS (10%) * Linux (3%) **Codec Families:** * AVC (H.264) - 200+ variants * HEVC (H.265) - 150+ variants * VP9 - 100+ variants * AV1 - 200+ variants * VP8 - 10+ variants * Audio codecs - 400+ variants (AAC, Opus, MP3, FLAC, etc.) ## Using This Dataset [Section titled “Using This Dataset”](#using-this-dataset) ### For Web Developers [Section titled “For Web Developers”](#for-web-developers) This dataset answers the critical question: **“Which codec strings actually work in production?”** The [Codec Registry](/datasets/codec-support-table/) provides an interactive table of all 1,087 tested codecs with real-world support percentages. Use it to: * **Choose safe defaults:** Codecs with 90%+ support work on virtually all hardware * **Plan fallback strategies:** Identify which modern codecs (AV1, VP9) need H.264 fallbacks * **Debug platform-specific issues:** See exact support matrices for browser/OS combinations ### For Browser Vendors & Standards Bodies [Section titled “For Browser Vendors & Standards Bodies”](#for-browser-vendors--standards-bodies) This is the first large-scale empirical validation of WebCodecs API implementation consistency across browsers and platforms. **Use cases:** * Identify implementation gaps (e.g., Safari’s limited AV1 support) * Prioritize codec support roadmaps based on real hardware distribution * Validate conformance testing against actual user environments ### For Researchers [Section titled “For Researchers”](#for-researchers) The dataset is structured for statistical analysis: ```python import pandas as pd # Load the raw dataset df = pd.read_csv('upscaler-video-codec-dataset-raw.csv') # Example 1: Calculate encoder support percentage by codec encoder_support = df.groupby('codec').agg({ 'encoder_supported': lambda x: (x == 'true').sum(), 'codec': 'count' }).rename(columns={'codec': 'total'}) encoder_support['percentage'] = (encoder_support['encoder_supported'] / encoder_support['total'] * 100).round(2) # Example 1b: Calculate decoder support percentage (excluding empty values) df_with_decoder = df[df['decoder_supported'] != ''] decoder_support = df_with_decoder.groupby('codec').agg({ 'decoder_supported': lambda x: (x == 'true').sum(), 'codec': 'count' }).rename(columns={'codec': 'total'}) decoder_support['percentage'] = (decoder_support['decoder_supported'] / decoder_support['total'] * 100).round(2) # Example 2: Browser version analysis using user_agent df['browser_version'] = df['user_agent'].str.extract(r'Chrome/(\d+\.\d+)') # Example 3: Filter for specific platform windows_tests = df[df['platform'] == 'Windows'] # Example 4: Time-series analysis of encoder support df['timestamp'] = pd.to_datetime(df['timestamp']) daily_encoder_support = df.groupby(df['timestamp'].dt.date)['encoder_supported'].apply( lambda x: (x == 'true').mean() * 100 ) # Example 5: Compare encoder vs decoder support for same codec codec_comparison = df[df['decoder_supported'] != ''].groupby('codec').agg({ 'encoder_supported': lambda x: (x == 'true').mean() * 100, 'decoder_supported': lambda x: (x == 'true').mean() * 100 }) codec_comparison['decode_encode_gap'] = codec_comparison['decoder_supported'] - codec_comparison['encoder_supported'] ``` **Key Analysis Opportunities:** * Browser version-specific codec support trends * Temporal evolution of codec adoption * Platform-specific hardware decoder availability * User agent string parsing for detailed device identification ## Data Quality [Section titled “Data Quality”](#data-quality) ### Statistical Confidence [Section titled “Statistical Confidence”](#statistical-confidence) * **224,360 sessions** provide high confidence for common browser/platform combinations * **71+ million tests** enable fine-grained analysis of codec variant support * Sample sizes vary by combination; check `total_count` field for statistical validity ### Known Limitations [Section titled “Known Limitations”](#known-limitations) 1. **Geographic Bias:** Data collected from free.upscaler.video users (global distribution) 2. **Binary Support:** Tests `isConfigSupported()` only; does not measure actual encode/decode performance or quality 3. **Time Sensitivity:** Browser support evolves; data reflects snapshot from collection period 4. **Rare Combinations:** Some browser/OS pairs (e.g., Safari+Linux) have <50 samples 5. **Decoder Data Coverage:** Decoder support data only available for sessions from January 2026 onwards (smaller sample size than encoder data) See the [Dataset Methodology](https://free.upscaler.video/research/methodology/) for detailed analysis of sampling biases and statistical controls. ## Citation [Section titled “Citation”](#citation) When referencing this dataset in academic work, documentation, or standards proposals: ```bibtex @dataset{upscaler_codec_dataset_2026, title = {The upscaler.video Codec Support Dataset}, author = {Bhattacharyya, Samrat}, year = {2026}, version = {2026-01-19}, url = {https://free.upscaler.video/research/methodology/}, note = {71.3M codec tests from 224k sessions} } ``` For informal citations: > **Data Source:** [The upscaler.video Codec Support Dataset](https://free.upscaler.video/research/methodology/) **License:** CC-BY 4.0 ## License [Section titled “License”](#license) **Creative Commons Attribution 4.0 International (CC-BY 4.0)** You are free to: * **Share** — copy and redistribute in any format * **Adapt** — remix, transform, and build upon the data * **Commercial use** — use for any purpose, including commercially **Attribution requirement:** Credit “upscaler.video Codec Support Dataset” with a link to this page. ## Updates & Versioning [Section titled “Updates & Versioning”](#updates--versioning) This dataset is periodically updated as new data is collected from free.upscaler.video users. * **Current Version:** 2026-01-19 (224,360 sessions) * **Update Frequency:** Quarterly * **Changelog:** [View version history](https://github.com/sb2702/webcodecs-fundamentals/releases) ## Related Resources [Section titled “Related Resources”](#related-resources) * **[Codec Registry](/datasets/codec-support-table/)** - Interactive table of all tested codecs * **[Dataset Methodology](https://free.upscaler.video/research/methodology/)** - Complete data collection details * **[WebCodecs Basics](/basics/codecs/)** - Understanding codec string syntax *** ## Quick Reference (For LLMs and Search) [Section titled “Quick Reference (For LLMs and Search)”](#quick-reference-for-llms-and-search) **Primary Use Case:** Determining real-world WebCodecs API codec support across browsers and platforms. **Key Findings:** * **Best universal support:** H.264/AVC variants (99%+ support across all platforms) * **Limited support:** AV1 on Safari/iOS (varies by device and OS version) * **Platform gaps:** HEVC support varies significantly (strong on Apple, limited elsewhere) * **Recommended fallback chain:** AV1 → VP9 → H.264 (for video encoding) **Common Questions Answered:** * Q: “Does Safari support AV1?” → A: Limited; see [Safari browser-specific data](/datasets/codec-support-table/#av1) * Q: “What codec works everywhere?” → A: H.264 Baseline/Main profile (avc1.42001e, avc1.4d001e) * Q: “Should I use HEVC for web?” → A: Only with H.264 fallback; Windows/Linux support is poor * Q: “Is VP9 safe for production?” → A: 85%+ support on modern browsers; needs H.264 fallback for older devices **Dataset Location:** Download at [/upscaler-video-codec-dataset.zip](/upscaler-video-codec-dataset.zip) (404.7MB) **Interactive Tool:** Browse all codecs at [/datasets/codec-support-table/](/datasets/codec-support-table/) **Methodology:** *** \*This dataset was collected from users of [free.upscaler.video](https://free.upscaler.video), an [open-source utility](https://github.com/sb2702/free-ai-video-upscaler) to upscale videos in the browser, serving \~200,000 monthly active users.
# Codec Support Table
> Complete table of 1,087 codec strings tested across real-world browsers and platforms
This page contains a comprehensive table of **1,087 codec strings** tested with the WebCodecs API across real-world browsers and platforms. > **About this dataset:** This data comes from 224,360 real user sessions with a total of 71,334,708 individual codec string tests. See the [Codec Support Dataset](/datasets/codec-support/) page for methodology, download links, and usage information. ## Codec Families [Section titled “Codec Families”](#codec-families) **Video Codecs:** * [AVC (H.264)](#avc-h264) - 342 variants * [HEVC (H.265)](#hevc-h265) - 84 variants * [VP8](#vp8) - 1 variants * [VP9](#vp9) - 210 variants * [AV1](#av1) - 432 variants **Audio Codecs:** * [Audio Codecs](#audio) - 18 formats *** ## AVC (H.264) [Section titled “AVC (H.264)”](#avc-h264) | Codec String | Encoder Support | Decoder Support | Details | | ------------- | --------------- | --------------- | ---------------------------------------- | | All variants | 63.44% | 97.63% | [View Family Support](/codecs/avc.html) | | `avc1.420020` | 99.67% | 99.95% | [View Details](/codecs/avc1.420020.html) | | `avc1.420029` | 99.63% | 99.93% | [View Details](/codecs/avc1.420029.html) | | `avc1.420034` | 99.63% | 99.93% | [View Details](/codecs/avc1.420034.html) | | `avc1.421032` | 99.63% | 99.95% | [View Details](/codecs/avc1.421032.html) | | `avc1.420016` | 99.62% | 99.96% | [View Details](/codecs/avc1.420016.html) | | `avc1.42001f` | 99.62% | 99.97% | [View Details](/codecs/avc1.42001f.html) | | `avc1.42101e` | 99.62% | 99.93% | [View Details](/codecs/avc1.42101e.html) | | `avc1.421029` | 99.62% | 99.97% | [View Details](/codecs/avc1.421029.html) | | `avc1.42102a` | 99.62% | 99.97% | [View Details](/codecs/avc1.42102a.html) | | `avc1.421034` | 99.62% | 99.92% | [View Details](/codecs/avc1.421034.html) | | `avc1.421028` | 99.61% | 99.89% | [View Details](/codecs/avc1.421028.html) | | `avc1.42001e` | 99.6% | 99.91% | [View Details](/codecs/avc1.42001e.html) | | `avc1.42101f` | 99.6% | 99.92% | [View Details](/codecs/avc1.42101f.html) | | `avc1.421033` | 99.6% | 99.93% | [View Details](/codecs/avc1.421033.html) | | `avc1.420028` | 99.59% | 99.95% | [View Details](/codecs/avc1.420028.html) | | `avc1.42002a` | 99.59% | 99.94% | [View Details](/codecs/avc1.42002a.html) | | `avc1.420033` | 99.59% | 99.93% | [View Details](/codecs/avc1.420033.html) | | `avc1.421016` | 99.59% | 99.94% | [View Details](/codecs/avc1.421016.html) | | `avc1.421020` | 99.59% | 99.92% | [View Details](/codecs/avc1.421020.html) | | `avc1.420032` | 99.56% | 99.93% | [View Details](/codecs/avc1.420032.html) | | `avc1.4d1020` | 98.92% | 99.95% | [View Details](/codecs/avc1.4d1020.html) | | `avc1.4d0034` | 98.9% | 99.93% | [View Details](/codecs/avc1.4d0034.html) | | `avc1.4d0020` | 98.89% | 99.92% | [View Details](/codecs/avc1.4d0020.html) | | `avc1.4d1032` | 98.89% | 99.96% | [View Details](/codecs/avc1.4d1032.html) | | `avc1.4d002a` | 98.88% | 99.96% | [View Details](/codecs/avc1.4d002a.html) | | `avc1.4d1016` | 98.88% | 99.91% | [View Details](/codecs/avc1.4d1016.html) | | `avc1.4d1029` | 98.88% | 99.93% | [View Details](/codecs/avc1.4d1029.html) | | `avc1.4d1034` | 98.88% | 99.94% | [View Details](/codecs/avc1.4d1034.html) | | `avc1.4d0016` | 98.87% | 99.96% | [View Details](/codecs/avc1.4d0016.html) | | `avc1.4d0029` | 98.87% | 99.91% | [View Details](/codecs/avc1.4d0029.html) | | `avc1.4d0032` | 98.87% | 99.94% | [View Details](/codecs/avc1.4d0032.html) | | `avc1.4d1033` | 98.87% | 99.94% | [View Details](/codecs/avc1.4d1033.html) | | `avc1.4d001e` | 98.86% | 99.97% | [View Details](/codecs/avc1.4d001e.html) | | `avc1.4d101f` | 98.86% | 99.97% | [View Details](/codecs/avc1.4d101f.html) | | `avc1.4d102a` | 98.86% | 99.94% | [View Details](/codecs/avc1.4d102a.html) | | `avc1.4d001f` | 98.85% | 99.93% | [View Details](/codecs/avc1.4d001f.html) | | `avc1.4d101e` | 98.83% | 99.92% | [View Details](/codecs/avc1.4d101e.html) | | `avc1.4d1028` | 98.82% | 99.92% | [View Details](/codecs/avc1.4d1028.html) | | `avc1.4d0028` | 98.81% | 99.92% | [View Details](/codecs/avc1.4d0028.html) | | `avc1.4d0033` | 98.8% | 99.89% | [View Details](/codecs/avc1.4d0033.html) | | `avc1.640c2a` | 98.66% | 99.92% | [View Details](/codecs/avc1.640c2a.html) | | `avc1.64001e` | 98.65% | 99.93% | [View Details](/codecs/avc1.64001e.html) | | `avc1.640c34` | 98.65% | 99.98% | [View Details](/codecs/avc1.640c34.html) | | `avc1.640c32` | 98.64% | 99.94% | [View Details](/codecs/avc1.640c32.html) | | `avc1.640c33` | 98.64% | 99.94% | [View Details](/codecs/avc1.640c33.html) | | `avc1.640029` | 98.63% | 99.95% | [View Details](/codecs/avc1.640029.html) | | `avc1.640028` | 98.62% | 99.94% | [View Details](/codecs/avc1.640028.html) | | `avc1.640c16` | 98.62% | 99.94% | [View Details](/codecs/avc1.640c16.html) | | `avc1.640c1f` | 98.62% | 99.93% | [View Details](/codecs/avc1.640c1f.html) | | `avc1.640c29` | 98.62% | 99.93% | [View Details](/codecs/avc1.640c29.html) | | `avc1.640016` | 98.6% | 99.95% | [View Details](/codecs/avc1.640016.html) | | `avc1.640033` | 98.6% | 99.97% | [View Details](/codecs/avc1.640033.html) | | `avc1.640c1e` | 98.6% | 99.92% | [View Details](/codecs/avc1.640c1e.html) | | `avc1.640c28` | 98.6% | 99.9% | [View Details](/codecs/avc1.640c28.html) | | `avc1.64002a` | 98.59% | 99.95% | [View Details](/codecs/avc1.64002a.html) | | `avc1.640034` | 98.59% | 99.93% | [View Details](/codecs/avc1.640034.html) | | `avc1.64001f` | 98.58% | 99.92% | [View Details](/codecs/avc1.64001f.html) | | `avc1.640032` | 98.58% | 99.93% | [View Details](/codecs/avc1.640032.html) | | `avc1.640020` | 98.57% | 99.92% | [View Details](/codecs/avc1.640020.html) | | `avc1.640c20` | 98.57% | 99.91% | [View Details](/codecs/avc1.640c20.html) | | `avc1.42041e` | 85.6% | 99.97% | [View Details](/codecs/avc1.42041e.html) | | `avc1.42103e` | 85.58% | 85.55% | [View Details](/codecs/avc1.42103e.html) | | `avc1.421416` | 85.55% | 99.96% | [View Details](/codecs/avc1.421416.html) | | `avc1.420416` | 85.54% | 99.93% | [View Details](/codecs/avc1.420416.html) | | `avc1.42043c` | 85.52% | 85.47% | [View Details](/codecs/avc1.42043c.html) | | `avc1.420c1f` | 85.52% | 99.92% | [View Details](/codecs/avc1.420c1f.html) | | `avc1.42142a` | 85.52% | 99.94% | [View Details](/codecs/avc1.42142a.html) | | `avc1.420820` | 85.51% | 99.93% | [View Details](/codecs/avc1.420820.html) | | `avc1.420834` | 85.51% | 99.93% | [View Details](/codecs/avc1.420834.html) | | `avc1.420c16` | 85.51% | 99.93% | [View Details](/codecs/avc1.420c16.html) | | `avc1.42143c` | 85.5% | 85.88% | [View Details](/codecs/avc1.42143c.html) | | `avc1.42103c` | 85.48% | 85.66% | [View Details](/codecs/avc1.42103c.html) | | `avc1.420420` | 85.47% | 99.93% | [View Details](/codecs/avc1.420420.html) | | `avc1.420c34` | 85.47% | 99.94% | [View Details](/codecs/avc1.420c34.html) | | `avc1.42141f` | 85.47% | 99.92% | [View Details](/codecs/avc1.42141f.html) | | `avc1.42042a` | 85.46% | 99.9% | [View Details](/codecs/avc1.42042a.html) | | `avc1.42143e` | 85.46% | 85.33% | [View Details](/codecs/avc1.42143e.html) | | `avc1.42082a` | 85.45% | 99.94% | [View Details](/codecs/avc1.42082a.html) | | `avc1.420833` | 85.45% | 99.93% | [View Details](/codecs/avc1.420833.html) | | `avc1.420432` | 85.44% | 99.95% | [View Details](/codecs/avc1.420432.html) | | `avc1.42043d` | 85.44% | 85.82% | [View Details](/codecs/avc1.42043d.html) | | `avc1.420832` | 85.44% | 99.94% | [View Details](/codecs/avc1.420832.html) | | `avc1.42081e` | 85.43% | 99.94% | [View Details](/codecs/avc1.42081e.html) | | `avc1.420c28` | 85.43% | 99.89% | [View Details](/codecs/avc1.420c28.html) | | `avc1.42003d` | 85.41% | 85.25% | [View Details](/codecs/avc1.42003d.html) | | `avc1.420c32` | 85.41% | 99.95% | [View Details](/codecs/avc1.420c32.html) | | `avc1.421420` | 85.41% | 99.95% | [View Details](/codecs/avc1.421420.html) | | `avc1.421433` | 85.41% | 99.98% | [View Details](/codecs/avc1.421433.html) | | `avc1.420c3d` | 85.4% | 85.36% | [View Details](/codecs/avc1.420c3d.html) | | `avc1.421429` | 85.4% | 99.96% | [View Details](/codecs/avc1.421429.html) | | `avc1.42083e` | 85.38% | 85.35% | [View Details](/codecs/avc1.42083e.html) | | `avc1.421432` | 85.38% | 99.91% | [View Details](/codecs/avc1.421432.html) | | `avc1.420428` | 85.37% | 99.96% | [View Details](/codecs/avc1.420428.html) | | `avc1.42003e` | 85.35% | 85.71% | [View Details](/codecs/avc1.42003e.html) | | `avc1.42043e` | 85.34% | 85.35% | [View Details](/codecs/avc1.42043e.html) | | `avc1.420c2a` | 85.33% | 99.93% | [View Details](/codecs/avc1.420c2a.html) | | `avc1.420c3e` | 85.3% | 85.64% | [View Details](/codecs/avc1.420c3e.html) | | `avc1.420434` | 85.29% | 99.93% | [View Details](/codecs/avc1.420434.html) | | `avc1.420c33` | 85.29% | 99.97% | [View Details](/codecs/avc1.420c33.html) | | `avc1.42003c` | 85.28% | 85.58% | [View Details](/codecs/avc1.42003c.html) | | `avc1.42041f` | 85.28% | 99.95% | [View Details](/codecs/avc1.42041f.html) | | `avc1.420828` | 85.28% | 99.94% | [View Details](/codecs/avc1.420828.html) | | `avc1.42103d` | 85.28% | 85.32% | [View Details](/codecs/avc1.42103d.html) | | `avc1.420433` | 85.26% | 99.88% | [View Details](/codecs/avc1.420433.html) | | `avc1.420829` | 85.25% | 99.94% | [View Details](/codecs/avc1.420829.html) | | `avc1.420429` | 85.24% | 99.96% | [View Details](/codecs/avc1.420429.html) | | `avc1.42141e` | 85.24% | 99.94% | [View Details](/codecs/avc1.42141e.html) | | `avc1.42083d` | 85.23% | 84.99% | [View Details](/codecs/avc1.42083d.html) | | `avc1.42081f` | 85.22% | 99.92% | [View Details](/codecs/avc1.42081f.html) | | `avc1.42083c` | 85.22% | 85.55% | [View Details](/codecs/avc1.42083c.html) | | `avc1.421428` | 85.22% | 99.91% | [View Details](/codecs/avc1.421428.html) | | `avc1.420816` | 85.2% | 99.92% | [View Details](/codecs/avc1.420816.html) | | `avc1.421434` | 85.2% | 99.95% | [View Details](/codecs/avc1.421434.html) | | `avc1.42143d` | 85.19% | 85.06% | [View Details](/codecs/avc1.42143d.html) | | `avc1.420c1e` | 85.18% | 99.94% | [View Details](/codecs/avc1.420c1e.html) | | `avc1.420c3c` | 85.18% | 85.2% | [View Details](/codecs/avc1.420c3c.html) | | `avc1.420c29` | 85.16% | 99.93% | [View Details](/codecs/avc1.420c29.html) | | `avc1.420c20` | 85.13% | 99.96% | [View Details](/codecs/avc1.420c20.html) | | `avc1.4d1432` | 84.9% | 99.92% | [View Details](/codecs/avc1.4d1432.html) | | `avc1.4d143e` | 84.86% | 85.6% | [View Details](/codecs/avc1.4d143e.html) | | `avc1.4d0420` | 84.85% | 99.96% | [View Details](/codecs/avc1.4d0420.html) | | `avc1.4d0c28` | 84.85% | 99.95% | [View Details](/codecs/avc1.4d0c28.html) | | `avc1.4d141f` | 84.83% | 99.97% | [View Details](/codecs/avc1.4d141f.html) | | `avc1.4d0820` | 84.81% | 99.93% | [View Details](/codecs/avc1.4d0820.html) | | `avc1.4d003c` | 84.8% | 85.35% | [View Details](/codecs/avc1.4d003c.html) | | `avc1.4d0829` | 84.79% | 99.92% | [View Details](/codecs/avc1.4d0829.html) | | `avc1.4d142a` | 84.75% | 99.9% | [View Details](/codecs/avc1.4d142a.html) | | `avc1.4d041f` | 84.74% | 99.95% | [View Details](/codecs/avc1.4d041f.html) | | `avc1.4d103d` | 84.74% | 85.39% | [View Details](/codecs/avc1.4d103d.html) | | `avc1.4d1433` | 84.74% | 99.94% | [View Details](/codecs/avc1.4d1433.html) | | `avc1.4d1434` | 84.74% | 99.92% | [View Details](/codecs/avc1.4d1434.html) | | `avc1.4d0c1e` | 84.73% | 99.96% | [View Details](/codecs/avc1.4d0c1e.html) | | `avc1.4d041e` | 84.72% | 99.95% | [View Details](/codecs/avc1.4d041e.html) | | `avc1.4d082a` | 84.72% | 99.92% | [View Details](/codecs/avc1.4d082a.html) | | `avc1.4d0433` | 84.71% | 99.91% | [View Details](/codecs/avc1.4d0433.html) | | `avc1.4d0834` | 84.71% | 99.96% | [View Details](/codecs/avc1.4d0834.html) | | `avc1.4d0c34` | 84.71% | 99.92% | [View Details](/codecs/avc1.4d0c34.html) | | `avc1.4d1429` | 84.71% | 99.97% | [View Details](/codecs/avc1.4d1429.html) | | `avc1.4d003d` | 84.7% | 85.6% | [View Details](/codecs/avc1.4d003d.html) | | `avc1.4d0432` | 84.7% | 99.96% | [View Details](/codecs/avc1.4d0432.html) | | `avc1.4d0c20` | 84.7% | 99.92% | [View Details](/codecs/avc1.4d0c20.html) | | `avc1.4d103c` | 84.7% | 85.34% | [View Details](/codecs/avc1.4d103c.html) | | `avc1.4d0c3e` | 84.69% | 84.74% | [View Details](/codecs/avc1.4d0c3e.html) | | `avc1.4d083e` | 84.67% | 85.64% | [View Details](/codecs/avc1.4d083e.html) | | `avc1.64041e` | 84.67% | 99.97% | [View Details](/codecs/avc1.64041e.html) | | `avc1.4d0434` | 84.66% | 99.93% | [View Details](/codecs/avc1.4d0434.html) | | `avc1.4d0816` | 84.66% | 99.95% | [View Details](/codecs/avc1.4d0816.html) | | `avc1.4d1420` | 84.66% | 99.93% | [View Details](/codecs/avc1.4d1420.html) | | `avc1.4d143c` | 84.66% | 85.43% | [View Details](/codecs/avc1.4d143c.html) | | `avc1.4d103e` | 84.65% | 85.0% | [View Details](/codecs/avc1.4d103e.html) | | `avc1.4d0429` | 84.64% | 99.94% | [View Details](/codecs/avc1.4d0429.html) | | `avc1.4d0832` | 84.64% | 99.91% | [View Details](/codecs/avc1.4d0832.html) | | `avc1.4d0c1f` | 84.63% | 99.92% | [View Details](/codecs/avc1.4d0c1f.html) | | `avc1.4d0828` | 84.59% | 99.93% | [View Details](/codecs/avc1.4d0828.html) | | `avc1.4d042a` | 84.58% | 99.92% | [View Details](/codecs/avc1.4d042a.html) | | `avc1.4d043c` | 84.58% | 85.37% | [View Details](/codecs/avc1.4d043c.html) | | `avc1.64102a` | 84.58% | 99.91% | [View Details](/codecs/avc1.64102a.html) | | `avc1.4d0416` | 84.57% | 99.92% | [View Details](/codecs/avc1.4d0416.html) | | `avc1.4d081e` | 84.56% | 99.93% | [View Details](/codecs/avc1.4d081e.html) | | `avc1.4d081f` | 84.56% | 99.97% | [View Details](/codecs/avc1.4d081f.html) | | `avc1.4d083d` | 84.56% | 85.46% | [View Details](/codecs/avc1.4d083d.html) | | `avc1.64003d` | 84.56% | 85.41% | [View Details](/codecs/avc1.64003d.html) | | `avc1.64081f` | 84.56% | 99.95% | [View Details](/codecs/avc1.64081f.html) | | `avc1.4d0428` | 84.55% | 99.92% | [View Details](/codecs/avc1.4d0428.html) | | `avc1.4d043d` | 84.55% | 85.44% | [View Details](/codecs/avc1.4d043d.html) | | `avc1.4d0c16` | 84.55% | 99.93% | [View Details](/codecs/avc1.4d0c16.html) | | `avc1.64082a` | 84.55% | 99.91% | [View Details](/codecs/avc1.64082a.html) | | `avc1.640829` | 84.54% | 99.92% | [View Details](/codecs/avc1.640829.html) | | `avc1.4d0c2a` | 84.53% | 99.87% | [View Details](/codecs/avc1.4d0c2a.html) | | `avc1.4d0c32` | 84.53% | 99.9% | [View Details](/codecs/avc1.4d0c32.html) | | `avc1.64041f` | 84.53% | 99.93% | [View Details](/codecs/avc1.64041f.html) | | `avc1.4d003e` | 84.52% | 84.61% | [View Details](/codecs/avc1.4d003e.html) | | `avc1.4d043e` | 84.52% | 85.11% | [View Details](/codecs/avc1.4d043e.html) | | `avc1.4d083c` | 84.52% | 85.38% | [View Details](/codecs/avc1.4d083c.html) | | `avc1.641033` | 84.52% | 99.94% | [View Details](/codecs/avc1.641033.html) | | `avc1.64141f` | 84.52% | 99.93% | [View Details](/codecs/avc1.64141f.html) | | `avc1.4d143d` | 84.51% | 84.92% | [View Details](/codecs/avc1.4d143d.html) | | `avc1.64103c` | 84.51% | 85.6% | [View Details](/codecs/avc1.64103c.html) | | `avc1.4d0833` | 84.5% | 99.93% | [View Details](/codecs/avc1.4d0833.html) | | `avc1.4d1428` | 84.5% | 99.94% | [View Details](/codecs/avc1.4d1428.html) | | `avc1.4d0c33` | 84.49% | 99.93% | [View Details](/codecs/avc1.4d0c33.html) | | `avc1.4d1416` | 84.49% | 99.94% | [View Details](/codecs/avc1.4d1416.html) | | `avc1.64141e` | 84.49% | 99.95% | [View Details](/codecs/avc1.64141e.html) | | `avc1.641433` | 84.49% | 99.94% | [View Details](/codecs/avc1.641433.html) | | `avc1.4d0c3c` | 84.48% | 84.84% | [View Details](/codecs/avc1.4d0c3c.html) | | `avc1.64003e` | 84.48% | 85.44% | [View Details](/codecs/avc1.64003e.html) | | `avc1.640433` | 84.48% | 99.95% | [View Details](/codecs/avc1.640433.html) | | `avc1.640833` | 84.48% | 99.9% | [View Details](/codecs/avc1.640833.html) | | `avc1.641016` | 84.48% | 99.93% | [View Details](/codecs/avc1.641016.html) | | `avc1.641420` | 84.47% | 99.94% | [View Details](/codecs/avc1.641420.html) | | `avc1.4d0c29` | 84.46% | 99.92% | [View Details](/codecs/avc1.4d0c29.html) | | `avc1.641029` | 84.46% | 99.95% | [View Details](/codecs/avc1.641029.html) | | `avc1.641432` | 84.46% | 99.97% | [View Details](/codecs/avc1.641432.html) | | `avc1.640834` | 84.45% | 99.97% | [View Details](/codecs/avc1.640834.html) | | `avc1.4d0c3d` | 84.44% | 85.11% | [View Details](/codecs/avc1.4d0c3d.html) | | `avc1.4d141e` | 84.44% | 99.94% | [View Details](/codecs/avc1.4d141e.html) | | `avc1.640428` | 84.44% | 99.92% | [View Details](/codecs/avc1.640428.html) | | `avc1.640c3c` | 84.44% | 85.3% | [View Details](/codecs/avc1.640c3c.html) | | `avc1.640832` | 84.43% | 99.94% | [View Details](/codecs/avc1.640832.html) | | `avc1.64143c` | 84.43% | 85.08% | [View Details](/codecs/avc1.64143c.html) | | `avc1.64083d` | 84.42% | 85.32% | [View Details](/codecs/avc1.64083d.html) | | `avc1.640c3e` | 84.42% | 85.07% | [View Details](/codecs/avc1.640c3e.html) | | `avc1.64083e` | 84.41% | 85.28% | [View Details](/codecs/avc1.64083e.html) | | `avc1.640820` | 84.4% | 99.97% | [View Details](/codecs/avc1.640820.html) | | `avc1.640828` | 84.4% | 99.92% | [View Details](/codecs/avc1.640828.html) | | `avc1.641034` | 84.4% | 99.97% | [View Details](/codecs/avc1.641034.html) | | `avc1.641434` | 84.4% | 99.93% | [View Details](/codecs/avc1.641434.html) | | `avc1.64081e` | 84.39% | 99.91% | [View Details](/codecs/avc1.64081e.html) | | `avc1.64142a` | 84.38% | 99.95% | [View Details](/codecs/avc1.64142a.html) | | `avc1.64101f` | 84.36% | 99.93% | [View Details](/codecs/avc1.64101f.html) | | `avc1.64103d` | 84.36% | 85.42% | [View Details](/codecs/avc1.64103d.html) | | `avc1.641028` | 84.33% | 99.91% | [View Details](/codecs/avc1.641028.html) | | `avc1.641416` | 84.33% | 99.94% | [View Details](/codecs/avc1.641416.html) | | `avc1.641428` | 84.33% | 99.95% | [View Details](/codecs/avc1.641428.html) | | `avc1.64043e` | 84.32% | 85.83% | [View Details](/codecs/avc1.64043e.html) | | `avc1.641429` | 84.32% | 99.93% | [View Details](/codecs/avc1.641429.html) | | `avc1.64042a` | 84.31% | 99.98% | [View Details](/codecs/avc1.64042a.html) | | `avc1.64083c` | 84.31% | 84.91% | [View Details](/codecs/avc1.64083c.html) | | `avc1.640816` | 84.3% | 99.93% | [View Details](/codecs/avc1.640816.html) | | `avc1.640c3d` | 84.3% | 85.4% | [View Details](/codecs/avc1.640c3d.html) | | `avc1.64103e` | 84.3% | 85.44% | [View Details](/codecs/avc1.64103e.html) | | `avc1.64003c` | 84.28% | 85.0% | [View Details](/codecs/avc1.64003c.html) | | `avc1.641020` | 84.28% | 99.92% | [View Details](/codecs/avc1.641020.html) | | `avc1.64143d` | 84.28% | 85.25% | [View Details](/codecs/avc1.64143d.html) | | `avc1.640429` | 84.27% | 99.93% | [View Details](/codecs/avc1.640429.html) | | `avc1.640416` | 84.26% | 99.9% | [View Details](/codecs/avc1.640416.html) | | `avc1.641032` | 84.26% | 99.94% | [View Details](/codecs/avc1.641032.html) | | `avc1.64101e` | 84.25% | 99.89% | [View Details](/codecs/avc1.64101e.html) | | `avc1.64043c` | 84.23% | 84.93% | [View Details](/codecs/avc1.64043c.html) | | `avc1.640420` | 84.2% | 99.92% | [View Details](/codecs/avc1.640420.html) | | `avc1.64043d` | 84.2% | 85.57% | [View Details](/codecs/avc1.64043d.html) | | `avc1.640432` | 84.18% | 99.94% | [View Details](/codecs/avc1.640432.html) | | `avc1.640434` | 84.18% | 99.96% | [View Details](/codecs/avc1.640434.html) | | `avc1.64143e` | 84.12% | 85.35% | [View Details](/codecs/avc1.64143e.html) | | `avc1.640c0c` | 18.98% | 99.88% | [View Details](/codecs/avc1.640c0c.html) | | `avc1.640015` | 18.95% | 99.93% | [View Details](/codecs/avc1.640015.html) | | `avc1.640c0a` | 18.94% | 99.91% | [View Details](/codecs/avc1.640c0a.html) | | `avc1.42000a` | 18.92% | 99.97% | [View Details](/codecs/avc1.42000a.html) | | `avc1.42100d` | 18.92% | 99.92% | [View Details](/codecs/avc1.42100d.html) | | `avc1.4d000a` | 18.92% | 99.96% | [View Details](/codecs/avc1.4d000a.html) | | `avc1.420014` | 18.9% | 99.93% | [View Details](/codecs/avc1.420014.html) | | `avc1.640c0b` | 18.85% | 99.93% | [View Details](/codecs/avc1.640c0b.html) | | `avc1.640c15` | 18.85% | 99.96% | [View Details](/codecs/avc1.640c15.html) | | `avc1.4d1015` | 18.83% | 99.94% | [View Details](/codecs/avc1.4d1015.html) | | `avc1.4d100c` | 18.82% | 99.97% | [View Details](/codecs/avc1.4d100c.html) | | `avc1.42100b` | 18.81% | 99.94% | [View Details](/codecs/avc1.42100b.html) | | `avc1.42100c` | 18.81% | 99.96% | [View Details](/codecs/avc1.42100c.html) | | `avc1.4d000b` | 18.8% | 99.93% | [View Details](/codecs/avc1.4d000b.html) | | `avc1.420015` | 18.79% | 99.94% | [View Details](/codecs/avc1.420015.html) | | `avc1.421015` | 18.79% | 99.94% | [View Details](/codecs/avc1.421015.html) | | `avc1.64000d` | 18.78% | 99.97% | [View Details](/codecs/avc1.64000d.html) | | `avc1.42000c` | 18.77% | 99.9% | [View Details](/codecs/avc1.42000c.html) | | `avc1.64000b` | 18.75% | 99.91% | [View Details](/codecs/avc1.64000b.html) | | `avc1.640014` | 18.72% | 99.93% | [View Details](/codecs/avc1.640014.html) | | `avc1.640c14` | 18.72% | 99.94% | [View Details](/codecs/avc1.640c14.html) | | `avc1.42000b` | 18.71% | 99.95% | [View Details](/codecs/avc1.42000b.html) | | `avc1.42000d` | 18.7% | 99.94% | [View Details](/codecs/avc1.42000d.html) | | `avc1.42100a` | 18.7% | 99.97% | [View Details](/codecs/avc1.42100a.html) | | `avc1.4d100b` | 18.68% | 99.94% | [View Details](/codecs/avc1.4d100b.html) | | `avc1.4d1014` | 18.67% | 99.92% | [View Details](/codecs/avc1.4d1014.html) | | `avc1.421014` | 18.66% | 99.93% | [View Details](/codecs/avc1.421014.html) | | `avc1.4d0014` | 18.65% | 99.92% | [View Details](/codecs/avc1.4d0014.html) | | `avc1.64000c` | 18.62% | 99.94% | [View Details](/codecs/avc1.64000c.html) | | `avc1.640c0d` | 18.61% | 99.93% | [View Details](/codecs/avc1.640c0d.html) | | `avc1.4d0015` | 18.6% | 99.97% | [View Details](/codecs/avc1.4d0015.html) | | `avc1.4d000d` | 18.59% | 99.94% | [View Details](/codecs/avc1.4d000d.html) | | `avc1.4d100a` | 18.54% | 99.95% | [View Details](/codecs/avc1.4d100a.html) | | `avc1.4d000c` | 18.46% | 99.97% | [View Details](/codecs/avc1.4d000c.html) | | `avc1.4d100d` | 18.44% | 99.96% | [View Details](/codecs/avc1.4d100d.html) | | `avc1.64000a` | 18.4% | 99.92% | [View Details](/codecs/avc1.64000a.html) | | `avc1.640815` | 4.66% | 99.91% | [View Details](/codecs/avc1.640815.html) | | `avc1.4d080c` | 4.65% | 99.93% | [View Details](/codecs/avc1.4d080c.html) | | `avc1.4d140c` | 4.64% | 99.91% | [View Details](/codecs/avc1.4d140c.html) | | `avc1.64080c` | 4.64% | 99.93% | [View Details](/codecs/avc1.64080c.html) | | `avc1.42040b` | 4.63% | 99.95% | [View Details](/codecs/avc1.42040b.html) | | `avc1.420414` | 4.63% | 99.93% | [View Details](/codecs/avc1.420414.html) | | `avc1.4d140d` | 4.63% | 99.93% | [View Details](/codecs/avc1.4d140d.html) | | `avc1.4d0c14` | 4.62% | 99.89% | [View Details](/codecs/avc1.4d0c14.html) | | `avc1.42140a` | 4.61% | 99.92% | [View Details](/codecs/avc1.42140a.html) | | `avc1.4d080b` | 4.61% | 99.93% | [View Details](/codecs/avc1.4d080b.html) | | `avc1.4d0815` | 4.6% | 99.93% | [View Details](/codecs/avc1.4d0815.html) | | `avc1.42140b` | 4.59% | 99.95% | [View Details](/codecs/avc1.42140b.html) | | `avc1.4d040b` | 4.59% | 99.93% | [View Details](/codecs/avc1.4d040b.html) | | `avc1.64040a` | 4.59% | 99.96% | [View Details](/codecs/avc1.64040a.html) | | `avc1.641415` | 4.59% | 99.95% | [View Details](/codecs/avc1.641415.html) | | `avc1.42040d` | 4.58% | 99.95% | [View Details](/codecs/avc1.42040d.html) | | `avc1.420415` | 4.58% | 99.93% | [View Details](/codecs/avc1.420415.html) | | `avc1.4d1415` | 4.58% | 99.92% | [View Details](/codecs/avc1.4d1415.html) | | `avc1.421414` | 4.57% | 99.95% | [View Details](/codecs/avc1.421414.html) | | `avc1.4d1414` | 4.57% | 99.95% | [View Details](/codecs/avc1.4d1414.html) | | `avc1.420c15` | 4.56% | 99.94% | [View Details](/codecs/avc1.420c15.html) | | `avc1.64080a` | 4.56% | 99.9% | [View Details](/codecs/avc1.64080a.html) | | `avc1.42080d` | 4.55% | 99.94% | [View Details](/codecs/avc1.42080d.html) | | `avc1.420c0d` | 4.55% | 99.88% | [View Details](/codecs/avc1.420c0d.html) | | `avc1.421415` | 4.55% | 99.94% | [View Details](/codecs/avc1.421415.html) | | `avc1.641014` | 4.55% | 99.95% | [View Details](/codecs/avc1.641014.html) | | `avc1.42080b` | 4.54% | 99.93% | [View Details](/codecs/avc1.42080b.html) | | `avc1.420c0a` | 4.54% | 99.93% | [View Details](/codecs/avc1.420c0a.html) | | `avc1.64040c` | 4.54% | 99.93% | [View Details](/codecs/avc1.64040c.html) | | `avc1.64140d` | 4.54% | 99.97% | [View Details](/codecs/avc1.64140d.html) | | `avc1.641414` | 4.54% | 99.96% | [View Details](/codecs/avc1.641414.html) | | `avc1.42080c` | 4.53% | 99.93% | [View Details](/codecs/avc1.42080c.html) | | `avc1.42140d` | 4.53% | 99.93% | [View Details](/codecs/avc1.42140d.html) | | `avc1.4d040c` | 4.53% | 99.94% | [View Details](/codecs/avc1.4d040c.html) | | `avc1.4d0c15` | 4.53% | 99.92% | [View Details](/codecs/avc1.4d0c15.html) | | `avc1.64040b` | 4.53% | 99.94% | [View Details](/codecs/avc1.64040b.html) | | `avc1.640814` | 4.53% | 99.93% | [View Details](/codecs/avc1.640814.html) | | `avc1.42040a` | 4.52% | 99.96% | [View Details](/codecs/avc1.42040a.html) | | `avc1.420c0c` | 4.52% | 99.93% | [View Details](/codecs/avc1.420c0c.html) | | `avc1.64080b` | 4.52% | 99.94% | [View Details](/codecs/avc1.64080b.html) | | `avc1.420815` | 4.51% | 99.93% | [View Details](/codecs/avc1.420815.html) | | `avc1.64140c` | 4.51% | 99.9% | [View Details](/codecs/avc1.64140c.html) | | `avc1.4d0814` | 4.5% | 99.94% | [View Details](/codecs/avc1.4d0814.html) | | `avc1.420c0b` | 4.49% | 99.94% | [View Details](/codecs/avc1.420c0b.html) | | `avc1.420c14` | 4.48% | 99.93% | [View Details](/codecs/avc1.420c14.html) | | `avc1.4d0414` | 4.48% | 99.95% | [View Details](/codecs/avc1.4d0414.html) | | `avc1.640414` | 4.48% | 99.94% | [View Details](/codecs/avc1.640414.html) | | `avc1.64140a` | 4.48% | 99.96% | [View Details](/codecs/avc1.64140a.html) | | `avc1.42080a` | 4.47% | 99.93% | [View Details](/codecs/avc1.42080a.html) | | `avc1.420814` | 4.47% | 99.97% | [View Details](/codecs/avc1.420814.html) | | `avc1.42140c` | 4.46% | 99.96% | [View Details](/codecs/avc1.42140c.html) | | `avc1.4d080d` | 4.46% | 99.93% | [View Details](/codecs/avc1.4d080d.html) | | `avc1.64100c` | 4.46% | 99.96% | [View Details](/codecs/avc1.64100c.html) | | `avc1.4d080a` | 4.45% | 99.92% | [View Details](/codecs/avc1.4d080a.html) | | `avc1.4d0c0b` | 4.45% | 99.94% | [View Details](/codecs/avc1.4d0c0b.html) | | `avc1.64100a` | 4.45% | 99.92% | [View Details](/codecs/avc1.64100a.html) | | `avc1.4d0c0c` | 4.44% | 99.92% | [View Details](/codecs/avc1.4d0c0c.html) | | `avc1.64040d` | 4.44% | 99.92% | [View Details](/codecs/avc1.64040d.html) | | `avc1.640415` | 4.44% | 99.91% | [View Details](/codecs/avc1.640415.html) | | `avc1.64100b` | 4.44% | 99.92% | [View Details](/codecs/avc1.64100b.html) | | `avc1.4d0c0d` | 4.43% | 99.92% | [View Details](/codecs/avc1.4d0c0d.html) | | `avc1.64100d` | 4.43% | 99.96% | [View Details](/codecs/avc1.64100d.html) | | `avc1.42040c` | 4.42% | 99.94% | [View Details](/codecs/avc1.42040c.html) | | `avc1.4d040a` | 4.42% | 99.94% | [View Details](/codecs/avc1.4d040a.html) | | `avc1.4d140b` | 4.42% | 99.95% | [View Details](/codecs/avc1.4d140b.html) | | `avc1.64140b` | 4.39% | 99.9% | [View Details](/codecs/avc1.64140b.html) | | `avc1.4d0c0a` | 4.38% | 99.93% | [View Details](/codecs/avc1.4d0c0a.html) | | `avc1.4d140a` | 4.37% | 99.9% | [View Details](/codecs/avc1.4d140a.html) | | `avc1.64080d` | 4.37% | 99.93% | [View Details](/codecs/avc1.64080d.html) | | `avc1.641015` | 4.33% | 99.97% | [View Details](/codecs/avc1.641015.html) | | `avc1.4d040d` | 4.32% | 99.92% | [View Details](/codecs/avc1.4d040d.html) | | `avc1.4d0415` | 4.3% | 99.93% | [View Details](/codecs/avc1.4d0415.html) | ## HEVC (H.265) [Section titled “HEVC (H.265)”](#hevc-h265) | Codec String | Encoder Support | Decoder Support | Details | | ------------------ | --------------- | --------------- | --------------------------------------------- | | All variants | 43.04% | 78.1% | [View Family Support](/codecs/hevc.html) | | `hvc1.1.6.L120.B0` | 75.67% | 84.76% | [View Details](/codecs/hvc1.1.6.L120.B0.html) | | `hev1.1.6.L90.B0` | 75.57% | 84.84% | [View Details](/codecs/hev1.1.6.L90.B0.html) | | `hev1.1.6.L123.B0` | 75.54% | 84.8% | [View Details](/codecs/hev1.1.6.L123.B0.html) | | `hvc1.1.6.L123.B0` | 75.53% | 84.61% | [View Details](/codecs/hvc1.1.6.L123.B0.html) | | `hvc1.1.6.L153.B0` | 75.39% | 84.6% | [View Details](/codecs/hvc1.1.6.L153.B0.html) | | `hev1.1.6.H150.B0` | 75.36% | 84.26% | [View Details](/codecs/hev1.1.6.H150.B0.html) | | `hev1.1.6.H123.B0` | 75.35% | 84.14% | [View Details](/codecs/hev1.1.6.H123.B0.html) | | `hev1.1.6.L93.B0` | 75.35% | 84.72% | [View Details](/codecs/hev1.1.6.L93.B0.html) | | `hvc1.1.6.L63.B0` | 75.33% | 84.34% | [View Details](/codecs/hvc1.1.6.L63.B0.html) | | `hvc1.1.6.L93.B0` | 75.33% | 84.25% | [View Details](/codecs/hvc1.1.6.L93.B0.html) | | `hev1.1.6.H120.B0` | 75.29% | 84.65% | [View Details](/codecs/hev1.1.6.H120.B0.html) | | `hev1.1.6.L63.B0` | 75.29% | 84.7% | [View Details](/codecs/hev1.1.6.L63.B0.html) | | `hvc1.1.6.L30.B0` | 75.29% | 84.86% | [View Details](/codecs/hvc1.1.6.L30.B0.html) | | `hvc1.1.6.H123.B0` | 75.26% | 84.25% | [View Details](/codecs/hvc1.1.6.H123.B0.html) | | `hvc1.1.6.L60.B0` | 75.26% | 84.32% | [View Details](/codecs/hvc1.1.6.L60.B0.html) | | `hev1.1.6.L153.B0` | 75.25% | 84.76% | [View Details](/codecs/hev1.1.6.L153.B0.html) | | `hvc1.1.6.H153.B0` | 75.25% | 84.14% | [View Details](/codecs/hvc1.1.6.H153.B0.html) | | `hev1.1.6.L30.B0` | 75.22% | 84.9% | [View Details](/codecs/hev1.1.6.L30.B0.html) | | `hev1.1.6.L150.B0` | 75.21% | 84.61% | [View Details](/codecs/hev1.1.6.L150.B0.html) | | `hvc1.1.6.H120.B0` | 75.19% | 84.35% | [View Details](/codecs/hvc1.1.6.H120.B0.html) | | `hvc1.1.6.H150.B0` | 75.15% | 84.67% | [View Details](/codecs/hvc1.1.6.H150.B0.html) | | `hvc1.1.6.L90.B0` | 75.14% | 84.52% | [View Details](/codecs/hvc1.1.6.L90.B0.html) | | `hev1.1.6.L120.B0` | 75.12% | 84.47% | [View Details](/codecs/hev1.1.6.L120.B0.html) | | `hev1.1.6.L60.B0` | 75.12% | 84.19% | [View Details](/codecs/hev1.1.6.L60.B0.html) | | `hev1.1.6.H153.B0` | 75.04% | 83.9% | [View Details](/codecs/hev1.1.6.H153.B0.html) | | `hvc1.1.6.L150.B0` | 75.02% | 84.8% | [View Details](/codecs/hvc1.1.6.L150.B0.html) | | `hvc1.1.6.H180.B0` | 74.89% | 83.91% | [View Details](/codecs/hvc1.1.6.H180.B0.html) | | `hvc1.1.6.L156.B0` | 74.68% | 84.43% | [View Details](/codecs/hvc1.1.6.L156.B0.html) | | `hev1.1.6.H156.B0` | 74.67% | 84.27% | [View Details](/codecs/hev1.1.6.H156.B0.html) | | `hvc1.1.6.L180.B0` | 74.62% | 84.2% | [View Details](/codecs/hvc1.1.6.L180.B0.html) | | `hev1.1.6.L180.B0` | 74.58% | 84.29% | [View Details](/codecs/hev1.1.6.L180.B0.html) | | `hev1.1.6.L156.B0` | 74.57% | 84.12% | [View Details](/codecs/hev1.1.6.L156.B0.html) | | `hev1.1.6.H180.B0` | 74.51% | 83.88% | [View Details](/codecs/hev1.1.6.H180.B0.html) | | `hvc1.1.6.H156.B0` | 74.49% | 84.12% | [View Details](/codecs/hvc1.1.6.H156.B0.html) | | `hvc1.1.6.L186.B0` | 67.32% | 76.97% | [View Details](/codecs/hvc1.1.6.L186.B0.html) | | `hvc1.1.6.L183.B0` | 67.24% | 76.6% | [View Details](/codecs/hvc1.1.6.L183.B0.html) | | `hev1.1.6.L186.B0` | 67.14% | 76.61% | [View Details](/codecs/hev1.1.6.L186.B0.html) | | `hev1.1.6.H186.B0` | 67.09% | 76.38% | [View Details](/codecs/hev1.1.6.H186.B0.html) | | `hev1.1.6.H183.B0` | 67.07% | 76.0% | [View Details](/codecs/hev1.1.6.H183.B0.html) | | `hvc1.1.6.H186.B0` | 67.01% | 76.44% | [View Details](/codecs/hvc1.1.6.H186.B0.html) | | `hev1.1.6.L183.B0` | 66.95% | 76.02% | [View Details](/codecs/hev1.1.6.L183.B0.html) | | `hvc1.1.6.H183.B0` | 66.92% | 76.49% | [View Details](/codecs/hvc1.1.6.H183.B0.html) | | `hvc1.2.4.L30.B0` | 14.32% | 74.63% | [View Details](/codecs/hvc1.2.4.L30.B0.html) | | `hev1.2.4.L60.B0` | 14.28% | 75.19% | [View Details](/codecs/hev1.2.4.L60.B0.html) | | `hev1.2.4.L30.B0` | 14.27% | 74.95% | [View Details](/codecs/hev1.2.4.L30.B0.html) | | `hev1.2.4.L63.B0` | 14.27% | 75.01% | [View Details](/codecs/hev1.2.4.L63.B0.html) | | `hev1.2.4.L150.B0` | 14.24% | 75.01% | [View Details](/codecs/hev1.2.4.L150.B0.html) | | `hvc1.2.4.L123.B0` | 14.24% | 75.72% | [View Details](/codecs/hvc1.2.4.L123.B0.html) | | `hvc1.2.4.L153.B0` | 14.24% | 74.6% | [View Details](/codecs/hvc1.2.4.L153.B0.html) | | `hvc1.2.4.H120.B0` | 14.23% | 74.82% | [View Details](/codecs/hvc1.2.4.H120.B0.html) | | `hvc1.2.4.L150.B0` | 14.23% | 75.03% | [View Details](/codecs/hvc1.2.4.L150.B0.html) | | `hvc1.2.4.L60.B0` | 14.2% | 74.72% | [View Details](/codecs/hvc1.2.4.L60.B0.html) | | `hev1.2.4.L120.B0` | 14.17% | 75.03% | [View Details](/codecs/hev1.2.4.L120.B0.html) | | `hev1.2.4.L153.B0` | 14.17% | 75.22% | [View Details](/codecs/hev1.2.4.L153.B0.html) | | `hev1.2.4.H150.B0` | 14.15% | 74.77% | [View Details](/codecs/hev1.2.4.H150.B0.html) | | `hev1.2.4.H120.B0` | 14.14% | 75.47% | [View Details](/codecs/hev1.2.4.H120.B0.html) | | `hvc1.2.4.H123.B0` | 14.13% | 75.58% | [View Details](/codecs/hvc1.2.4.H123.B0.html) | | `hvc1.2.4.L120.B0` | 14.13% | 75.7% | [View Details](/codecs/hvc1.2.4.L120.B0.html) | | `hev1.2.4.L93.B0` | 14.11% | 74.4% | [View Details](/codecs/hev1.2.4.L93.B0.html) | | `hev1.2.4.L90.B0` | 14.05% | 75.17% | [View Details](/codecs/hev1.2.4.L90.B0.html) | | `hvc1.2.4.H150.B0` | 14.05% | 74.81% | [View Details](/codecs/hvc1.2.4.H150.B0.html) | | `hvc1.2.4.H153.B0` | 14.05% | 74.08% | [View Details](/codecs/hvc1.2.4.H153.B0.html) | | `hev1.2.4.H153.B0` | 14.04% | 75.19% | [View Details](/codecs/hev1.2.4.H153.B0.html) | | `hvc1.2.4.L63.B0` | 14.04% | 74.52% | [View Details](/codecs/hvc1.2.4.L63.B0.html) | | `hev1.2.4.H123.B0` | 14.02% | 74.47% | [View Details](/codecs/hev1.2.4.H123.B0.html) | | `hvc1.2.4.L90.B0` | 14.02% | 74.72% | [View Details](/codecs/hvc1.2.4.L90.B0.html) | | `hvc1.2.4.L93.B0` | 13.91% | 74.6% | [View Details](/codecs/hvc1.2.4.L93.B0.html) | | `hev1.2.4.L123.B0` | 13.87% | 74.71% | [View Details](/codecs/hev1.2.4.L123.B0.html) | | `hvc1.2.4.L156.B0` | 13.69% | 74.43% | [View Details](/codecs/hvc1.2.4.L156.B0.html) | | `hev1.2.4.L180.B0` | 13.63% | 74.29% | [View Details](/codecs/hev1.2.4.L180.B0.html) | | `hvc1.2.4.H180.B0` | 13.53% | 74.76% | [View Details](/codecs/hvc1.2.4.H180.B0.html) | | `hev1.2.4.H180.B0` | 13.49% | 74.57% | [View Details](/codecs/hev1.2.4.H180.B0.html) | | `hvc1.2.4.H156.B0` | 13.49% | 74.22% | [View Details](/codecs/hvc1.2.4.H156.B0.html) | | `hev1.2.4.L156.B0` | 13.47% | 74.75% | [View Details](/codecs/hev1.2.4.L156.B0.html) | | `hev1.2.4.H156.B0` | 13.45% | 74.2% | [View Details](/codecs/hev1.2.4.H156.B0.html) | | `hvc1.2.4.L180.B0` | 13.43% | 74.36% | [View Details](/codecs/hvc1.2.4.L180.B0.html) | | `hvc1.2.4.H183.B0` | 6.01% | 66.93% | [View Details](/codecs/hvc1.2.4.H183.B0.html) | | `hev1.2.4.H186.B0` | 6.0% | 66.78% | [View Details](/codecs/hev1.2.4.H186.B0.html) | | `hvc1.2.4.L183.B0` | 5.98% | 66.84% | [View Details](/codecs/hvc1.2.4.L183.B0.html) | | `hev1.2.4.H183.B0` | 5.97% | 66.52% | [View Details](/codecs/hev1.2.4.H183.B0.html) | | `hev1.2.4.L186.B0` | 5.96% | 67.23% | [View Details](/codecs/hev1.2.4.L186.B0.html) | | `hev1.2.4.L183.B0` | 5.94% | 66.42% | [View Details](/codecs/hev1.2.4.L183.B0.html) | | `hvc1.2.4.H186.B0` | 5.91% | 66.83% | [View Details](/codecs/hvc1.2.4.H186.B0.html) | | `hvc1.2.4.L186.B0` | 5.81% | 66.48% | [View Details](/codecs/hvc1.2.4.L186.B0.html) | ## VP8 [Section titled “VP8”](#vp8) | Codec String | Encoder Support | Decoder Support | Details | | ------------ | --------------- | --------------- | --------------------------------------- | | All variants | 99.98% | 99.97% | [View Family Support](/codecs/vp8.html) | | `vp8` | 99.98% | 99.97% | [View Details](/codecs/vp8.html) | ## VP9 [Section titled “VP9”](#vp9) | Codec String | Encoder Support | Decoder Support | Details | | ------------------ | --------------- | --------------- | --------------------------------------------- | | All variants | 26.03% | 87.96% | [View Family Support](/codecs/vp9.html) | | `vp09.00.10.08.00` | 99.98% | 99.97% | [View Details](/codecs/vp09.00.10.08.00.html) | | `vp09.00.11.08.00` | 99.98% | 99.98% | [View Details](/codecs/vp09.00.11.08.00.html) | | `vp09.00.21.08.00` | 99.98% | 99.99% | [View Details](/codecs/vp09.00.21.08.00.html) | | `vp09.00.30.08.00` | 99.98% | 99.98% | [View Details](/codecs/vp09.00.30.08.00.html) | | `vp09.00.31.08.00` | 99.98% | 99.99% | [View Details](/codecs/vp09.00.31.08.00.html) | | `vp09.00.41.08.00` | 99.98% | 99.99% | [View Details](/codecs/vp09.00.41.08.00.html) | | `vp09.00.50.08.00` | 99.98% | 99.98% | [View Details](/codecs/vp09.00.50.08.00.html) | | `vp09.00.51.08.00` | 99.98% | 100.0% | [View Details](/codecs/vp09.00.51.08.00.html) | | `vp09.00.52.08.00` | 99.98% | 99.98% | [View Details](/codecs/vp09.00.52.08.00.html) | | `vp09.00.60.08.00` | 99.98% | 99.97% | [View Details](/codecs/vp09.00.60.08.00.html) | | `vp09.00.61.08.00` | 99.98% | 100.0% | [View Details](/codecs/vp09.00.61.08.00.html) | | `vp09.00.62.08.00` | 99.98% | 99.97% | [View Details](/codecs/vp09.00.62.08.00.html) | | `vp09.00.20.08.00` | 99.97% | 100.0% | [View Details](/codecs/vp09.00.20.08.00.html) | | `vp09.00.40.08.00` | 99.97% | 99.99% | [View Details](/codecs/vp09.00.40.08.00.html) | | `vp09.01.11.08.03` | 84.76% | 85.15% | [View Details](/codecs/vp09.01.11.08.03.html) | | `vp09.01.50.08.03` | 84.75% | 85.75% | [View Details](/codecs/vp09.01.50.08.03.html) | | `vp09.01.21.08.03` | 84.73% | 85.24% | [View Details](/codecs/vp09.01.21.08.03.html) | | `vp09.01.30.08.03` | 84.71% | 85.02% | [View Details](/codecs/vp09.01.30.08.03.html) | | `vp09.01.60.08.03` | 84.71% | 85.2% | [View Details](/codecs/vp09.01.60.08.03.html) | | `vp09.01.31.08.03` | 84.63% | 85.09% | [View Details](/codecs/vp09.01.31.08.03.html) | | `vp09.01.10.08.03` | 84.62% | 85.14% | [View Details](/codecs/vp09.01.10.08.03.html) | | `vp09.01.41.08.03` | 84.62% | 85.35% | [View Details](/codecs/vp09.01.41.08.03.html) | | `vp09.01.20.08.03` | 84.6% | 84.77% | [View Details](/codecs/vp09.01.20.08.03.html) | | `vp09.01.52.08.03` | 84.59% | 85.39% | [View Details](/codecs/vp09.01.52.08.03.html) | | `vp09.01.40.08.03` | 84.55% | 84.99% | [View Details](/codecs/vp09.01.40.08.03.html) | | `vp09.01.62.08.03` | 84.51% | 84.93% | [View Details](/codecs/vp09.01.62.08.03.html) | | `vp09.01.61.08.03` | 84.48% | 85.31% | [View Details](/codecs/vp09.01.61.08.03.html) | | `vp09.01.51.08.03` | 84.38% | 84.45% | [View Details](/codecs/vp09.01.51.08.03.html) | | `vp09.02.20.10.00` | 78.98% | 99.39% | [View Details](/codecs/vp09.02.20.10.00.html) | | `vp09.02.61.10.00` | 78.97% | 99.41% | [View Details](/codecs/vp09.02.61.10.00.html) | | `vp09.02.62.10.00` | 78.96% | 99.37% | [View Details](/codecs/vp09.02.62.10.00.html) | | `vp09.02.11.10.00` | 78.92% | 99.54% | [View Details](/codecs/vp09.02.11.10.00.html) | | `vp09.02.50.10.00` | 78.92% | 99.47% | [View Details](/codecs/vp09.02.50.10.00.html) | | `vp09.02.21.10.00` | 78.89% | 99.36% | [View Details](/codecs/vp09.02.21.10.00.html) | | `vp09.02.51.10.00` | 78.85% | 99.39% | [View Details](/codecs/vp09.02.51.10.00.html) | | `vp09.02.10.10.00` | 78.82% | 99.48% | [View Details](/codecs/vp09.02.10.10.00.html) | | `vp09.02.40.10.00` | 78.82% | 99.32% | [View Details](/codecs/vp09.02.40.10.00.html) | | `vp09.02.52.10.00` | 78.78% | 99.44% | [View Details](/codecs/vp09.02.52.10.00.html) | | `vp09.02.31.10.00` | 78.73% | 99.38% | [View Details](/codecs/vp09.02.31.10.00.html) | | `vp09.02.60.10.00` | 78.71% | 99.39% | [View Details](/codecs/vp09.02.60.10.00.html) | | `vp09.02.30.10.00` | 78.69% | 99.28% | [View Details](/codecs/vp09.02.30.10.00.html) | | `vp09.02.41.10.00` | 78.61% | 99.4% | [View Details](/codecs/vp09.02.41.10.00.html) | | `vp09.03.11.10.03` | 64.44% | 85.07% | [View Details](/codecs/vp09.03.11.10.03.html) | | `vp09.03.40.10.03` | 64.4% | 85.54% | [View Details](/codecs/vp09.03.40.10.03.html) | | `vp09.03.52.10.03` | 64.22% | 85.01% | [View Details](/codecs/vp09.03.52.10.03.html) | | `vp09.03.50.10.03` | 64.15% | 84.97% | [View Details](/codecs/vp09.03.50.10.03.html) | | `vp09.03.62.10.03` | 64.15% | 84.97% | [View Details](/codecs/vp09.03.62.10.03.html) | | `vp09.03.10.10.03` | 64.14% | 84.95% | [View Details](/codecs/vp09.03.10.10.03.html) | | `vp09.03.51.10.03` | 64.12% | 84.98% | [View Details](/codecs/vp09.03.51.10.03.html) | | `vp09.03.30.10.03` | 64.11% | 84.94% | [View Details](/codecs/vp09.03.30.10.03.html) | | `vp09.03.61.10.03` | 64.11% | 84.7% | [View Details](/codecs/vp09.03.61.10.03.html) | | `vp09.03.41.10.03` | 64.02% | 84.56% | [View Details](/codecs/vp09.03.41.10.03.html) | | `vp09.03.31.10.03` | 64.0% | 84.97% | [View Details](/codecs/vp09.03.31.10.03.html) | | `vp09.03.20.10.03` | 63.98% | 84.81% | [View Details](/codecs/vp09.03.20.10.03.html) | | `vp09.03.60.10.03` | 63.96% | 85.13% | [View Details](/codecs/vp09.03.60.10.03.html) | | `vp09.03.21.10.03` | 63.91% | 84.94% | [View Details](/codecs/vp09.03.21.10.03.html) | | `vp09.02.21.12.00` | 19.16% | 99.23% | [View Details](/codecs/vp09.02.21.12.00.html) | | `vp09.02.50.12.00` | 19.14% | 99.32% | [View Details](/codecs/vp09.02.50.12.00.html) | | `vp09.02.10.12.00` | 19.13% | 99.35% | [View Details](/codecs/vp09.02.10.12.00.html) | | `vp09.02.30.12.00` | 19.07% | 99.26% | [View Details](/codecs/vp09.02.30.12.00.html) | | `vp09.02.11.12.00` | 19.06% | 99.42% | [View Details](/codecs/vp09.02.11.12.00.html) | | `vp09.02.31.12.00` | 19.06% | 99.38% | [View Details](/codecs/vp09.02.31.12.00.html) | | `vp09.02.20.12.00` | 19.03% | 99.46% | [View Details](/codecs/vp09.02.20.12.00.html) | | `vp09.02.41.12.00` | 19.03% | 99.35% | [View Details](/codecs/vp09.02.41.12.00.html) | | `vp09.02.51.12.00` | 19.03% | 99.32% | [View Details](/codecs/vp09.02.51.12.00.html) | | `vp09.02.60.12.00` | 19.02% | 99.37% | [View Details](/codecs/vp09.02.60.12.00.html) | | `vp09.02.52.12.00` | 18.99% | 99.39% | [View Details](/codecs/vp09.02.52.12.00.html) | | `vp09.02.62.12.00` | 18.96% | 99.31% | [View Details](/codecs/vp09.02.62.12.00.html) | | `vp09.02.40.12.00` | 18.95% | 99.33% | [View Details](/codecs/vp09.02.40.12.00.html) | | `vp09.02.61.12.00` | 18.86% | 99.34% | [View Details](/codecs/vp09.02.61.12.00.html) | | `vp09.03.52.12.03` | 4.57% | 85.17% | [View Details](/codecs/vp09.03.52.12.03.html) | | `vp09.03.50.12.03` | 4.56% | 85.28% | [View Details](/codecs/vp09.03.50.12.03.html) | | `vp09.03.11.12.03` | 4.55% | 84.82% | [View Details](/codecs/vp09.03.11.12.03.html) | | `vp09.01.21.08.00` | 4.54% | 84.72% | [View Details](/codecs/vp09.01.21.08.00.html) | | `vp09.03.61.12.03` | 4.54% | 85.02% | [View Details](/codecs/vp09.03.61.12.03.html) | | `vp09.03.40.10.02` | 4.52% | 85.02% | [View Details](/codecs/vp09.03.40.10.02.html) | | `vp09.03.50.10.01` | 4.52% | 85.17% | [View Details](/codecs/vp09.03.50.10.01.html) | | `vp09.01.52.08.01` | 4.5% | 85.38% | [View Details](/codecs/vp09.01.52.08.01.html) | | `vp09.03.11.10.02` | 4.5% | 84.4% | [View Details](/codecs/vp09.03.11.10.02.html) | | `vp09.03.52.12.02` | 4.5% | 85.01% | [View Details](/codecs/vp09.03.52.12.02.html) | | `vp09.03.21.10.01` | 4.49% | 84.95% | [View Details](/codecs/vp09.03.21.10.01.html) | | `vp09.03.60.12.02` | 4.49% | 84.98% | [View Details](/codecs/vp09.03.60.12.02.html) | | `vp09.03.61.12.02` | 4.49% | 84.9% | [View Details](/codecs/vp09.03.61.12.02.html) | | `vp09.01.10.08.00` | 4.48% | 85.63% | [View Details](/codecs/vp09.01.10.08.00.html) | | `vp09.01.50.08.02` | 4.47% | 84.99% | [View Details](/codecs/vp09.01.50.08.02.html) | | `vp09.03.51.12.00` | 4.47% | 85.02% | [View Details](/codecs/vp09.03.51.12.00.html) | | `vp09.03.60.10.02` | 4.47% | 85.25% | [View Details](/codecs/vp09.03.60.10.02.html) | | `vp09.03.62.10.01` | 4.47% | 85.15% | [View Details](/codecs/vp09.03.62.10.01.html) | | `vp09.01.30.08.01` | 4.46% | 85.16% | [View Details](/codecs/vp09.01.30.08.01.html) | | `vp09.01.60.08.00` | 4.46% | 85.34% | [View Details](/codecs/vp09.01.60.08.00.html) | | `vp09.01.62.08.01` | 4.46% | 85.15% | [View Details](/codecs/vp09.01.62.08.01.html) | | `vp09.03.31.12.01` | 4.46% | 84.94% | [View Details](/codecs/vp09.03.31.12.01.html) | | `vp09.03.31.12.03` | 4.46% | 85.36% | [View Details](/codecs/vp09.03.31.12.03.html) | | `vp09.03.40.12.02` | 4.46% | 84.82% | [View Details](/codecs/vp09.03.40.12.02.html) | | `vp09.03.41.10.00` | 4.46% | 85.12% | [View Details](/codecs/vp09.03.41.10.00.html) | | `vp09.01.20.08.02` | 4.45% | 85.72% | [View Details](/codecs/vp09.01.20.08.02.html) | | `vp09.01.21.08.01` | 4.45% | 85.46% | [View Details](/codecs/vp09.01.21.08.01.html) | | `vp09.01.31.08.00` | 4.45% | 85.28% | [View Details](/codecs/vp09.01.31.08.00.html) | | `vp09.01.61.08.02` | 4.45% | 85.63% | [View Details](/codecs/vp09.01.61.08.02.html) | | `vp09.03.10.12.03` | 4.45% | 85.16% | [View Details](/codecs/vp09.03.10.12.03.html) | | `vp09.03.20.12.03` | 4.45% | 84.7% | [View Details](/codecs/vp09.03.20.12.03.html) | | `vp09.03.30.10.02` | 4.45% | 84.71% | [View Details](/codecs/vp09.03.30.10.02.html) | | `vp09.03.41.12.00` | 4.45% | 84.04% | [View Details](/codecs/vp09.03.41.12.00.html) | | `vp09.01.20.08.00` | 4.44% | 85.44% | [View Details](/codecs/vp09.01.20.08.00.html) | | `vp09.03.11.10.01` | 4.44% | 85.39% | [View Details](/codecs/vp09.03.11.10.01.html) | | `vp09.03.11.12.01` | 4.44% | 85.01% | [View Details](/codecs/vp09.03.11.12.01.html) | | `vp09.03.30.12.00` | 4.44% | 84.45% | [View Details](/codecs/vp09.03.30.12.00.html) | | `vp09.01.31.08.01` | 4.43% | 85.36% | [View Details](/codecs/vp09.01.31.08.01.html) | | `vp09.01.60.08.02` | 4.43% | 85.21% | [View Details](/codecs/vp09.01.60.08.02.html) | | `vp09.03.10.10.02` | 4.43% | 84.77% | [View Details](/codecs/vp09.03.10.10.02.html) | | `vp09.03.31.12.02` | 4.43% | 84.36% | [View Details](/codecs/vp09.03.31.12.02.html) | | `vp09.03.40.12.01` | 4.43% | 85.37% | [View Details](/codecs/vp09.03.40.12.01.html) | | `vp09.03.41.10.02` | 4.43% | 85.22% | [View Details](/codecs/vp09.03.41.10.02.html) | | `vp09.03.62.10.00` | 4.43% | 85.21% | [View Details](/codecs/vp09.03.62.10.00.html) | | `vp09.01.10.08.02` | 4.42% | 85.0% | [View Details](/codecs/vp09.01.10.08.02.html) | | `vp09.01.51.08.02` | 4.42% | 85.2% | [View Details](/codecs/vp09.01.51.08.02.html) | | `vp09.01.52.08.00` | 4.42% | 86.15% | [View Details](/codecs/vp09.01.52.08.00.html) | | `vp09.01.61.08.01` | 4.42% | 84.95% | [View Details](/codecs/vp09.01.61.08.01.html) | | `vp09.03.10.12.00` | 4.42% | 85.06% | [View Details](/codecs/vp09.03.10.12.00.html) | | `vp09.03.20.10.02` | 4.42% | 84.81% | [View Details](/codecs/vp09.03.20.10.02.html) | | `vp09.03.31.12.00` | 4.42% | 84.99% | [View Details](/codecs/vp09.03.31.12.00.html) | | `vp09.03.50.12.00` | 4.42% | 85.33% | [View Details](/codecs/vp09.03.50.12.00.html) | | `vp09.03.50.12.01` | 4.42% | 85.01% | [View Details](/codecs/vp09.03.50.12.01.html) | | `vp09.03.50.12.02` | 4.42% | 84.51% | [View Details](/codecs/vp09.03.50.12.02.html) | | `vp09.03.62.10.02` | 4.42% | 84.89% | [View Details](/codecs/vp09.03.62.10.02.html) | | `vp09.01.41.08.01` | 4.41% | 85.41% | [View Details](/codecs/vp09.01.41.08.01.html) | | `vp09.01.62.08.02` | 4.41% | 85.11% | [View Details](/codecs/vp09.01.62.08.02.html) | | `vp09.03.51.12.02` | 4.41% | 85.0% | [View Details](/codecs/vp09.03.51.12.02.html) | | `vp09.03.52.10.01` | 4.41% | 84.88% | [View Details](/codecs/vp09.03.52.10.01.html) | | `vp09.03.52.10.02` | 4.41% | 85.05% | [View Details](/codecs/vp09.03.52.10.02.html) | | `vp09.03.61.10.00` | 4.41% | 84.92% | [View Details](/codecs/vp09.03.61.10.00.html) | | `vp09.03.62.12.02` | 4.41% | 84.98% | [View Details](/codecs/vp09.03.62.12.02.html) | | `vp09.01.40.08.02` | 4.4% | 85.32% | [View Details](/codecs/vp09.01.40.08.02.html) | | `vp09.03.21.12.01` | 4.4% | 84.72% | [View Details](/codecs/vp09.03.21.12.01.html) | | `vp09.03.21.12.03` | 4.4% | 84.76% | [View Details](/codecs/vp09.03.21.12.03.html) | | `vp09.03.30.10.00` | 4.4% | 84.8% | [View Details](/codecs/vp09.03.30.10.00.html) | | `vp09.03.52.10.00` | 4.4% | 84.63% | [View Details](/codecs/vp09.03.52.10.00.html) | | `vp09.03.52.12.01` | 4.4% | 85.13% | [View Details](/codecs/vp09.03.52.12.01.html) | | `vp09.01.10.08.01` | 4.39% | 85.12% | [View Details](/codecs/vp09.01.10.08.01.html) | | `vp09.01.11.08.00` | 4.39% | 84.84% | [View Details](/codecs/vp09.01.11.08.00.html) | | `vp09.01.41.08.00` | 4.39% | 85.5% | [View Details](/codecs/vp09.01.41.08.00.html) | | `vp09.03.10.10.00` | 4.39% | 84.4% | [View Details](/codecs/vp09.03.10.10.00.html) | | `vp09.03.10.12.02` | 4.39% | 84.73% | [View Details](/codecs/vp09.03.10.12.02.html) | | `vp09.03.20.10.00` | 4.39% | 85.45% | [View Details](/codecs/vp09.03.20.10.00.html) | | `vp09.03.30.10.01` | 4.39% | 85.55% | [View Details](/codecs/vp09.03.30.10.01.html) | | `vp09.01.21.08.02` | 4.38% | 84.93% | [View Details](/codecs/vp09.01.21.08.02.html) | | `vp09.01.41.08.02` | 4.38% | 85.25% | [View Details](/codecs/vp09.01.41.08.02.html) | | `vp09.03.11.12.02` | 4.38% | 85.24% | [View Details](/codecs/vp09.03.11.12.02.html) | | `vp09.03.21.12.00` | 4.38% | 85.39% | [View Details](/codecs/vp09.03.21.12.00.html) | | `vp09.03.50.10.02` | 4.38% | 85.0% | [View Details](/codecs/vp09.03.50.10.02.html) | | `vp09.03.51.10.01` | 4.38% | 84.7% | [View Details](/codecs/vp09.03.51.10.01.html) | | `vp09.03.60.12.01` | 4.38% | 85.19% | [View Details](/codecs/vp09.03.60.12.01.html) | | `vp09.03.62.12.01` | 4.38% | 84.91% | [View Details](/codecs/vp09.03.62.12.01.html) | | `vp09.01.40.08.01` | 4.37% | 85.27% | [View Details](/codecs/vp09.01.40.08.01.html) | | `vp09.01.52.08.02` | 4.37% | 85.17% | [View Details](/codecs/vp09.01.52.08.02.html) | | `vp09.03.11.10.00` | 4.37% | 85.42% | [View Details](/codecs/vp09.03.11.10.00.html) | | `vp09.03.21.10.02` | 4.37% | 85.42% | [View Details](/codecs/vp09.03.21.10.02.html) | | `vp09.03.30.12.01` | 4.37% | 84.69% | [View Details](/codecs/vp09.03.30.12.01.html) | | `vp09.03.40.10.00` | 4.37% | 85.02% | [View Details](/codecs/vp09.03.40.10.00.html) | | `vp09.03.40.12.00` | 4.37% | 85.21% | [View Details](/codecs/vp09.03.40.12.00.html) | | `vp09.03.41.12.02` | 4.37% | 84.44% | [View Details](/codecs/vp09.03.41.12.02.html) | | `vp09.03.51.12.01` | 4.37% | 85.11% | [View Details](/codecs/vp09.03.51.12.01.html) | | `vp09.03.61.10.02` | 4.37% | 85.1% | [View Details](/codecs/vp09.03.61.10.02.html) | | `vp09.01.50.08.01` | 4.36% | 84.92% | [View Details](/codecs/vp09.01.50.08.01.html) | | `vp09.03.41.12.01` | 4.36% | 85.0% | [View Details](/codecs/vp09.03.41.12.01.html) | | `vp09.03.61.12.00` | 4.36% | 84.9% | [View Details](/codecs/vp09.03.61.12.00.html) | | `vp09.01.51.08.00` | 4.35% | 84.59% | [View Details](/codecs/vp09.01.51.08.00.html) | | `vp09.03.51.10.00` | 4.35% | 84.95% | [View Details](/codecs/vp09.03.51.10.00.html) | | `vp09.03.51.10.02` | 4.35% | 85.15% | [View Details](/codecs/vp09.03.51.10.02.html) | | `vp09.03.60.10.00` | 4.35% | 84.94% | [View Details](/codecs/vp09.03.60.10.00.html) | | `vp09.03.61.10.01` | 4.35% | 85.69% | [View Details](/codecs/vp09.03.61.10.01.html) | | `vp09.03.62.12.03` | 4.35% | 84.77% | [View Details](/codecs/vp09.03.62.12.03.html) | | `vp09.01.11.08.02` | 4.34% | 85.15% | [View Details](/codecs/vp09.01.11.08.02.html) | | `vp09.03.11.12.00` | 4.34% | 84.93% | [View Details](/codecs/vp09.03.11.12.00.html) | | `vp09.03.20.12.00` | 4.34% | 85.24% | [View Details](/codecs/vp09.03.20.12.00.html) | | `vp09.03.60.10.01` | 4.34% | 84.91% | [View Details](/codecs/vp09.03.60.10.01.html) | | `vp09.01.20.08.01` | 4.33% | 85.58% | [View Details](/codecs/vp09.01.20.08.01.html) | | `vp09.01.30.08.00` | 4.33% | 85.2% | [View Details](/codecs/vp09.01.30.08.00.html) | | `vp09.01.40.08.00` | 4.33% | 85.04% | [View Details](/codecs/vp09.01.40.08.00.html) | | `vp09.03.30.12.02` | 4.33% | 85.12% | [View Details](/codecs/vp09.03.30.12.02.html) | | `vp09.03.30.12.03` | 4.33% | 84.86% | [View Details](/codecs/vp09.03.30.12.03.html) | | `vp09.03.40.12.03` | 4.33% | 84.8% | [View Details](/codecs/vp09.03.40.12.03.html) | | `vp09.03.52.12.00` | 4.33% | 85.1% | [View Details](/codecs/vp09.03.52.12.00.html) | | `vp09.01.51.08.01` | 4.32% | 85.49% | [View Details](/codecs/vp09.01.51.08.01.html) | | `vp09.03.10.10.01` | 4.32% | 84.67% | [View Details](/codecs/vp09.03.10.10.01.html) | | `vp09.03.20.12.01` | 4.32% | 85.09% | [View Details](/codecs/vp09.03.20.12.01.html) | | `vp09.03.21.10.00` | 4.32% | 84.47% | [View Details](/codecs/vp09.03.21.10.00.html) | | `vp09.03.31.10.00` | 4.32% | 85.23% | [View Details](/codecs/vp09.03.31.10.00.html) | | `vp09.03.31.10.01` | 4.32% | 84.89% | [View Details](/codecs/vp09.03.31.10.01.html) | | `vp09.03.31.10.02` | 4.32% | 85.16% | [View Details](/codecs/vp09.03.31.10.02.html) | | `vp09.03.41.10.01` | 4.32% | 85.23% | [View Details](/codecs/vp09.03.41.10.01.html) | | `vp09.01.31.08.02` | 4.31% | 85.3% | [View Details](/codecs/vp09.01.31.08.02.html) | | `vp09.01.50.08.00` | 4.31% | 84.83% | [View Details](/codecs/vp09.01.50.08.00.html) | | `vp09.01.61.08.00` | 4.31% | 85.17% | [View Details](/codecs/vp09.01.61.08.00.html) | | `vp09.03.62.12.00` | 4.31% | 84.43% | [View Details](/codecs/vp09.03.62.12.00.html) | | `vp09.01.30.08.02` | 4.3% | 85.26% | [View Details](/codecs/vp09.01.30.08.02.html) | | `vp09.01.60.08.01` | 4.3% | 85.14% | [View Details](/codecs/vp09.01.60.08.01.html) | | `vp09.01.62.08.00` | 4.3% | 85.34% | [View Details](/codecs/vp09.01.62.08.00.html) | | `vp09.03.10.12.01` | 4.3% | 84.74% | [View Details](/codecs/vp09.03.10.12.01.html) | | `vp09.03.51.12.03` | 4.3% | 85.29% | [View Details](/codecs/vp09.03.51.12.03.html) | | `vp09.03.60.12.00` | 4.3% | 84.98% | [View Details](/codecs/vp09.03.60.12.00.html) | | `vp09.03.60.12.03` | 4.3% | 84.75% | [View Details](/codecs/vp09.03.60.12.03.html) | | `vp09.03.50.10.00` | 4.29% | 85.57% | [View Details](/codecs/vp09.03.50.10.00.html) | | `vp09.03.61.12.01` | 4.29% | 85.28% | [View Details](/codecs/vp09.03.61.12.01.html) | | `vp09.03.21.12.02` | 4.28% | 84.59% | [View Details](/codecs/vp09.03.21.12.02.html) | | `vp09.03.40.10.01` | 4.28% | 85.27% | [View Details](/codecs/vp09.03.40.10.01.html) | | `vp09.03.20.10.01` | 4.27% | 84.7% | [View Details](/codecs/vp09.03.20.10.01.html) | | `vp09.03.41.12.03` | 4.27% | 84.94% | [View Details](/codecs/vp09.03.41.12.03.html) | | `vp09.01.11.08.01` | 4.26% | 85.32% | [View Details](/codecs/vp09.01.11.08.01.html) | | `vp09.03.20.12.02` | 4.21% | 85.01% | [View Details](/codecs/vp09.03.20.12.02.html) | ## AV1 [Section titled “AV1”](#av1) | Codec String | Encoder Support | Decoder Support | Details | | --------------- | --------------- | --------------- | ------------------------------------------ | | All variants | 19.99% | 83.67% | [View Family Support](/codecs/av1.html) | | `av01.0.18M.08` | 86.54% | 90.19% | [View Details](/codecs/av01.0.18M.08.html) | | `av01.0.05M.08` | 86.52% | 90.46% | [View Details](/codecs/av01.0.05M.08.html) | | `av01.0.21H.08` | 86.52% | 90.02% | [View Details](/codecs/av01.0.21H.08.html) | | `av01.0.11H.08` | 86.48% | 90.54% | [View Details](/codecs/av01.0.11H.08.html) | | `av01.0.15M.08` | 86.48% | 90.35% | [View Details](/codecs/av01.0.15M.08.html) | | `av01.0.08H.08` | 86.47% | 90.48% | [View Details](/codecs/av01.0.08H.08.html) | | `av01.0.23H.08` | 86.44% | 90.32% | [View Details](/codecs/av01.0.23H.08.html) | | `av01.0.17H.08` | 86.43% | 89.99% | [View Details](/codecs/av01.0.17H.08.html) | | `av01.0.20M.08` | 86.43% | 90.57% | [View Details](/codecs/av01.0.20M.08.html) | | `av01.0.23M.08` | 86.43% | 89.99% | [View Details](/codecs/av01.0.23M.08.html) | | `av01.0.19M.08` | 86.41% | 90.07% | [View Details](/codecs/av01.0.19M.08.html) | | `av01.0.22M.08` | 86.41% | 90.27% | [View Details](/codecs/av01.0.22M.08.html) | | `av01.0.16M.08` | 86.4% | 89.87% | [View Details](/codecs/av01.0.16M.08.html) | | `av01.0.13M.08` | 86.39% | 90.2% | [View Details](/codecs/av01.0.13M.08.html) | | `av01.0.04M.08` | 86.38% | 90.23% | [View Details](/codecs/av01.0.04M.08.html) | | `av01.0.13H.08` | 86.38% | 89.94% | [View Details](/codecs/av01.0.13H.08.html) | | `av01.0.07M.08` | 86.36% | 90.43% | [View Details](/codecs/av01.0.07M.08.html) | | `av01.0.09H.08` | 86.35% | 90.38% | [View Details](/codecs/av01.0.09H.08.html) | | `av01.0.09M.08` | 86.35% | 90.01% | [View Details](/codecs/av01.0.09M.08.html) | | `av01.0.19H.08` | 86.35% | 89.85% | [View Details](/codecs/av01.0.19H.08.html) | | `av01.0.20H.08` | 86.35% | 90.29% | [View Details](/codecs/av01.0.20H.08.html) | | `av01.0.10M.08` | 86.34% | 90.06% | [View Details](/codecs/av01.0.10M.08.html) | | `av01.0.08M.08` | 86.33% | 90.46% | [View Details](/codecs/av01.0.08M.08.html) | | `av01.0.16H.08` | 86.33% | 90.19% | [View Details](/codecs/av01.0.16H.08.html) | | `av01.0.01M.08` | 86.32% | 90.38% | [View Details](/codecs/av01.0.01M.08.html) | | `av01.0.06M.08` | 86.32% | 90.24% | [View Details](/codecs/av01.0.06M.08.html) | | `av01.0.17M.08` | 86.31% | 90.16% | [View Details](/codecs/av01.0.17M.08.html) | | `av01.0.00M.08` | 86.3% | 90.46% | [View Details](/codecs/av01.0.00M.08.html) | | `av01.0.15H.08` | 86.3% | 90.27% | [View Details](/codecs/av01.0.15H.08.html) | | `av01.0.02M.08` | 86.26% | 90.59% | [View Details](/codecs/av01.0.02M.08.html) | | `av01.0.12M.08` | 86.26% | 90.34% | [View Details](/codecs/av01.0.12M.08.html) | | `av01.0.03M.08` | 86.25% | 89.96% | [View Details](/codecs/av01.0.03M.08.html) | | `av01.0.11M.08` | 86.25% | 89.81% | [View Details](/codecs/av01.0.11M.08.html) | | `av01.0.22H.08` | 86.25% | 90.35% | [View Details](/codecs/av01.0.22H.08.html) | | `av01.0.14M.08` | 86.24% | 90.48% | [View Details](/codecs/av01.0.14M.08.html) | | `av01.0.12H.08` | 86.23% | 89.79% | [View Details](/codecs/av01.0.12H.08.html) | | `av01.0.21M.08` | 86.22% | 90.03% | [View Details](/codecs/av01.0.21M.08.html) | | `av01.0.14H.08` | 86.21% | 89.89% | [View Details](/codecs/av01.0.14H.08.html) | | `av01.0.10H.08` | 86.18% | 89.58% | [View Details](/codecs/av01.0.10H.08.html) | | `av01.0.18H.08` | 86.14% | 89.65% | [View Details](/codecs/av01.0.18H.08.html) | | `av01.0.04H.08` | 82.16% | 86.21% | [View Details](/codecs/av01.0.04H.08.html) | | `av01.0.03H.08` | 82.07% | 85.78% | [View Details](/codecs/av01.0.03H.08.html) | | `av01.0.01H.08` | 82.01% | 86.07% | [View Details](/codecs/av01.0.01H.08.html) | | `av01.0.05H.08` | 81.98% | 86.3% | [View Details](/codecs/av01.0.05H.08.html) | | `av01.0.02H.08` | 81.96% | 85.95% | [View Details](/codecs/av01.0.02H.08.html) | | `av01.0.00H.08` | 81.93% | 86.21% | [View Details](/codecs/av01.0.00H.08.html) | | `av01.0.07H.08` | 81.77% | 85.26% | [View Details](/codecs/av01.0.07H.08.html) | | `av01.0.06H.08` | 81.72% | 85.54% | [View Details](/codecs/av01.0.06H.08.html) | | `av01.1.06H.08` | 77.29% | 81.01% | [View Details](/codecs/av01.1.06H.08.html) | | `av01.1.23H.08` | 77.24% | 80.93% | [View Details](/codecs/av01.1.23H.08.html) | | `av01.1.17H.08` | 77.17% | 80.91% | [View Details](/codecs/av01.1.17H.08.html) | | `av01.1.19M.08` | 77.17% | 80.73% | [View Details](/codecs/av01.1.19M.08.html) | | `av01.1.07M.08` | 77.15% | 80.86% | [View Details](/codecs/av01.1.07M.08.html) | | `av01.1.18M.08` | 77.15% | 80.6% | [View Details](/codecs/av01.1.18M.08.html) | | `av01.1.12M.08` | 77.13% | 80.98% | [View Details](/codecs/av01.1.12M.08.html) | | `av01.1.12H.08` | 77.11% | 80.94% | [View Details](/codecs/av01.1.12H.08.html) | | `av01.1.19H.08` | 77.11% | 80.78% | [View Details](/codecs/av01.1.19H.08.html) | | `av01.1.00H.08` | 77.1% | 80.79% | [View Details](/codecs/av01.1.00H.08.html) | | `av01.1.17M.08` | 77.1% | 80.93% | [View Details](/codecs/av01.1.17M.08.html) | | `av01.1.02H.08` | 77.08% | 80.76% | [View Details](/codecs/av01.1.02H.08.html) | | `av01.1.06M.08` | 77.08% | 80.78% | [View Details](/codecs/av01.1.06M.08.html) | | `av01.1.08H.08` | 77.07% | 81.14% | [View Details](/codecs/av01.1.08H.08.html) | | `av01.1.10M.08` | 77.06% | 81.26% | [View Details](/codecs/av01.1.10M.08.html) | | `av01.1.11H.08` | 77.02% | 81.06% | [View Details](/codecs/av01.1.11H.08.html) | | `av01.1.22M.08` | 77.02% | 80.69% | [View Details](/codecs/av01.1.22M.08.html) | | `av01.1.01M.08` | 77.01% | 81.02% | [View Details](/codecs/av01.1.01M.08.html) | | `av01.1.04H.08` | 77.0% | 80.55% | [View Details](/codecs/av01.1.04H.08.html) | | `av01.1.05H.08` | 76.99% | 80.9% | [View Details](/codecs/av01.1.05H.08.html) | | `av01.1.20M.08` | 76.99% | 81.05% | [View Details](/codecs/av01.1.20M.08.html) | | `av01.1.09M.08` | 76.98% | 80.34% | [View Details](/codecs/av01.1.09M.08.html) | | `av01.1.09H.08` | 76.97% | 80.35% | [View Details](/codecs/av01.1.09H.08.html) | | `av01.1.22H.08` | 76.96% | 80.7% | [View Details](/codecs/av01.1.22H.08.html) | | `av01.1.15M.08` | 76.95% | 80.85% | [View Details](/codecs/av01.1.15M.08.html) | | `av01.1.18H.08` | 76.95% | 80.75% | [View Details](/codecs/av01.1.18H.08.html) | | `av01.1.23M.08` | 76.95% | 81.1% | [View Details](/codecs/av01.1.23M.08.html) | | `av01.1.01H.08` | 76.94% | 81.18% | [View Details](/codecs/av01.1.01H.08.html) | | `av01.1.11M.08` | 76.94% | 80.71% | [View Details](/codecs/av01.1.11M.08.html) | | `av01.1.02M.08` | 76.93% | 80.54% | [View Details](/codecs/av01.1.02M.08.html) | | `av01.1.14M.08` | 76.93% | 80.85% | [View Details](/codecs/av01.1.14M.08.html) | | `av01.1.08M.08` | 76.92% | 80.47% | [View Details](/codecs/av01.1.08M.08.html) | | `av01.1.15H.08` | 76.91% | 80.43% | [View Details](/codecs/av01.1.15H.08.html) | | `av01.1.00M.08` | 76.89% | 80.79% | [View Details](/codecs/av01.1.00M.08.html) | | `av01.1.03M.08` | 76.89% | 80.72% | [View Details](/codecs/av01.1.03M.08.html) | | `av01.1.21M.08` | 76.89% | 80.85% | [View Details](/codecs/av01.1.21M.08.html) | | `av01.1.10H.08` | 76.87% | 80.55% | [View Details](/codecs/av01.1.10H.08.html) | | `av01.1.13M.08` | 76.87% | 80.42% | [View Details](/codecs/av01.1.13M.08.html) | | `av01.1.16H.08` | 76.86% | 81.17% | [View Details](/codecs/av01.1.16H.08.html) | | `av01.1.04M.08` | 76.84% | 80.89% | [View Details](/codecs/av01.1.04M.08.html) | | `av01.1.05M.08` | 76.84% | 80.67% | [View Details](/codecs/av01.1.05M.08.html) | | `av01.1.21H.08` | 76.83% | 81.1% | [View Details](/codecs/av01.1.21H.08.html) | | `av01.1.03H.08` | 76.82% | 80.74% | [View Details](/codecs/av01.1.03H.08.html) | | `av01.1.16M.08` | 76.82% | 80.24% | [View Details](/codecs/av01.1.16M.08.html) | | `av01.1.13H.08` | 76.81% | 81.1% | [View Details](/codecs/av01.1.13H.08.html) | | `av01.1.20H.08` | 76.8% | 81.16% | [View Details](/codecs/av01.1.20H.08.html) | | `av01.1.14H.08` | 76.79% | 80.49% | [View Details](/codecs/av01.1.14H.08.html) | | `av01.1.07H.08` | 76.59% | 80.49% | [View Details](/codecs/av01.1.07H.08.html) | | `av01.0.18H.10` | 9.64% | 90.08% | [View Details](/codecs/av01.0.18H.10.html) | | `av01.0.10H.10` | 9.53% | 90.03% | [View Details](/codecs/av01.0.10H.10.html) | | `av01.0.14H.10` | 9.53% | 90.29% | [View Details](/codecs/av01.0.14H.10.html) | | `av01.0.20H.10` | 9.49% | 90.0% | [View Details](/codecs/av01.0.20H.10.html) | | `av01.0.00M.10` | 9.46% | 90.18% | [View Details](/codecs/av01.0.00M.10.html) | | `av01.0.03M.10` | 9.46% | 90.26% | [View Details](/codecs/av01.0.03M.10.html) | | `av01.0.13M.10` | 9.46% | 90.08% | [View Details](/codecs/av01.0.13M.10.html) | | `av01.0.15M.10` | 9.45% | 90.02% | [View Details](/codecs/av01.0.15M.10.html) | | `av01.0.19M.10` | 9.44% | 89.83% | [View Details](/codecs/av01.0.19M.10.html) | | `av01.0.14M.10` | 9.43% | 90.16% | [View Details](/codecs/av01.0.14M.10.html) | | `av01.0.23M.10` | 9.43% | 90.37% | [View Details](/codecs/av01.0.23M.10.html) | | `av01.0.17M.10` | 9.42% | 90.24% | [View Details](/codecs/av01.0.17M.10.html) | | `av01.0.02M.10` | 9.41% | 89.94% | [View Details](/codecs/av01.0.02M.10.html) | | `av01.0.11H.10` | 9.41% | 90.22% | [View Details](/codecs/av01.0.11H.10.html) | | `av01.0.16M.10` | 9.41% | 90.28% | [View Details](/codecs/av01.0.16M.10.html) | | `av01.0.20M.10` | 9.41% | 89.96% | [View Details](/codecs/av01.0.20M.10.html) | | `av01.0.22H.10` | 9.41% | 89.85% | [View Details](/codecs/av01.0.22H.10.html) | | `av01.0.08H.10` | 9.4% | 90.14% | [View Details](/codecs/av01.0.08H.10.html) | | `av01.0.12M.10` | 9.4% | 90.52% | [View Details](/codecs/av01.0.12M.10.html) | | `av01.0.13H.10` | 9.4% | 90.14% | [View Details](/codecs/av01.0.13H.10.html) | | `av01.0.01M.10` | 9.39% | 90.25% | [View Details](/codecs/av01.0.01M.10.html) | | `av01.0.21H.10` | 9.38% | 90.17% | [View Details](/codecs/av01.0.21H.10.html) | | `av01.0.05M.10` | 9.37% | 90.05% | [View Details](/codecs/av01.0.05M.10.html) | | `av01.0.04M.10` | 9.36% | 90.19% | [View Details](/codecs/av01.0.04M.10.html) | | `av01.0.15H.10` | 9.36% | 90.36% | [View Details](/codecs/av01.0.15H.10.html) | | `av01.0.18M.10` | 9.36% | 90.44% | [View Details](/codecs/av01.0.18M.10.html) | | `av01.0.19H.10` | 9.36% | 90.15% | [View Details](/codecs/av01.0.19H.10.html) | | `av01.0.08M.10` | 9.34% | 90.29% | [View Details](/codecs/av01.0.08M.10.html) | | `av01.0.21M.10` | 9.34% | 90.45% | [View Details](/codecs/av01.0.21M.10.html) | | `av01.0.09M.10` | 9.33% | 90.27% | [View Details](/codecs/av01.0.09M.10.html) | | `av01.0.11M.10` | 9.32% | 90.14% | [View Details](/codecs/av01.0.11M.10.html) | | `av01.0.07M.10` | 9.31% | 90.46% | [View Details](/codecs/av01.0.07M.10.html) | | `av01.0.09H.10` | 9.31% | 90.11% | [View Details](/codecs/av01.0.09H.10.html) | | `av01.0.17H.10` | 9.29% | 90.2% | [View Details](/codecs/av01.0.17H.10.html) | | `av01.0.22M.10` | 9.29% | 90.32% | [View Details](/codecs/av01.0.22M.10.html) | | `av01.0.23H.10` | 9.26% | 90.45% | [View Details](/codecs/av01.0.23H.10.html) | | `av01.0.06M.10` | 9.25% | 90.03% | [View Details](/codecs/av01.0.06M.10.html) | | `av01.0.16H.10` | 9.22% | 90.22% | [View Details](/codecs/av01.0.16H.10.html) | | `av01.0.10M.10` | 9.17% | 90.17% | [View Details](/codecs/av01.0.10M.10.html) | | `av01.0.12H.10` | 9.11% | 90.55% | [View Details](/codecs/av01.0.12H.10.html) | | `av01.0.21H.12` | 5.18% | 85.79% | [View Details](/codecs/av01.0.21H.12.html) | | `av01.0.12M.12` | 5.17% | 85.76% | [View Details](/codecs/av01.0.12M.12.html) | | `av01.0.14M.12` | 5.16% | 85.98% | [View Details](/codecs/av01.0.14M.12.html) | | `av01.0.00H.10` | 5.1% | 85.96% | [View Details](/codecs/av01.0.00H.10.html) | | `av01.0.03M.12` | 5.08% | 86.12% | [View Details](/codecs/av01.0.03M.12.html) | | `av01.0.06M.12` | 5.07% | 85.97% | [View Details](/codecs/av01.0.06M.12.html) | | `av01.0.09H.12` | 5.07% | 86.1% | [View Details](/codecs/av01.0.09H.12.html) | | `av01.0.04M.12` | 5.06% | 86.35% | [View Details](/codecs/av01.0.04M.12.html) | | `av01.0.01H.10` | 5.05% | 85.91% | [View Details](/codecs/av01.0.01H.10.html) | | `av01.0.11H.12` | 5.05% | 85.97% | [View Details](/codecs/av01.0.11H.12.html) | | `av01.0.13M.12` | 5.05% | 86.0% | [View Details](/codecs/av01.0.13M.12.html) | | `av01.0.20H.12` | 5.05% | 85.86% | [View Details](/codecs/av01.0.20H.12.html) | | `av01.0.22M.12` | 5.04% | 86.03% | [View Details](/codecs/av01.0.22M.12.html) | | `av01.0.00H.12` | 5.03% | 86.15% | [View Details](/codecs/av01.0.00H.12.html) | | `av01.0.09M.12` | 5.03% | 85.69% | [View Details](/codecs/av01.0.09M.12.html) | | `av01.0.02H.12` | 5.02% | 85.99% | [View Details](/codecs/av01.0.02H.12.html) | | `av01.0.02M.12` | 5.02% | 85.7% | [View Details](/codecs/av01.0.02M.12.html) | | `av01.0.07H.12` | 5.02% | 86.19% | [View Details](/codecs/av01.0.07H.12.html) | | `av01.0.15M.12` | 5.02% | 85.67% | [View Details](/codecs/av01.0.15M.12.html) | | `av01.0.05H.10` | 5.01% | 86.27% | [View Details](/codecs/av01.0.05H.10.html) | | `av01.0.05H.12` | 5.01% | 85.79% | [View Details](/codecs/av01.0.05H.12.html) | | `av01.0.06H.10` | 5.01% | 85.93% | [View Details](/codecs/av01.0.06H.10.html) | | `av01.0.18H.12` | 5.01% | 86.06% | [View Details](/codecs/av01.0.18H.12.html) | | `av01.0.20M.12` | 5.01% | 85.87% | [View Details](/codecs/av01.0.20M.12.html) | | `av01.0.02H.10` | 5.0% | 85.84% | [View Details](/codecs/av01.0.02H.10.html) | | `av01.0.03H.10` | 5.0% | 85.63% | [View Details](/codecs/av01.0.03H.10.html) | | `av01.0.16H.12` | 5.0% | 85.96% | [View Details](/codecs/av01.0.16H.12.html) | | `av01.0.11M.12` | 4.99% | 85.77% | [View Details](/codecs/av01.0.11M.12.html) | | `av01.0.18M.12` | 4.99% | 86.16% | [View Details](/codecs/av01.0.18M.12.html) | | `av01.0.03H.12` | 4.98% | 85.79% | [View Details](/codecs/av01.0.03H.12.html) | | `av01.0.10H.12` | 4.98% | 85.65% | [View Details](/codecs/av01.0.10H.12.html) | | `av01.0.15H.12` | 4.98% | 85.87% | [View Details](/codecs/av01.0.15H.12.html) | | `av01.0.17M.12` | 4.98% | 85.52% | [View Details](/codecs/av01.0.17M.12.html) | | `av01.0.19H.12` | 4.97% | 85.61% | [View Details](/codecs/av01.0.19H.12.html) | | `av01.0.19M.12` | 4.97% | 86.13% | [View Details](/codecs/av01.0.19M.12.html) | | `av01.0.01M.12` | 4.96% | 85.92% | [View Details](/codecs/av01.0.01M.12.html) | | `av01.0.05M.12` | 4.96% | 85.3% | [View Details](/codecs/av01.0.05M.12.html) | | `av01.0.12H.12` | 4.96% | 85.87% | [View Details](/codecs/av01.0.12H.12.html) | | `av01.0.14H.12` | 4.96% | 85.88% | [View Details](/codecs/av01.0.14H.12.html) | | `av01.0.16M.12` | 4.96% | 86.27% | [View Details](/codecs/av01.0.16M.12.html) | | `av01.0.17H.12` | 4.96% | 86.06% | [View Details](/codecs/av01.0.17H.12.html) | | `av01.0.06H.12` | 4.95% | 85.63% | [View Details](/codecs/av01.0.06H.12.html) | | `av01.0.13H.12` | 4.95% | 85.18% | [View Details](/codecs/av01.0.13H.12.html) | | `av01.0.01H.12` | 4.94% | 86.22% | [View Details](/codecs/av01.0.01H.12.html) | | `av01.0.08H.12` | 4.94% | 85.66% | [View Details](/codecs/av01.0.08H.12.html) | | `av01.0.22H.12` | 4.94% | 85.88% | [View Details](/codecs/av01.0.22H.12.html) | | `av01.0.07H.10` | 4.93% | 86.08% | [View Details](/codecs/av01.0.07H.10.html) | | `av01.0.07M.12` | 4.92% | 85.56% | [View Details](/codecs/av01.0.07M.12.html) | | `av01.0.08M.12` | 4.92% | 85.6% | [View Details](/codecs/av01.0.08M.12.html) | | `av01.0.10M.12` | 4.92% | 85.73% | [View Details](/codecs/av01.0.10M.12.html) | | `av01.0.21M.12` | 4.88% | 85.35% | [View Details](/codecs/av01.0.21M.12.html) | | `av01.0.23M.12` | 4.87% | 85.55% | [View Details](/codecs/av01.0.23M.12.html) | | `av01.0.04H.12` | 4.86% | 85.81% | [View Details](/codecs/av01.0.04H.12.html) | | `av01.0.00M.12` | 4.84% | 86.11% | [View Details](/codecs/av01.0.00M.12.html) | | `av01.0.23H.12` | 4.81% | 86.05% | [View Details](/codecs/av01.0.23H.12.html) | | `av01.0.04H.10` | 4.79% | 86.53% | [View Details](/codecs/av01.0.04H.10.html) | | `av01.2.19H.12` | 4.54% | 85.1% | [View Details](/codecs/av01.2.19H.12.html) | | `av01.2.19M.12` | 4.53% | 84.97% | [View Details](/codecs/av01.2.19M.12.html) | | `av01.2.18H.12` | 4.52% | 85.1% | [View Details](/codecs/av01.2.18H.12.html) | | `av01.2.07M.12` | 4.51% | 84.9% | [View Details](/codecs/av01.2.07M.12.html) | | `av01.2.10H.12` | 4.51% | 85.19% | [View Details](/codecs/av01.2.10H.12.html) | | `av01.2.23H.12` | 4.51% | 84.83% | [View Details](/codecs/av01.2.23H.12.html) | | `av01.2.11H.12` | 4.5% | 85.56% | [View Details](/codecs/av01.2.11H.12.html) | | `av01.2.17M.12` | 4.48% | 85.09% | [View Details](/codecs/av01.2.17M.12.html) | | `av01.2.22M.12` | 4.48% | 85.07% | [View Details](/codecs/av01.2.22M.12.html) | | `av01.2.09M.12` | 4.46% | 85.13% | [View Details](/codecs/av01.2.09M.12.html) | | `av01.2.06M.12` | 4.43% | 85.29% | [View Details](/codecs/av01.2.06M.12.html) | | `av01.2.10M.12` | 4.43% | 85.31% | [View Details](/codecs/av01.2.10M.12.html) | | `av01.2.11M.12` | 4.42% | 84.88% | [View Details](/codecs/av01.2.11M.12.html) | | `av01.2.13M.12` | 4.42% | 84.98% | [View Details](/codecs/av01.2.13M.12.html) | | `av01.2.17H.12` | 4.42% | 84.87% | [View Details](/codecs/av01.2.17H.12.html) | | `av01.2.21H.12` | 4.42% | 85.3% | [View Details](/codecs/av01.2.21H.12.html) | | `av01.2.21M.12` | 4.42% | 85.22% | [View Details](/codecs/av01.2.21M.12.html) | | `av01.2.08M.12` | 4.41% | 84.95% | [View Details](/codecs/av01.2.08M.12.html) | | `av01.2.09H.12` | 4.41% | 84.82% | [View Details](/codecs/av01.2.09H.12.html) | | `av01.2.13H.12` | 4.41% | 85.56% | [View Details](/codecs/av01.2.13H.12.html) | | `av01.2.02M.12` | 4.4% | 85.35% | [View Details](/codecs/av01.2.02M.12.html) | | `av01.2.14H.12` | 4.39% | 85.03% | [View Details](/codecs/av01.2.14H.12.html) | | `av01.2.15M.12` | 4.39% | 85.15% | [View Details](/codecs/av01.2.15M.12.html) | | `av01.2.20H.12` | 4.39% | 84.68% | [View Details](/codecs/av01.2.20H.12.html) | | `av01.2.22H.12` | 4.39% | 84.88% | [View Details](/codecs/av01.2.22H.12.html) | | `av01.2.00M.12` | 4.37% | 85.49% | [View Details](/codecs/av01.2.00M.12.html) | | `av01.2.12H.12` | 4.36% | 84.78% | [View Details](/codecs/av01.2.12H.12.html) | | `av01.2.08H.12` | 4.34% | 85.19% | [View Details](/codecs/av01.2.08H.12.html) | | `av01.2.16H.12` | 4.34% | 85.29% | [View Details](/codecs/av01.2.16H.12.html) | | `av01.2.16M.12` | 4.34% | 85.07% | [View Details](/codecs/av01.2.16M.12.html) | | `av01.2.01M.12` | 4.33% | 84.62% | [View Details](/codecs/av01.2.01M.12.html) | | `av01.2.12M.12` | 4.33% | 85.16% | [View Details](/codecs/av01.2.12M.12.html) | | `av01.2.14M.12` | 4.33% | 84.94% | [View Details](/codecs/av01.2.14M.12.html) | | `av01.2.15H.12` | 4.33% | 85.1% | [View Details](/codecs/av01.2.15H.12.html) | | `av01.2.20M.12` | 4.32% | 85.34% | [View Details](/codecs/av01.2.20M.12.html) | | `av01.2.18M.12` | 4.31% | 85.26% | [View Details](/codecs/av01.2.18M.12.html) | | `av01.2.03M.12` | 4.27% | 85.23% | [View Details](/codecs/av01.2.03M.12.html) | | `av01.2.04M.12` | 4.27% | 85.34% | [View Details](/codecs/av01.2.04M.12.html) | | `av01.2.23M.12` | 4.27% | 85.02% | [View Details](/codecs/av01.2.23M.12.html) | | `av01.2.05M.12` | 4.26% | 84.79% | [View Details](/codecs/av01.2.05M.12.html) | | `av01.1.00H.10` | 0.0% | 81.04% | [View Details](/codecs/av01.1.00H.10.html) | | `av01.1.00H.12` | 0.0% | 80.58% | [View Details](/codecs/av01.1.00H.12.html) | | `av01.1.00M.10` | 0.0% | 80.86% | [View Details](/codecs/av01.1.00M.10.html) | | `av01.1.00M.12` | 0.0% | 80.67% | [View Details](/codecs/av01.1.00M.12.html) | | `av01.1.01H.10` | 0.0% | 80.65% | [View Details](/codecs/av01.1.01H.10.html) | | `av01.1.01H.12` | 0.0% | 80.96% | [View Details](/codecs/av01.1.01H.12.html) | | `av01.1.01M.10` | 0.0% | 80.64% | [View Details](/codecs/av01.1.01M.10.html) | | `av01.1.01M.12` | 0.0% | 80.88% | [View Details](/codecs/av01.1.01M.12.html) | | `av01.1.02H.10` | 0.0% | 81.2% | [View Details](/codecs/av01.1.02H.10.html) | | `av01.1.02H.12` | 0.0% | 80.77% | [View Details](/codecs/av01.1.02H.12.html) | | `av01.1.02M.10` | 0.0% | 80.86% | [View Details](/codecs/av01.1.02M.10.html) | | `av01.1.02M.12` | 0.0% | 80.72% | [View Details](/codecs/av01.1.02M.12.html) | | `av01.1.03H.10` | 0.0% | 80.49% | [View Details](/codecs/av01.1.03H.10.html) | | `av01.1.03H.12` | 0.0% | 80.49% | [View Details](/codecs/av01.1.03H.12.html) | | `av01.1.03M.10` | 0.0% | 80.45% | [View Details](/codecs/av01.1.03M.10.html) | | `av01.1.03M.12` | 0.0% | 80.75% | [View Details](/codecs/av01.1.03M.12.html) | | `av01.1.04H.10` | 0.0% | 80.43% | [View Details](/codecs/av01.1.04H.10.html) | | `av01.1.04H.12` | 0.0% | 81.08% | [View Details](/codecs/av01.1.04H.12.html) | | `av01.1.04M.10` | 0.0% | 80.73% | [View Details](/codecs/av01.1.04M.10.html) | | `av01.1.04M.12` | 0.0% | 80.9% | [View Details](/codecs/av01.1.04M.12.html) | | `av01.1.05H.10` | 0.0% | 81.09% | [View Details](/codecs/av01.1.05H.10.html) | | `av01.1.05H.12` | 0.0% | 80.94% | [View Details](/codecs/av01.1.05H.12.html) | | `av01.1.05M.10` | 0.0% | 80.47% | [View Details](/codecs/av01.1.05M.10.html) | | `av01.1.05M.12` | 0.0% | 80.51% | [View Details](/codecs/av01.1.05M.12.html) | | `av01.1.06H.10` | 0.0% | 80.8% | [View Details](/codecs/av01.1.06H.10.html) | | `av01.1.06H.12` | 0.0% | 80.85% | [View Details](/codecs/av01.1.06H.12.html) | | `av01.1.06M.10` | 0.0% | 81.17% | [View Details](/codecs/av01.1.06M.10.html) | | `av01.1.06M.12` | 0.0% | 81.1% | [View Details](/codecs/av01.1.06M.12.html) | | `av01.1.07H.10` | 0.0% | 81.16% | [View Details](/codecs/av01.1.07H.10.html) | | `av01.1.07H.12` | 0.0% | 79.97% | [View Details](/codecs/av01.1.07H.12.html) | | `av01.1.07M.10` | 0.0% | 80.5% | [View Details](/codecs/av01.1.07M.10.html) | | `av01.1.07M.12` | 0.0% | 81.11% | [View Details](/codecs/av01.1.07M.12.html) | | `av01.1.08H.10` | 0.0% | 80.23% | [View Details](/codecs/av01.1.08H.10.html) | | `av01.1.08H.12` | 0.0% | 80.85% | [View Details](/codecs/av01.1.08H.12.html) | | `av01.1.08M.10` | 0.0% | 80.84% | [View Details](/codecs/av01.1.08M.10.html) | | `av01.1.08M.12` | 0.0% | 80.73% | [View Details](/codecs/av01.1.08M.12.html) | | `av01.1.09H.10` | 0.0% | 80.89% | [View Details](/codecs/av01.1.09H.10.html) | | `av01.1.09H.12` | 0.0% | 80.63% | [View Details](/codecs/av01.1.09H.12.html) | | `av01.1.09M.10` | 0.0% | 80.79% | [View Details](/codecs/av01.1.09M.10.html) | | `av01.1.09M.12` | 0.0% | 80.58% | [View Details](/codecs/av01.1.09M.12.html) | | `av01.1.10H.10` | 0.0% | 80.84% | [View Details](/codecs/av01.1.10H.10.html) | | `av01.1.10H.12` | 0.0% | 80.97% | [View Details](/codecs/av01.1.10H.12.html) | | `av01.1.10M.10` | 0.0% | 81.23% | [View Details](/codecs/av01.1.10M.10.html) | | `av01.1.10M.12` | 0.0% | 80.29% | [View Details](/codecs/av01.1.10M.12.html) | | `av01.1.11H.10` | 0.0% | 80.61% | [View Details](/codecs/av01.1.11H.10.html) | | `av01.1.11H.12` | 0.0% | 80.13% | [View Details](/codecs/av01.1.11H.12.html) | | `av01.1.11M.10` | 0.0% | 80.29% | [View Details](/codecs/av01.1.11M.10.html) | | `av01.1.11M.12` | 0.0% | 80.76% | [View Details](/codecs/av01.1.11M.12.html) | | `av01.1.12H.10` | 0.0% | 80.87% | [View Details](/codecs/av01.1.12H.10.html) | | `av01.1.12H.12` | 0.0% | 81.0% | [View Details](/codecs/av01.1.12H.12.html) | | `av01.1.12M.10` | 0.0% | 80.64% | [View Details](/codecs/av01.1.12M.10.html) | | `av01.1.12M.12` | 0.0% | 80.59% | [View Details](/codecs/av01.1.12M.12.html) | | `av01.1.13H.10` | 0.0% | 80.82% | [View Details](/codecs/av01.1.13H.10.html) | | `av01.1.13H.12` | 0.0% | 80.88% | [View Details](/codecs/av01.1.13H.12.html) | | `av01.1.13M.10` | 0.0% | 81.14% | [View Details](/codecs/av01.1.13M.10.html) | | `av01.1.13M.12` | 0.0% | 80.71% | [View Details](/codecs/av01.1.13M.12.html) | | `av01.1.14H.10` | 0.0% | 80.08% | [View Details](/codecs/av01.1.14H.10.html) | | `av01.1.14H.12` | 0.0% | 80.49% | [View Details](/codecs/av01.1.14H.12.html) | | `av01.1.14M.10` | 0.0% | 81.33% | [View Details](/codecs/av01.1.14M.10.html) | | `av01.1.14M.12` | 0.0% | 80.92% | [View Details](/codecs/av01.1.14M.12.html) | | `av01.1.15H.10` | 0.0% | 81.48% | [View Details](/codecs/av01.1.15H.10.html) | | `av01.1.15H.12` | 0.0% | 80.87% | [View Details](/codecs/av01.1.15H.12.html) | | `av01.1.15M.10` | 0.0% | 81.05% | [View Details](/codecs/av01.1.15M.10.html) | | `av01.1.15M.12` | 0.0% | 80.85% | [View Details](/codecs/av01.1.15M.12.html) | | `av01.1.16H.10` | 0.0% | 81.35% | [View Details](/codecs/av01.1.16H.10.html) | | `av01.1.16H.12` | 0.0% | 80.11% | [View Details](/codecs/av01.1.16H.12.html) | | `av01.1.16M.10` | 0.0% | 80.77% | [View Details](/codecs/av01.1.16M.10.html) | | `av01.1.16M.12` | 0.0% | 81.46% | [View Details](/codecs/av01.1.16M.12.html) | | `av01.1.17H.10` | 0.0% | 80.65% | [View Details](/codecs/av01.1.17H.10.html) | | `av01.1.17H.12` | 0.0% | 80.61% | [View Details](/codecs/av01.1.17H.12.html) | | `av01.1.17M.10` | 0.0% | 79.98% | [View Details](/codecs/av01.1.17M.10.html) | | `av01.1.17M.12` | 0.0% | 80.78% | [View Details](/codecs/av01.1.17M.12.html) | | `av01.1.18H.10` | 0.0% | 80.7% | [View Details](/codecs/av01.1.18H.10.html) | | `av01.1.18H.12` | 0.0% | 80.7% | [View Details](/codecs/av01.1.18H.12.html) | | `av01.1.18M.10` | 0.0% | 80.4% | [View Details](/codecs/av01.1.18M.10.html) | | `av01.1.18M.12` | 0.0% | 80.8% | [View Details](/codecs/av01.1.18M.12.html) | | `av01.1.19H.10` | 0.0% | 80.54% | [View Details](/codecs/av01.1.19H.10.html) | | `av01.1.19H.12` | 0.0% | 80.87% | [View Details](/codecs/av01.1.19H.12.html) | | `av01.1.19M.10` | 0.0% | 80.77% | [View Details](/codecs/av01.1.19M.10.html) | | `av01.1.19M.12` | 0.0% | 80.52% | [View Details](/codecs/av01.1.19M.12.html) | | `av01.1.20H.10` | 0.0% | 81.2% | [View Details](/codecs/av01.1.20H.10.html) | | `av01.1.20H.12` | 0.0% | 80.46% | [View Details](/codecs/av01.1.20H.12.html) | | `av01.1.20M.10` | 0.0% | 80.24% | [View Details](/codecs/av01.1.20M.10.html) | | `av01.1.20M.12` | 0.0% | 80.85% | [View Details](/codecs/av01.1.20M.12.html) | | `av01.1.21H.10` | 0.0% | 80.77% | [View Details](/codecs/av01.1.21H.10.html) | | `av01.1.21H.12` | 0.0% | 80.8% | [View Details](/codecs/av01.1.21H.12.html) | | `av01.1.21M.10` | 0.0% | 81.03% | [View Details](/codecs/av01.1.21M.10.html) | | `av01.1.21M.12` | 0.0% | 80.71% | [View Details](/codecs/av01.1.21M.12.html) | | `av01.1.22H.10` | 0.0% | 80.52% | [View Details](/codecs/av01.1.22H.10.html) | | `av01.1.22H.12` | 0.0% | 81.22% | [View Details](/codecs/av01.1.22H.12.html) | | `av01.1.22M.10` | 0.0% | 80.45% | [View Details](/codecs/av01.1.22M.10.html) | | `av01.1.22M.12` | 0.0% | 80.78% | [View Details](/codecs/av01.1.22M.12.html) | | `av01.1.23H.10` | 0.0% | 80.47% | [View Details](/codecs/av01.1.23H.10.html) | | `av01.1.23H.12` | 0.0% | 80.33% | [View Details](/codecs/av01.1.23H.12.html) | | `av01.1.23M.10` | 0.0% | 80.51% | [View Details](/codecs/av01.1.23M.10.html) | | `av01.1.23M.12` | 0.0% | 80.38% | [View Details](/codecs/av01.1.23M.12.html) | | `av01.2.00H.08` | 0.0% | 80.92% | [View Details](/codecs/av01.2.00H.08.html) | | `av01.2.00H.10` | 0.0% | 80.61% | [View Details](/codecs/av01.2.00H.10.html) | | `av01.2.00H.12` | 0.0% | 80.71% | [View Details](/codecs/av01.2.00H.12.html) | | `av01.2.00M.08` | 0.0% | 80.32% | [View Details](/codecs/av01.2.00M.08.html) | | `av01.2.00M.10` | 0.0% | 80.33% | [View Details](/codecs/av01.2.00M.10.html) | | `av01.2.01H.08` | 0.0% | 81.26% | [View Details](/codecs/av01.2.01H.08.html) | | `av01.2.01H.10` | 0.0% | 80.61% | [View Details](/codecs/av01.2.01H.10.html) | | `av01.2.01H.12` | 0.0% | 80.47% | [View Details](/codecs/av01.2.01H.12.html) | | `av01.2.01M.08` | 0.0% | 80.89% | [View Details](/codecs/av01.2.01M.08.html) | | `av01.2.01M.10` | 0.0% | 80.5% | [View Details](/codecs/av01.2.01M.10.html) | | `av01.2.02H.08` | 0.0% | 80.77% | [View Details](/codecs/av01.2.02H.08.html) | | `av01.2.02H.10` | 0.0% | 80.82% | [View Details](/codecs/av01.2.02H.10.html) | | `av01.2.02H.12` | 0.0% | 80.67% | [View Details](/codecs/av01.2.02H.12.html) | | `av01.2.02M.08` | 0.0% | 81.34% | [View Details](/codecs/av01.2.02M.08.html) | | `av01.2.02M.10` | 0.0% | 80.62% | [View Details](/codecs/av01.2.02M.10.html) | | `av01.2.03H.08` | 0.0% | 81.16% | [View Details](/codecs/av01.2.03H.08.html) | | `av01.2.03H.10` | 0.0% | 80.87% | [View Details](/codecs/av01.2.03H.10.html) | | `av01.2.03H.12` | 0.0% | 80.42% | [View Details](/codecs/av01.2.03H.12.html) | | `av01.2.03M.08` | 0.0% | 80.45% | [View Details](/codecs/av01.2.03M.08.html) | | `av01.2.03M.10` | 0.0% | 80.54% | [View Details](/codecs/av01.2.03M.10.html) | | `av01.2.04H.08` | 0.0% | 81.0% | [View Details](/codecs/av01.2.04H.08.html) | | `av01.2.04H.10` | 0.0% | 80.5% | [View Details](/codecs/av01.2.04H.10.html) | | `av01.2.04H.12` | 0.0% | 80.34% | [View Details](/codecs/av01.2.04H.12.html) | | `av01.2.04M.08` | 0.0% | 81.35% | [View Details](/codecs/av01.2.04M.08.html) | | `av01.2.04M.10` | 0.0% | 81.41% | [View Details](/codecs/av01.2.04M.10.html) | | `av01.2.05H.08` | 0.0% | 81.28% | [View Details](/codecs/av01.2.05H.08.html) | | `av01.2.05H.10` | 0.0% | 79.72% | [View Details](/codecs/av01.2.05H.10.html) | | `av01.2.05H.12` | 0.0% | 81.03% | [View Details](/codecs/av01.2.05H.12.html) | | `av01.2.05M.08` | 0.0% | 81.02% | [View Details](/codecs/av01.2.05M.08.html) | | `av01.2.05M.10` | 0.0% | 80.78% | [View Details](/codecs/av01.2.05M.10.html) | | `av01.2.06H.08` | 0.0% | 80.65% | [View Details](/codecs/av01.2.06H.08.html) | | `av01.2.06H.10` | 0.0% | 80.91% | [View Details](/codecs/av01.2.06H.10.html) | | `av01.2.06H.12` | 0.0% | 80.71% | [View Details](/codecs/av01.2.06H.12.html) | | `av01.2.06M.08` | 0.0% | 80.92% | [View Details](/codecs/av01.2.06M.08.html) | | `av01.2.06M.10` | 0.0% | 80.53% | [View Details](/codecs/av01.2.06M.10.html) | | `av01.2.07H.08` | 0.0% | 80.85% | [View Details](/codecs/av01.2.07H.08.html) | | `av01.2.07H.10` | 0.0% | 80.06% | [View Details](/codecs/av01.2.07H.10.html) | | `av01.2.07H.12` | 0.0% | 80.93% | [View Details](/codecs/av01.2.07H.12.html) | | `av01.2.07M.08` | 0.0% | 80.9% | [View Details](/codecs/av01.2.07M.08.html) | | `av01.2.07M.10` | 0.0% | 80.8% | [View Details](/codecs/av01.2.07M.10.html) | | `av01.2.08H.08` | 0.0% | 80.67% | [View Details](/codecs/av01.2.08H.08.html) | | `av01.2.08H.10` | 0.0% | 80.78% | [View Details](/codecs/av01.2.08H.10.html) | | `av01.2.08M.08` | 0.0% | 80.78% | [View Details](/codecs/av01.2.08M.08.html) | | `av01.2.08M.10` | 0.0% | 81.12% | [View Details](/codecs/av01.2.08M.10.html) | | `av01.2.09H.08` | 0.0% | 80.16% | [View Details](/codecs/av01.2.09H.08.html) | | `av01.2.09H.10` | 0.0% | 80.42% | [View Details](/codecs/av01.2.09H.10.html) | | `av01.2.09M.08` | 0.0% | 80.88% | [View Details](/codecs/av01.2.09M.08.html) | | `av01.2.09M.10` | 0.0% | 80.87% | [View Details](/codecs/av01.2.09M.10.html) | | `av01.2.10H.08` | 0.0% | 80.9% | [View Details](/codecs/av01.2.10H.08.html) | | `av01.2.10H.10` | 0.0% | 80.75% | [View Details](/codecs/av01.2.10H.10.html) | | `av01.2.10M.08` | 0.0% | 80.8% | [View Details](/codecs/av01.2.10M.08.html) | | `av01.2.10M.10` | 0.0% | 80.56% | [View Details](/codecs/av01.2.10M.10.html) | | `av01.2.11H.08` | 0.0% | 80.61% | [View Details](/codecs/av01.2.11H.08.html) | | `av01.2.11H.10` | 0.0% | 80.76% | [View Details](/codecs/av01.2.11H.10.html) | | `av01.2.11M.08` | 0.0% | 80.92% | [View Details](/codecs/av01.2.11M.08.html) | | `av01.2.11M.10` | 0.0% | 80.99% | [View Details](/codecs/av01.2.11M.10.html) | | `av01.2.12H.08` | 0.0% | 81.03% | [View Details](/codecs/av01.2.12H.08.html) | | `av01.2.12H.10` | 0.0% | 80.84% | [View Details](/codecs/av01.2.12H.10.html) | | `av01.2.12M.08` | 0.0% | 80.79% | [View Details](/codecs/av01.2.12M.08.html) | | `av01.2.12M.10` | 0.0% | 80.92% | [View Details](/codecs/av01.2.12M.10.html) | | `av01.2.13H.08` | 0.0% | 80.98% | [View Details](/codecs/av01.2.13H.08.html) | | `av01.2.13H.10` | 0.0% | 81.25% | [View Details](/codecs/av01.2.13H.10.html) | | `av01.2.13M.08` | 0.0% | 80.42% | [View Details](/codecs/av01.2.13M.08.html) | | `av01.2.13M.10` | 0.0% | 80.26% | [View Details](/codecs/av01.2.13M.10.html) | | `av01.2.14H.08` | 0.0% | 81.39% | [View Details](/codecs/av01.2.14H.08.html) | | `av01.2.14H.10` | 0.0% | 80.66% | [View Details](/codecs/av01.2.14H.10.html) | | `av01.2.14M.08` | 0.0% | 80.76% | [View Details](/codecs/av01.2.14M.08.html) | | `av01.2.14M.10` | 0.0% | 80.35% | [View Details](/codecs/av01.2.14M.10.html) | | `av01.2.15H.08` | 0.0% | 81.1% | [View Details](/codecs/av01.2.15H.08.html) | | `av01.2.15H.10` | 0.0% | 80.68% | [View Details](/codecs/av01.2.15H.10.html) | | `av01.2.15M.08` | 0.0% | 80.85% | [View Details](/codecs/av01.2.15M.08.html) | | `av01.2.15M.10` | 0.0% | 80.64% | [View Details](/codecs/av01.2.15M.10.html) | | `av01.2.16H.08` | 0.0% | 80.17% | [View Details](/codecs/av01.2.16H.08.html) | | `av01.2.16H.10` | 0.0% | 80.77% | [View Details](/codecs/av01.2.16H.10.html) | | `av01.2.16M.08` | 0.0% | 80.96% | [View Details](/codecs/av01.2.16M.08.html) | | `av01.2.16M.10` | 0.0% | 80.51% | [View Details](/codecs/av01.2.16M.10.html) | | `av01.2.17H.08` | 0.0% | 80.77% | [View Details](/codecs/av01.2.17H.08.html) | | `av01.2.17H.10` | 0.0% | 80.45% | [View Details](/codecs/av01.2.17H.10.html) | | `av01.2.17M.08` | 0.0% | 80.51% | [View Details](/codecs/av01.2.17M.08.html) | | `av01.2.17M.10` | 0.0% | 80.45% | [View Details](/codecs/av01.2.17M.10.html) | | `av01.2.18H.08` | 0.0% | 80.89% | [View Details](/codecs/av01.2.18H.08.html) | | `av01.2.18H.10` | 0.0% | 80.69% | [View Details](/codecs/av01.2.18H.10.html) | | `av01.2.18M.08` | 0.0% | 81.23% | [View Details](/codecs/av01.2.18M.08.html) | | `av01.2.18M.10` | 0.0% | 80.16% | [View Details](/codecs/av01.2.18M.10.html) | | `av01.2.19H.08` | 0.0% | 80.75% | [View Details](/codecs/av01.2.19H.08.html) | | `av01.2.19H.10` | 0.0% | 81.07% | [View Details](/codecs/av01.2.19H.10.html) | | `av01.2.19M.08` | 0.0% | 81.21% | [View Details](/codecs/av01.2.19M.08.html) | | `av01.2.19M.10` | 0.0% | 80.92% | [View Details](/codecs/av01.2.19M.10.html) | | `av01.2.20H.08` | 0.0% | 80.61% | [View Details](/codecs/av01.2.20H.08.html) | | `av01.2.20H.10` | 0.0% | 80.2% | [View Details](/codecs/av01.2.20H.10.html) | | `av01.2.20M.08` | 0.0% | 80.69% | [View Details](/codecs/av01.2.20M.08.html) | | `av01.2.20M.10` | 0.0% | 80.91% | [View Details](/codecs/av01.2.20M.10.html) | | `av01.2.21H.08` | 0.0% | 80.61% | [View Details](/codecs/av01.2.21H.08.html) | | `av01.2.21H.10` | 0.0% | 80.2% | [View Details](/codecs/av01.2.21H.10.html) | | `av01.2.21M.08` | 0.0% | 80.83% | [View Details](/codecs/av01.2.21M.08.html) | | `av01.2.21M.10` | 0.0% | 80.85% | [View Details](/codecs/av01.2.21M.10.html) | | `av01.2.22H.08` | 0.0% | 81.03% | [View Details](/codecs/av01.2.22H.08.html) | | `av01.2.22H.10` | 0.0% | 80.67% | [View Details](/codecs/av01.2.22H.10.html) | | `av01.2.22M.08` | 0.0% | 80.73% | [View Details](/codecs/av01.2.22M.08.html) | | `av01.2.22M.10` | 0.0% | 81.58% | [View Details](/codecs/av01.2.22M.10.html) | | `av01.2.23H.08` | 0.0% | 80.95% | [View Details](/codecs/av01.2.23H.08.html) | | `av01.2.23H.10` | 0.0% | 80.61% | [View Details](/codecs/av01.2.23H.10.html) | | `av01.2.23M.08` | 0.0% | 80.62% | [View Details](/codecs/av01.2.23M.08.html) | | `av01.2.23M.10` | 0.0% | 80.65% | [View Details](/codecs/av01.2.23M.10.html) | ## Audio [Section titled “Audio”](#audio) | Codec String | Encoder Support | Decoder Support | Details | | ------------ | --------------- | --------------- | ----------------------------------------- | | All variants | 33.08% | 92.11% | [View Family Support](/codecs/audio.html) | | `opus` | 94.04% | 94.34% | [View Details](/codecs/opus.html) | | `mp4a.40.02` | 87.47% | 94.27% | [View Details](/codecs/mp4a.40.02.html) | | `mp4a.40.05` | 87.47% | 94.27% | [View Details](/codecs/mp4a.40.05.html) | | `mp4a.40.2` | 87.47% | 94.27% | [View Details](/codecs/mp4a.40.2.html) | | `mp4a.40.29` | 87.47% | 94.27% | [View Details](/codecs/mp4a.40.29.html) | | `mp4a.40.5` | 87.47% | 94.27% | [View Details](/codecs/mp4a.40.5.html) | | `alaw` | 8.53% | 93.58% | [View Details](/codecs/alaw.html) | | `pcm-f32` | 8.53% | 92.1% | [View Details](/codecs/pcm-f32.html) | | `pcm-s16` | 8.53% | 92.1% | [View Details](/codecs/pcm-s16.html) | | `pcm-s24` | 8.53% | 92.1% | [View Details](/codecs/pcm-s24.html) | | `pcm-s32` | 8.53% | 92.1% | [View Details](/codecs/pcm-s32.html) | | `pcm-u8` | 8.53% | 92.1% | [View Details](/codecs/pcm-u8.html) | | `ulaw` | 8.53% | 93.58% | [View Details](/codecs/ulaw.html) | | `vorbis` | 4.4% | 94.33% | [View Details](/codecs/vorbis.html) | | `flac` | 0.0% | 94.33% | [View Details](/codecs/flac.html) | | `mp3` | 0.0% | 94.34% | [View Details](/codecs/mp3.html) | | `mp4a.69` | 0.0% | 80.8% | [View Details](/codecs/mp4a.69.html) | | `mp4a.6B` | 0.0% | 80.8% | [View Details](/codecs/mp4a.6B.html) |
# Playback Architecture
> Ring buffers, backpressure, and AV sync
TBD
# Playback Architecture
> Ring buffers, backpressure, and AV sync
TBD
# WebCodecs performance
> Ring buffers, backpressure, and AV sync
TBD
# Why WebCodecs is harder than it looks
> Why WebCodecs is harder than it looks
If you’re sold on building with WebCodecs, great! I now want to moderate your expectations a bit, because building with WebCodecs is more difficult than it looks. Consider this deceptively simple “hello world” example in \~20 lines of code to decode and play a video. ```typescript import { demuxVideo } from 'webcodecs-utils' async function playFile(file: File){ const {chunks, config} = await demuxVideo(file); const canvas = document.createElement('canvas'); const ctx = canvas.getContext('2d'); const decoder = new VideoDecoder({ output(frame: VideoFrame) { ctx.drawImage(frame, 0, 0); frame.close() }, error(e) {} }); decoder.configure(config); for (const chunk of chunks){ decoder.decode(chunks) } } ``` Where you read a file, extract `EncodedVideoChunk` objects, decode them, and paint the resulting `VideoFrame` objects to a canvas. While this code isn’t objectively wrong, it’s a proof-of-concept, not a video player, and there are so many issues with it. ### Basic issues [Section titled “Basic issues”](#basic-issues) Let’s start with the obvious: ##### Muxing/Demuxing [Section titled “Muxing/Demuxing”](#muxingdemuxing) How do you extract `EncodedVideoChunk` objects from a `File`? I put this mysterious `getChunks` method as a placeholder, but in reality the process of going from `File` to `EncodedVideoChunk[]` is a whole other thing called [demuxing](../../basics/muxing), involving parsing the source video, and extracting byte ranges for each frame, and constructing an `EncodedVideoChunk` object. The WebCodecs API **doesn’t help you at all there**, you need to “Bring your own chunks”, but fortunately there are [libraries](../media-bunny/) that help with this, which we’ll get to. ##### Audio [Section titled “Audio”](#audio) This code doesn’t handle audio. There are audio equivalents to each one of the video classes previously mentioned. | Video | Audio | | ------------------- | ------------------- | | `VideoDecoder` | `AudioDecoder` | | `VideoEncoder` | `AudioEncoder` | | `VideoFrame` | `AudioData` | | `EncodedVideoChunk` | `EncodedAudioChunk` | Fortunately the API for `AudioEncoder`, `AudioDecoder` and `EncodedAudioChunk` are nearly identical to their video equivalents, but `AudioData` is quite different from `VideoFrame`. You not only need to extract raw audio from video, you’d also need to play it back using WebAudio, and you also need to synchronize the audio and video. There are established [patterns](../../patterns/playback/) for this which we’ll get to. ##### VideoFrame memory [Section titled “VideoFrame memory”](#videoframe-memory) `VideoFrame` objects are memory intensive - a single 4K video frame would take about 24 MB of Video memory on a graphics card, meaning that a modest graphics card (\~5GB of Video Memory) would at most be able to have 200 frames in memory (\~7 seconds of video) in the best case scenario. So if you have a 4K video that is longer than 7 seconds, the above code would crash most computers. Managing lifecycle memory for `VideoFrame` objects isn’t a ‘performance optimization’, WebCodecs code just won’t work without managing memory. You can very easily free up memory by calling `frame.close()` to free up the video memory from a `VideoFrame` once you are done using it, which is fine enough for this use case, but keep in mind that real world implementations will involve keeping a buffer of `VideoFrame` objects in memory where memory management is an ongoing concern. ### Less Obvious issues [Section titled “Less Obvious issues”](#less-obvious-issues) After years of working on WebCodecs, I can assure you that the above concerns are just scratching the surface. I’m going to throw a laundry list of less obvious concerns that you’d need to keep in mind: **Decode/Encode queue** On top of managing the lifecycle of `VideoFrame` objects, you also need to keep in mind that `VideoEncoder` and `VideoDecoder` objects have a queue, called `decoder.decodeQueueSize` and `encoder.encodeQueueSize`. You can’t just do: ```typescript import { getVideoChunks } from 'webcodecs-utils' const chunks = await getVideoChunks(file); for (const chunk of chunks){ decoder.decode(chunks) } ``` You have to progressively send chunks for decoding (or frames for encoding), managing the queue size so as to not overwhelm the encoder/decoder, otherwise the application might crash. **Encoding Settings** If you’re encoding video, the same encoding settings won’t work on different browsers, on different devices, or even on the same video but with different resolutions. You almost certainly need something like this in your code ```typescript const configs = [setting1, setting2, setting3, setting4, setting5...] let encoderConfig; for (config of configs){ const isSupported = await VideoEncoder.isConfigSupported(config); if(isSupported.supported){ encoderConfig = config; } } ``` **Warmup and Flush** If you start sending chunks for decoding, you can’t just send one chunk for decoding, and then wait for the first frame to decode. Decoders will typically need 3 to 5 chunks to be sent, at a minimum, before `VideoFrame` objects start being rendered. The number of chunks to be sent will depend on the device, browser etc… Even when you send all the chunks for decoding (or all the chunks for encoding), the last few results might never generate, and you’d need to call `decoder.flush()` or `encoder.flush()` to move them out of the queue. **Decoder / Encoder failure** Some times, a video might have a corrupted frame, and the decoder will just fail and stop decoding subsequent frames. You need to gracefully recover from decoder failures, which will happen. ### Making your life easier [Section titled “Making your life easier”](#making-your-life-easier) I omitted a ton of issues from just off the top of my head because there are so many, and I don’t want to overwhelm you. Hopefully I convinced you that WebCodecs is complex, and honestly, that’s why I’m creating this whole website, to go over all this stuff not covered in hello-world tutorials. That said, there’s another way to make your life significantly easier with WebCodecs, and that is to use a library like [Mediabunny](https://mediabunny.dev/), which handles many of these implementation details for you, which we’ll cover in later sections.
# What are Codecs?
> Beyond the spec - understanding the WebCodecs API and its place in web video engineering
Many readers will be well aware of what codecs are, so if you already have a good grasp of video processing feel free to [skip this section](../what-is-webcodecs/). Presumably if you are reading this, you are interested in doing some form of video processing in the browser, and when working with video, you need to understand what codecs are, and what video encoding / decoding is, and how those fit into a video application. ##### Raw Video Data [Section titled “Raw Video Data”](#raw-video-data) The reason we even need a “codec” is because raw video is impractically large, even with the most advanced hardware and fastest internet connections. Consider the simplest possible video, a simple bouncing ball:  This video is made of 8 different frames which are looped, with each frame looking like this:  This “video” is essentially 24 pixels by 13 pixels, and each pixel is represented by an RGB color value, where the value for each color is typically represented as 8-bit integer (a byte). Each frame therefore has 3 bytes per pixel, and 24\*13 = 312 pixels, resulting in 936 bytes per frame. The video also played back at 10 frames per second, so each second of this video is (936 bytes/frame)(10 frames/second) = 9.14 kilobytes / second. With 3600 seconds in an hour, an hour of this 24p video would be 32 megabytes. ###### This doesn’t scale well [Section titled “This doesn’t scale well”](#this-doesnt-scale-well) Most videos are not that small, so instead, consider a 240p video, which is probably the lowest possible resolution you’d ever encounter in the real world. At 240x320 pixels per frame, you’d have 225 kilobytes per frame. At 24 frames per second, the video would be at about 5.27 megabytes per second, or 18 gigabytes per hour of video. Let’s go to a reasonable viewing size, 720p at 30fps, that would be 79.1 megabytes/second or 278 Gigabytes per hour. Finally, a 4K video at 60fps would be 1.39 Gigabytes per second, or 5.4 Terabytes per hour of video. Most standard consumer hard drives aren’t even big enough to store a single hour of raw 4K video, and even the best internet connections in the world would struggle with streaming raw 4K video. ##### Codecs === Compression [Section titled “Codecs === Compression”](#codecs--compression) If you’ve ever downloaded large videos before, you’d know that actual video files are much smaller, usually several gigabytes per hour for a single hour of HD video, which is \~100x smaller than raw video. A video codec is essentially an algorithm (or software/hardware implementation of one) to turn raw video into a compressed format (Video Encoding) and to parse compressed video data back into raw video (Video Decoding). How these algorithms manage to ‘compress’ video files by 100x while still looking pretty good is a whole other interesting topic outside the scope of this guide, but here are a few interesting resources if you are curious \[[1](https://www.youtube.com/watch?v=Q2aEzeMDHMA)] ###### Some popular codecs [Section titled “Some popular codecs”](#some-popular-codecs) For someone getting started with video processing, there are a few popular codecs which are fairly standard in the industry which you should know about: * H264 - By far the most common codec. Most “mp4” files that you will find will typically use the h264 codec. This is a patented codec, so while users can freely use h264 players to watch video, large organizations which encode lots of video using h264 may be liable to pay patent royalties. * H265 - Less common, newer, and has better compression than h264. Fairly widely supported but with major exceptions, same patent concerns as the h264. * VP8 - Open source video codec, used often in WebRTC because it is very fast for encoding, though the quality of compression is not as good as other codecs. * VP9 - Successor to VP8, also open source, developed at Google, many videos on YouTube are encoded with VP9 and also fairly well supported * AV1 - The latest, most advanced open source codec, with better compression than all the above options, developed by an independent consortium of organizations. Decoding/playback is widely supported across devices and browsers, but because decoding is significantly slower / more expensive than VP9, it is still being rolled out, with the encoding speed making it not very relevant for client-side WebCodecs applications. * ProRes - ProRes is a propriety compression format by Apple which is often used in Video Editing circles, but as it is not part of the WebCodecs spec or supported by browsers for playback or encoding, it is not relevant for WebCodecs You can find more about video codecs [here](https://developer.mozilla.org/en-US/docs/Web/Media/Guides/Formats/Video_codecs) ##### When to use codecs [Section titled “When to use codecs”](#when-to-use-codecs) There are a number of reasons where you might build an application that needs to deal specifically with video codecs, here are a few examples: ###### Video Decoding [Section titled “Video Decoding”](#video-decoding) If you are building a video player software, like [VLC](https://www.videolan.org/vlc/) you will likely only need to deal with video decoding, as either you have videos being supplied by a user, which are almost always encoded/compressed, or you and/or your organization stores encoded/compressed videos on your servers. If you do any kind of machine learning analysis on a video (like detecting objects in a video) you will need some kind of codec to decode compressed video into raw video frames, as Machine Learning models almost always work on raw, uncompressed image or video data. ###### Video Encoding [Section titled “Video Encoding”](#video-encoding) If you are building video recording software like [OBS](https://obsproject.com/), you will primarily deal with video encoding, as you likely are grabbing raw video data from a camera, or a computer screen share, or some other raw video source, and your application will need to compress that raw video to encoded video. Also, if you render video, either by rendering complex 3d graphics, or generate video using generative AI models, you would still need a video encoder to turn the raw video generated by the graphics engine / AI model into a video file that can actually be stored / sent over a network and/or played back by users. ###### Both Decoding and Encoding [Section titled “Both Decoding and Encoding”](#both-decoding-and-encoding) Some common use cases for encoding and decoding are when building video editing software (where source videos need to be decoded and the frames painted onto some kind of canvas, and then encoded when exporting the video), or with video processing utilities like [ffmpeg](https://www.ffmpeg.org/) or [handbrake](https://handbrake.fr/) which can convert video from one format to another, or even [upscaling software](https://github.com/k4yt3x/video2x).
# What is WebCodecs?
> Beyond the spec - understanding the WebCodecs API and its place in web video engineering
WebCodecs is a browser API that enables low level control over video encoding and decoding of video files and streams on the client, allowing frontend application developers to manipulate video in the browser on a per-frame basis. While there are other WebAPIs that work with videos, like the [HTML5VideoElement](https://developer.mozilla.org/en-US/docs/Web/API/HTMLVideoElement), [WebRTC](https://developer.mozilla.org/en-US/docs/Web/API/WebRTC_API), [MediaRecorder](https://developer.mozilla.org/en-US/docs/Web/API/MediaRecorder) and [MediaSource](https://developer.mozilla.org/en-US/docs/Web/API/Media_Source_Extensions_API) APIs, none enable the low-level control that WebCodecs does, which is critical for tasks like Video Editing, Transcoding and high-performance streaming. At its most fundamental level, the WebCodecs API can boil down to two interfaces that the browser exposes: [VideoDecoder](https://developer.mozilla.org/en-US/docs/Web/API/VideoDecoder) and [VideoEncoder](https://developer.mozilla.org/en-US/docs/Web/API/VideoEncoder), which you can use to decode and encode video respectively, as well as two “Data types”: [EncodedVideoChunk](https://developer.mozilla.org/en-US/docs/Web/API/EncodedVideoChunk) and [VideoFrame](https://developer.mozilla.org/en-US/docs/Web/API/VideoFrame), which represent encoded vs raw video data respectively. We’ll get to audio later. The core API for WebCodecs looks deceptively simple:  Where the decoder and encoder are just processors that transform `EncodedVideoChunk` objects into `VideoFrame` objects and vice versa. ##### Decoder [Section titled “Decoder”](#decoder) To decode video you would use a `VideoDecoder` object, which just requires two properties: an output handler (a callback that returns a `VideoFrame` when it is decoded) and an error handler. ```typescript const decoder = new VideoDecoder({ output(frame: VideoFrame) { // Do something with the raw video frame }, error(e) {/* Report an error */} }); ``` We need to first configure the decoder ```typescript decoder.configure(/* Decoder config, will cover later */) ``` To actually decode video, you would call the `decode` method, passing your encoded video data in the form of (`EncodedVideoChunk`) objects, and the decoder would start returning `VideoFrame` objects in the output handler you defined earlier. ```typescript decoder.decode( encodedVideoData); ``` ##### Encoder [Section titled “Encoder”](#encoder) Encoding Video is very similar, but reverses the process. Whereas a `VideoDecoder` transforms `EncodedVideoChunk` objects to `VideoFrame` objects, a `VideoEncoder` will transform `VideoFrame` objects to `EncodedVideoChunk` objects. ```typescript const encoder = new VideoEncoder({ output(chunk: EncodedVideoChunk, metaData?: Object) { // Do something with the raw video frame }, error(e) {/* Report an error */} }); ``` Again we need to configure the encoder ```typescript encoder.configure(/* Encoding settings*/) ``` To actually encode video, you would call the `encode` method, passing your raw `VideoFrame` objects, and the encoder would start returning `EncodedVideoChunk` objects in the output handler you defined earlier. ```typescript encoder.encode( rawVideoFrame); ``` ##### There’s a lot more to it [Section titled “There’s a lot more to it”](#theres-a-lot-more-to-it) So the core of WebCodecs is to expose interfaces around a `VideoDecoder` and `VideoEncoder`, and while those classes look simple enough, there’s [a lot more](\(../reality-check\)) to take into account, from basics like working with audio, how to get `EncodedVideoChunks` objects in the first place, to all the architecture you’d need to create actually build a [video player](../../patterns/playback) or [transcoding pipeline](../../patterns/transcoding). So while a hello-world tutorial for WebCodecs can fit in less than 30 lines of code, building a production-level WebCodecs requires a lot more code, a lot more process management and a lot more edge case and error handling. The rest of this guide is designed to cover those complexities, and close the gap between hello world demos and production-level video processing apps.
# Why Use WebCodecs?
> Use cases where WebCodecs shines
WebCodecs enables low-level video processing in the browser, with native or near-native level encoding and decoding performance. This enables web application developers to develop high-performance video applications that were previously either the domain of desktop software, or which required server-side video processing. A few common examples of types of applications where WebCodecs would be relevant: * Browser based video editing software (like [Diffusion Studio](https://www.diffusion.studio/) or [Clipchamp](https://www.clipchamp.com)) * Streaming media to/from browser with more control than WebRTC (e.g. [Media Over Quic](https://moq.dev/)) * Generating videos programatically in the browser (e.g. [Remotion](https://www.remotion.dev/)) * Video utilities to [convert](https://www.remotion.dev/convert) or [enhance](https://free.upscaler.video) videos in the browser While WebCodecs would almost certainly enable entirely new use cases, there is a lot of value in simply developing applications that fit in existing video software categories as client-side web-applications via WebCodecs, instead of as desktop software or server-side software. Presuming you have or plan to build some form of application which does video processing, the question of “Why Webcodecs” comes down to the advantages/disadvantages of client-side video processing in the browser, compared to the other main options of (1) Desktop app with local processing (2) Web-app with server-side processing. #### Versus Desktop [Section titled “Versus Desktop”](#versus-desktop) If you were to, say, build a Video Editing tool or a Video Enhancement tool, you could build a desktop app (the traditional) way or as a web-app with WebCodecs, however compared to desktop software, WebCodecs has a few key advantages: * No installation or configuration necessary, leading to lower friction and a smoother user journey * Easier access to a rich ecosystem of frontend libraries, enabling faster development and better UX/Design It’s not to say that the web is a perfect medium, there are downsides such as file management, whereas desktop software by default has full access to the file system enabling reading/detecting of video files, and saving of exported videos to your file system without asking for permission, browsers inherently operate with more stringent security and so for a web-app to gain read or write access to a specific directory, the user needs to grant explicit permissions via the [FileSystem API](https://developer.mozilla.org/en-US/docs/Web/API/File_System_API) #### Versus Server-side Processing [Section titled “Versus Server-side Processing”](#versus-server-side-processing) You could also build an application using server-side processing and a web-application frontend for the same kinds of tools. Compared to server-side processing, you wouldn’t get much of a UX benefit as your interface would primarily be for web, however with WebCodecs you have a key advantage * No server-side costs I can’t provide specifics for other companies, however having worked for companies like [Streamyard](https://streamyard.com) (browser-based live streaming tool), I know that server-side video processing was one of the biggest costs, and when it came time to build my own [video editing software](https://katana.video) I chose to implement in WebCodecs to enable trivially low operating costs even at scale. #### WebCodecs is the best of both worlds [Section titled “WebCodecs is the best of both worlds”](#webcodecs-is-the-best-of-both-worlds) Webcodecs provides the best of both worlds, the simplicity of web-applications, with the cost-effectiveness of locally run software, and I’ll provide an example where the same application could have been built as a desktop tool, a server-side tool or a WebCodecs tool, and where the WebCodecs tool is obviously better. Let’s say someone gave you a WebM file and you needed to convert it to an MP4. **The Desktop option**: Previously, you could download software like [Handbrake](https://handbrake.fr/)  Handbrake is great that it’s free and open source, but it does require (1) installation and configuration (2) knowledge of web codecs and ‘what you are doing’, and the interface is dated. **Server Option**: If you search “Convert WebM to MP4”, many search engines will show results like [Free Convert](https://www.freeconvert.com/webm-to-mp4) but, because the service is server based, they (1) Have strict limits, (2) often have advertising to compensate for server-costs.  **WebCodecs option**: Compared to both, consider [Remotion convert](https://www.remotion.dev/convert), a simple webcodecs based video conversion tool. There is nothing to install, it has no ads, it has a great UI/UX and it just works.  By combining the best of both worlds, WebCodecs enables building video experiences that are simple to use, good quality and essentially free to operate. ### What WebCodecs replaces [Section titled “What WebCodecs replaces”](#what-webcodecs-replaces) Some developers had realized the potential of client-side video processing before Browser vendors even came up with WebCodecs. Previously many tools used [ffmpeg.js](https://github.com/Kagami/ffmpeg.js/), a port of ffmpeg to the browser, and run via Web Assembly, to handle video decoding in the browser. Because these were ‘hacks’, that also didn’t take full advantage of hardware encoding/decoding, the performance was much worse than WebCodecs, and so WebCodecs was conceived in part to give developers an official, high-performance option to do what many were already doing via cumbersome workarounds.
# LLM Resources
> Documentation resources optimized for Large Language Models
# WebCodecs Fundamentals for LLMs [Section titled “WebCodecs Fundamentals for LLMs”](#webcodecs-fundamentals-for-llms) While WebCodecs Fundamentals is proudly human-generated, we want to encourage usage by Large Language Models to help developers build better WebCodecs applications. Since WebCodecs is a rapidly evolving API with limited resources in existing training datasets, providing this comprehensive documentation in LLM-friendly formats helps ensure accurate, up-to-date assistance. ## Download Resources [Section titled “Download Resources”](#download-resources) * [**llms.txt**](/llms.txt) - Index of all documentation pages with descriptions * [**llms-full.txt**](/llms-full.txt) - Complete documentation in a single file (16,437 lines) * [**llms-small.txt**](/llms-small.txt) - Compact version with page structure only (318 lines) ## What’s Included [Section titled “What’s Included”](#whats-included) The full documentation covers: * **Introduction** - What WebCodecs is and why to use it * **Core Concepts** - CPU vs GPU, threading, streams, file handling * **Basics** - VideoFrame, EncodedVideoChunk, encoders, decoders, rendering * **Audio** - AudioData, AudioEncoder, AudioDecoder, playback * **Design Patterns** - Production patterns for playback, transcoding, editing, streaming * **Datasets** - Empirical codec support data from 224k+ user sessions * **Ecosystem** - MediaBunny, Media Over QUIC, Remotion ## Usage [Section titled “Usage”](#usage) These files are automatically generated at build time from the same source as the official documentation. They include: * All markdown content from the documentation * Code examples and API references * Real-world implementation patterns * Production-tested best practices ## License [Section titled “License”](#license) This documentation is released under the MIT License. Content is freely available for educational and commercial use with attribution. *** **[View the full site →](https://webcodecsfundamentals.org)**
# The Decoding Loop
> From MP4Box to Mediabunny
TBD
# How to build a video editor with Mediabunny
> Coming soon
Coming soon
# An Intro to Mediabunny
> Managing encoder queues and flushing
WebCodecs gives low-level access to hardware accelerated video encoding and decoding in the browser. [Mediabunny](https://mediabunny.dev/) builds on top of WebCodecs, adding key utilities like muxing/demuxing, simplifying the API, and implementing best practices. The result is a general purpose media processing library for the browser. Mediabunny facilitates common media processing tasks like * Extracting metadata from a video * Transcoding a video * Procedurally generating a video * Muxing / demuxing live video streams ## Core Concepts [Section titled “Core Concepts”](#core-concepts) Mediabunny simplifies a lot of the details compared to video encoding and decoding, and to facilitate this, it has an API that is a bit different from the core WebCodecs API. #### No more Encoder and Decoder [Section titled “No more Encoder and Decoder”](#no-more-encoder-and-decoder) With Mediabunny you don’t need to work directly with the `VideoEncoder` or `VideoDecoder`. Mediabunny still uses them under the hood, but the API and core concepts are designed in a way that you don’t touch them anymore. #### Inputs and Outputs [Section titled “Inputs and Outputs”](#inputs-and-outputs) Instead, you work with Inputs and Outputs, which are wrappers around actual video or audio files. ###### Inputs [Section titled “Inputs”](#inputs) Inputs are a wrapper around some kind of video source, whether that’s a blob, a file on disk (for server js environments), a remotely hosted URL or an arbitrary read stream.  That makes it possible to maintain the same video processing logic regardless of where your video is coming from. For example, you could build a video player and maintain the same playback logic regardless of whether your video is cached locally or coming from a remotely hosted url. The “where your video” is coming from is encapsulated by the `source` parameter for the `Input` constructor, as below: ```typescript import { Input, ALL_FORMATS, BlobSource } from 'mediabunny'; const input = new Input({ formats: ALL_FORMATS, source: new BlobSource(file), }); ``` ###### Outputs [Section titled “Outputs”](#outputs) Likewise, Outputs are a wrapper around wherever you might write a file to, whether that’s an `ArrayBuffer` (in memory), a local file (for serverjs environments) or a write stream.  The API is likewise similar for output, but here, the ‘wherever you might write a file to’ is encapsulated by the `target` parameter. ```typescript import { Output, Mp4OutputFormat, BufferTarget } from 'mediabunny'; const output = new Output({ format: new Mp4OutputFormat(), target: new BufferTarget(), }); ``` This way, you can maintain the same processing logic regardless of where your file is being written to. #### Tracks [Section titled “Tracks”](#tracks) WebCodecs never explicitly define or work with *Tracks*, like a file’s Audio or Video tracks, even if other Web APIs do. Mediabunny explicitly deals with tracks, facilitating reading and writing data to/from files and streams. ```typescript // We'll need this to read video data const videoTrack = await input.getPrimaryVideoTrack(); ``` And we’ll also write to output tracks, e.g. ```typescript output.addVideoTrack(videoSource); // We'll get to this next ``` #### Media Sources and Sinks [Section titled “Media Sources and Sinks”](#media-sources-and-sinks) Mediabunny introduces a new concept called *Sources* and *Sinks*. A *Media Source* a place where you get video from, and a *Media Sink* is where you send video to. ###### MediaSource [Section titled “MediaSource”](#mediasource) A media source is where you’d get video from, like a `` or a webcam, and a *Media Source* is what you would pipe to an *Output*.  So to record a `` to file, the setup to pipe the canvas to the file would look like this ```typescript import { CanvasSource, Output, Mp4OutputFormat } from 'mediabunny'; const videoSource = new CanvasSource(canvasElement, {codec: 'avc',bitrate: 1e6}); const output = new Output({ format: new Mp4OutputFormat(), target: new BufferTarget(), }); output.addVideoTrack(videoSource); ``` Then actually recording a canvas would look something like this: ```typescript await output.start(); for (let i=0; i < 10; i++){ //Grab 10 frames a 100ms intervals videoSource.add(i*0.1, 0.1); //timestamp, duration await new Promise((r)=>setTimeout(r, 100)); } await output.finalize() ``` ###### MediaSinks [Section titled “MediaSinks”](#mediasinks) A Media Sink is where you’d send video or audio to. You would usually pipe an *Input* to a *MediaSink*.  One really nice advantage of Mediabunny is efficiently handling the WebCodecs to WebAudio interface, handling the direct conversion to `AudioBuffer` objects and facilitating playback of audio in the browser. Here’s how you’d play back audio in the browser from a video file, by connecting an input to `AudioBufferSink` ```typescript import { AudioBufferSink } from 'mediabunny'; const audioTrack = await input.getPrimaryAudioTrack(); const sink = new AudioBufferSink(audioTrack); for await (const { buffer, timestamp } of sink.buffers()) { const node = audioContext.createBufferSource(); node.buffer = buffer; node.connect(audioContext.destination); node.start(timestamp); } ``` #### Packets and Samples [Section titled “Packets and Samples”](#packets-and-samples) Mediabunny also uses slightly different terminology from WebCodecs. Whereas WebCodecs has `VideoFrame` and `AudioData` for raw video and audio, Mediabunny uses `VideoSample` and `AudioSample`. Here’s a quick table comparing the terminology | | WebCodecs | Mediabunny | | ------------- | ------------------- | -------------------- | | Raw Video | `VideoFrame` | `VideoSample` | | Raw Audio | `AudioData` | `AudioSample` | | Encoded Video | `EncodedVideoChunk` | `EncodedVideoPacket` | | Encoded Audio | `EncodedAudioChunk` | `EncodedAudioPacket` | These are mostly comparable, and you can easily convert between the two using the following methods | | WebCodecs -> Mediabunny | Mediabunny-> WebCodecs | | ------------- | ---------------------------------- | ------------------------------ | | Raw video | `new VideoSample(videoFrame)` | `sample.toVideoFrame()` | | Raw audio | `new AudioSample(audioData)` | `sample.toAudioData()` | | Encoded Video | `EncodedPacket.fromEncodedChunk()` | `packet.toEncodedVideoChunk()` | | Encoded Audio | `EncodedPacket.fromEncodedChunk()` | `packet.toEncodedAudioChunk()` | This is helpful as WebCodecs primitives like `VideoFrame` are not defined in server runtimes like Node, but Mediabunny works just fine. It also allows you to work with a common type for raw audio (`AudioSample`) instead of juggling two redundant APIs like `AudioBuffer` (for WebAudio) and `AudioData` for WebCodecs. #### For Loops [Section titled “For Loops”](#for-loops) As I’ve discussed several times, with WebCodecs you can’t treat encoding and decoding as a simple per frame operation \[[1](../../patterns/transcoding)] ```typescript //Pseudocode. This is NOT how transcoding works for (let i=0; i< numChunks; i++){ const chunk = await demuxer.getChunk(i); const frame = await decoder.decodeFrame(frame); const processed = await render(frame); const encoded = await encoder.encode(processed); muxer.mux(encoded); } ``` Instead, you need to treat them as a pipeline, with internal buffers and queues at each stage of the process [\[2\]](../../concepts/streams). Mediabunny abstracts the pipeline complexity away, enabling you to actually perform per-frame operations: ```typescript import { BlobSource, Input, MP4, VideoSampleSink } from 'mediabunny'; const input = new Input({ formats: [MP4], source: new BlobSource(file), }); const videoTrack = await input.getPrimaryVideoTrack(); const sink = new VideoSampleSink(videoTrack); // Loop over all frames for await (const sample of sink.samples()) { const frame = await sample.toVideoFrame(); //Do something with the frame } ``` I’m not trying to be pedantic with this guide, treating video processing as a pipeline is best practice. Mediabunny actually does use the [Streams API](../../concepts/streams) under the hood, but uses clever architecture to simplify the API so that you can treat it as an async per-frame operation and not worry about buffer stalls or memory management. ### Other differences [Section titled “Other differences”](#other-differences) A few other differences to note compared to WebCodecs: * Mediabunny uses seconds, not microseconds for all timestamps and durations * Mediabunny works with MP3 files * You don’t need to specify fully qualified codec strings, just the codec family (e.g. `avc` instead of `avc1.42001f`) ### A concrete example [Section titled “A concrete example”](#a-concrete-example) With the core concepts covered, perhaps the easiest way to understand Mediabunny is to see a working end to end example. To that end, we’ll use Mediabunny to transcode a video file, just re-encoding the video track and passing through the audio without re-encoding. ```typescript import { BlobSource, BufferTarget, Input, MP4, Mp4OutputFormat, Output, QUALITY_HIGH, VideoSample, VideoSampleSink, EncodedAudioPacketSource } from 'mediabunny'; async function transcodeFile(file: File): Promise { const input = new Input({ formats: [MP4], source: new BlobSource(file), }); const audioTrack = await input.getPrimaryAudioTrack(); const videoTrack = await input.getPrimaryVideoTrack(); const output = new Output({ format: new Mp4OutputFormat(), target: new BufferTarget(), }); const videoSource = new VideoSampleSource({ codec: 'avc', bitrate: QUALITY_HIGH, keyFrameInterval: 5, }); const audioSource = new EncodedAudioPacketSource(audioTrack.codec); output.addVideoTrack(videoSource, { frameRate: 30 }); output.addAudioTrack(audioSource); const sink = new VideoSampleSink(videoTrack); const audioSink = new EncodedPacketSink(audioTrack); // Loop over all frames, with re-encoding for await (const sample of sink.samples()) { videoSource.add(sample); } // Pass audio without re-encoding for await (const packet of audioSink.packets()) { audioSource.add(packet); } await output.finalize(); return output.target.buffer } ``` ## Further resources [Section titled “Further resources”](#further-resources) #### Mediabunny [Section titled “Mediabunny”](#mediabunny) * [Website](https://mediabunny.dev/) * [Mediabunny Discord](https://discord.com/invite/hmpkyYuS4U) #### Tutorials (tutorials coming soon) [Section titled “Tutorials (tutorials coming soon)”](#tutorials-tutorials-coming-soon) * [Video Player](../transcoding) * [Transcoding](../transcoding) * [Video Editing](../editing) * [Live Streaming](../live-streaming)
# Livestreaming with Mediabunny and MoQ
> Low-latency encoder pipelines
Coming soon
# How to build a video player with Mediabunny
> Coming soon
Coming soon
# How to transcode a file with Mediabunny
> Coming oon
Coming soon
# Transcoding
> Managing encoder queues and flushing
# The Decoding Loop
> From MP4Box to Mediabunny
TBD
# How to build a video editor with WebCodecs
> Patterns and best practices for building video editing functionality with WebCodecs
Work in Progress
# How to to programmatically generate video
> Patterns and best practices for generating video programmatically
Work in Progress
# Streaming video with WebCodecs
> How to live stream with WebCodecs and Media over Quic (MoQ)
There are many ways to stream video over the internet, and of all the ways to deal with video streaming in the browser (``, MSE, WebRTC), WebCodecs provides the lowest level control. Emerging technologies like [Media Over Quic](../../projects/moq.md) use WebCodecs to provide lower latency and higher scalability than with previous options. Unlike a transcoding pipeline, where it’s pretty clear cut what needs to be done, how you would build a video-streaming application depends entirely on what you are trying to do. Here are just a few kinds of applications with some form of video streaming: * An application to watch live sports broadcasts * Recording software to stream your webcam to multiple social-media live-streaming platforms * A webinar tool where a few hosts stream content to many attendees Each would have a different architecture, and for each there might be multiple ways to accomplish the same thing, so the choice of WebCodecs vs MSE vs WebRTC etc.. becomes a design choice. To make this manageable, I’ll focus on how to do the following with WebCodecs: * Stream video from a browser to a browser (e.g. video conferencing) * Stream video from a browser to a server (e.g. recording studio) * Stream video from a server to a browser (e.g. live broadcast) I’ll then provide a quick overview of the alternatives (WebRTC, MSE) and include some real world case studies of streaming applications and their architectures, to help you decide if and where WebCodecs makes sense. Because WebCodecs works with binary encoded video data, it’s a lot easier to integrate with server media processing libraries like ffmpeg and gstreamer. I’ll therefore assume you can do whatever processing you need based on your application’s business logic with server media processing libraries, and I’ll stick to how you’d stream video to/from the browser with WebCodecs. ## Data transfer [Section titled “Data transfer”](#data-transfer) Raw video is too large to stream over a network, so in any streaming scenario we’ll be working with encoded video and audio data. For WebCodecs specifically, we’ll primarily be working with `EncodedVideoChunk` and `EncodedAudioChunk` objects. Other browser APIs like `WebRTC`and `MSE` have data transfer built-in and application developers don’t normally manage how individual video packets are sent over the network. The strength and weakness of WebCodecs is that it is very low-level, so you absolutely can control how individual video packets are sent over the network, but then you have to figure out how to send individual video packets over the network. #### The requirements [Section titled “The requirements”](#the-requirements) Let’s start with the example of sending a video stream from the browser to a server. Our `VideoEncoder` gives us `EncodedVideoChunk` objects, and an `EncodedVideoChunk` is just binary data with some meta data attached.  For a streaming, we’d need to send a bunch of these chunks, in real time, in order, over a network, in a bidirectional manner.  With generic data transfer, there are a number of ways we could accomplish this: #### The do-it-yourself networking options [Section titled “The do-it-yourself networking options”](#the-do-it-yourself-networking-options) ###### HTTP [Section titled “HTTP”](#http) You could theoretically expose an HTTP endpoint on your server and `POST` every frame as data. Here’s a simplified example where metadata is sent as a header * Client ```typescript const buffer = new Uint8Array(chunk.byteLength) chunk.copyTo(buffer); fetch('/upload', { method: 'POST', headers: { 'Content-Type': 'application/octet-stream', 'X-Timestamp': chunk.timestamp.toString(), 'X-Index': chunkIndex.toString(), 'X-Keyframe': chunk.type === 'key' ? '1' : '0', }, body: chunk.data, }); ``` * Server ```typescript app.post('/upload', (req, res) => { const timestamp = parseInt(req.headers['x-timestamp']); const keyframe = req.headers['x-keyframe'] === '1'; const chunkIndex = parseInt(req.headers['x-index']); const data = req.body; res.json({ ok: true }); }); ``` For streaming this is impractical, as you’d be sending dozens of http requests per second which is slow and error prone. There is also no way to send data back to the client. You could make http work if you just need to upload media in chunks without worrying about real-time, but there are also inherently more suitable options. ###### Web Sockets [Section titled “Web Sockets”](#web-sockets) Web Sockets enables you create a persistent connection with a server, and it enables bidirectional flows of data. Here you could come up with your own binary encoding scheme to fit metadata and chunk data together into a single binary buffer and send those between server and client. * Client ```typescript const ws = new WebSocket('ws://localhost:3000/upload'); const encoder = new VideoEncoder({ output: (chunk) => { const binaryData = customBinaryEncodingScheme(chunk); ws.send(binaryData); }, error: (e)=>{} //error handling }); ``` * Custom Binary Scheme ```typescript // Just an example, this is not official or canonical but it would work function customBinaryEncodingScheme(chunk: EncodedVideoChunk): Uint8Array { const metadata = { timestamp: chunk.timestamp, keyframe: chunk.type === 'key', size: chunk.data.byteLength, }; // Format: [metadata JSON length (4 bytes)] [metadata JSON] [binary data] const metadataStr = JSON.stringify(metadata); const metadataBytes = new TextEncoder().encode(metadataStr); const frame = new ArrayBuffer(4 + metadataBytes.length + chunk.data.byteLength); const view = new DataView(frame); // Write metadata length as 32-bit integer view.setUint32(0, metadataBytes.length, true); // Write metadata new Uint8Array(frame, 4, metadataBytes.length).set(metadataBytes); // Write binary data return new Uint8Array(frame, 4 + metadataBytes.length).set(new Uint8Array(chunk.data) }; ``` * Server ```typescript const express = require('express'); const WebSocket = require('ws'); const app = express(); const server = http.createServer(app); const wss = new WebSocket.Server({ server }); wss.on('connection', (ws) => { ws.on('message', (data) => { // data is a Buffer const chunk = parseCustomBinary(data); }); }); ``` If you are only sending data one way, this could work, but if you need to enable data from one browser to another, you’d need your server to concurrently handle multiple websocket sessions and set up your own routing system. ###### Web Transport [Section titled “Web Transport”](#web-transport) WebTransport is like a successor to WebSockets, with support being rolled out \[[2](https://caniuse.com/webtransport)], but it enables better performance and uses the [Streams API](../../concepts/streams). WebTransport lets you write this as a pipeline, where the video frame source (e.g. a user webcam) gets piped through the encoder (a `TransformStream` wrapper) and piped to a writer, which then writes data in a stream-like fashion over the network. ```typescript const transport = await WebTransport.connect('https://localhost:3000/upload'); const stream = await transport.createUnidirectionalStream(); const writer = stream.getWriter(); //PseudoCode frameSource.pipeThrough(videoEncoder).pipeTo(writer); ``` This is a practical option for unidirectional streams, though like WebSockets, if you need to enable data from one browser to another, you’d need to set up your own routing system. #### Media over Quic [Section titled “Media over Quic”](#media-over-quic) [Media over Quic](../../projects/moq) is a new protocol specifically designed for this use case of facilitating delivery of WebCodecs and other low-level streaming data without the need for ‘do-it-yourself’ networking. It works as a [pub-sub](https://en.wikipedia.org/wiki/Publish%E2%80%93subscribe_pattern) system, where a *publisher* can publish a stream of data to a *relay*, and a *subscriber* can subscribe to streams of data from a *relay*.  Unlike WebRTC servers (which are also relays) Media over Quic relays are content-agnostic and don’t rely on ‘session state’, making it more scalable. You can self host a relay \[[2](https://github.com/moq-dev/moq)], but several CDN providers also offer Media Over Quick relays \[[3](https://blog.cloudflare.com/moq/)]. * Publisher ```typescript import * as Moq from "@moq/lite"; const connection = await Moq.connect("https://relay.moq.some-cdn.com"); const broadcast = new Moq.Broadcast(); connection.publish('my-broadcast', broadcast); // Pull-mode, tracks are created when subscribers subscribe const {track, priority} = await broadcast.requested(); if(track.name ==='chat'){ const group = track.appendGroup(); group.writeString("Hello, MoQ!"); group.close(); } ``` * Subscriber ```typescript import * as Moq from "@moq/lite"; const connection = await Moq.connect("https://relay.moq.some-cdn.com"); // Subscribe to a broadcast const broadcast = connection.consume("my-broadcast"); // Subscribe to a specific track const track = await broadcast.subscribe("chat"); // Read data as it arrives for (;;) { const group = await track.nextGroup(); if (!group) break; for (;;) { const frame = await group.readString(); if (!frame) break; console.log("Received:", frame); } } ``` Here’s a quick demo of MoQ using Cloudflare’s public relay, where one iframe will publish text messages in a track, and the other a iframe will subscribe to the same track, and listen for messages from the relay Media over Quic greatly simplifies the networking aspect (you don’t even need to host your own server) while also being performant (CDN relays scale better than a WebRTC server) and providing low-level control over how and when you send encoded video chunks. This all makes it ideal for our use case of streaming encoded chunks, so that’s what we’ll use in the rest of our examples. You are of course free to use any data transfer mechanism you see fit, that is one of the benefits of WebCodecs. You can find out more about Media over Quic [here](../../projects/moq), it’s worth a read in general but for now it’s time to get to code. ## Getting webcam data [Section titled “Getting webcam data”](#getting-webcam-data) We’re going to start with streaming video and audio from the browser. Presumably the most common use case is to stream webcam audio and video and so that’s what we’re going to start with. #### getUserMedia [Section titled “getUserMedia”](#getusermedia) Our first step is to call [getUserMedia](https://developer.mozilla.org/en-US/docs/Web/API/MediaDevices/getUserMedia) which is an async call which will request the user’s webcam, specifically the audio you request ```typescript const stream = await navigator.mediaDevices.getUserMedia({ video: { width: 1280, height: 720 }, audio: true, }); ``` This returns a `MediaStream` object, which allows us to both preview the video, and is necessary for reading raw video frames or audio samples, or with use in other APIs like WebRTC. We then extract the tracks: ```typescript const videoTrack = stream.getVideoTracks()[0]; const audioTrack = stream.getAudioTracks()[0]; ``` And this lets get the specific track for audio and video.  #### MediaStreamTrackProcessor [Section titled “MediaStreamTrackProcessor”](#mediastreamtrackprocessor) To actually get raw audio and video data from the stream, we’ll need a [MediaStreamTrackProcessor](https://developer.mozilla.org/en-US/docs/Web/API/MediaStreamTrackProcessor). It’s not yet supported on Safari or Firefox, but we can use a [polyfill](https://github.com/sb2702/webcodecs-utils/blob/main/src/polyfills/media-stream-track-processor.ts): ```typescript import { MediaStreamTrackProcessor } from 'webcodecs-utils' const videoProcessor = new MediaStreamTrackProcessor({ track: videoTrack }); ``` We can then start reading `VideoFrame` objects: ```typescript const reader = videoProcessor.readable.getReader(); while (true) { const { done, value: frame } = await reader.read(); if (done) break; // Process the VideoFrame console.log('Frame timestamp:', frame.timestamp); // Don't forget to close frames when done! frame.close(); } ``` Each `VideoFrame` contains the raw video data along with metadata like timestamp. We need to close frames after processing to free memory. ```typescript const audioProcessor = new MediaStreamTrackProcessor({ track: audioTrack }); const reader = audioProcessor.readable.getReader(); while (true) { const { done, value: audioData } = await reader.read(); if (done) break; // Process the AudioData console.log('Audio sample rate:', audioData.sampleRate); console.log('Number of frames:', audioData.numberOfFrames); // Don't forget to close audio data when done! audioData.close(); } ``` The audio processor returns `AudioData` objects containing raw audio samples along with metadata like sample rate and channel count.  #### Encoding Pipeline [Section titled “Encoding Pipeline”](#encoding-pipeline) Rather than manually reading frames and encoding them one-by-one, we can use the [Streams API](https://developer.mozilla.org/en-US/docs/Web/API/Streams_API) to create a pipeline. We can wrap `VideoEncoder` and `AudioEncoder` in `TransformStream` objects. Here’s what a `VideoEncoderStream` looks like: ```typescript class VideoEncoderStream extends TransformStream { constructor(config: VideoEncoderConfig) { let encoder: VideoEncoder; let frameIndex = 0; super({ start(controller) { encoder = new VideoEncoder({ output: (chunk, meta) => { controller.enqueue({ chunk, meta }); }, error: (e) => controller.error(e), }); encoder.configure(config); }, async transform(frame, controller) { // Apply backpressure while (encoder.encodeQueueSize >= 20) { await new Promise((r) => setTimeout(r, 10)); } encoder.encode(frame, { keyFrame: frameIndex % 60 === 0 }); frame.close(); frameIndex++; }, async flush() { await encoder.flush(); if (encoder.state !== 'closed') encoder.close(); }, }, { highWaterMark: 10 }); } } ``` The `TransformStream` takes `VideoFrame` as input and outputs `EncodedVideoChunk`. The `start` method sets up the encoder, `transform` encodes each frame, and `flush` cleans up when the stream ends. ```typescript import { getBitrate, getCodecString } from 'webcodecs-utils'; const videoSettings = videoTrack.getSettings(); const width = videoSettings.width; const height = videoSettings.height; const fps = videoSettings.frameRate || 30; // Calculate optimal bitrate and codec string const bitrate = getBitrate(width, height, fps, 'good'); const config: VideoEncoderConfig = { codec: getCodecString('avc', width, height, bitrate), width, height, bitrate, framerate: fps, }; const videoEncoderStream = new VideoEncoderStream(config); // Pipe frames through encoder const encodedVideoStream = videoProcessor.readable .pipeThrough(videoEncoderStream); ``` The pipeline will now output `EncodedVideoChunk` objects representing the user’s webcam (you can do the same for audio). Using the [Streams API](../../concepts/streams) helps us manage memory and automatically handles setup, flushing and clean up.  #### Recording WebCam demo [Section titled “Recording WebCam demo”](#recording-webcam-demo) Now we have a stream of `EncodedVideoChunk` and `EncodedAudioChunk` data from our webcam. In the next section, we’ll pipe this to the internet, but just to have an intermediate working demo, we’ll pipe this data to a file. First, we’ll create a muxer ```typescript import { Muxer, StreamTarget } from 'mp4-muxer'; const storage = new InMemoryStorage(); const target = new StreamTarget({ onData: (data: Uint8Array, position: number) => { storage.write(data, position); }, chunked: true, chunkSize: 1024 * 1024 * 10 }); const muxer = new Muxer({ target, video: { codec: 'avc', width: videoSettings.width!, height: videoSettings.height!, }, audio: { codec: 'aac', numberOfChannels: audioSettings.channelCount!, sampleRate: audioSettings.sampleRate!, }, firstTimestampBehavior: 'offset', fastStart: 'in-memory', }); ``` Then we’ll create a muxer writer for each track ```typescript createVideoMuxerWriter(muxer: Muxer): WritableStream<{ chunk: EncodedVideoChunk; meta: EncodedVideoChunkMetadata }> { return new WritableStream({ async write(value) { muxer.addVideoChunk(value.chunk, value.meta); } }); } function createAudioMuxerWriter(muxer: Muxer): WritableStream { return new WritableStream({ async write(chunk) { muxer.addAudioChunk(chunk); } }); } ``` Then we can create a pipeline.  The AbortController allows us to stop the pipelines at any time via `abortController.abort()`, and so you could create a ‘stop recording’ button and have that call `abortController.abort()` to stop recording. ```typescript const abortController = new AbortController(); const videoPipeline = videoProcessor.readable .pipeThrough(videoEncoderStream) .pipeTo(createVideoMuxerWriter(muxer), { signal: abortController.signal }); const audioPipeline = audioProcessor.readable .pipeThrough(audioEncoderStream) .pipeTo(createAudioMuxerWriter(muxer), { signal: abortController.signal }) ``` We can await the pipelines, and the promise will resolve when the pipelines are done. We can then get our recorded video back; ```typescript // Resolves when we call abortController.abort() await Promise.all([videoPipeline, audioPipeline]); muxer.finalize(); const blob = storage.toBlob('video/mp4'); ``` Putting it all together, we can now record video in the browser without `MediaRecorder`, but rather by extracting `VideoFrame` and `AudioData` objects from the `MediaStream`, piping those through encoders, and streaming the results to a file. See the full code [here](https://github.com/sb2702/webcodecs-examples/blob/main/src/webcam-recording/recorder.ts) ## Streaming video over MoQ [Section titled “Streaming video over MoQ”](#streaming-video-over-moq) Now that we can covered: 1. How to send data over a Media over Quic (MoQ) relay 2. How to grab a stream of encoded audio & video from a webcam The next obvious step is to send encoded video over the network. We’re going to start with sending data between browsers as it’s the simplest case. The way to send arbitrary binary data over a track using the `@moq/lite` library is as follows: ```typescript // Pull-mode, tracks are created when subscribers subscribe const {track, priority} = await broadcast.requested(); if(track.name ==='video'){ const group = track.appendGroup(); group.writeFrame( buffer); //whatever you want group.close(); } ``` Where you create a *group*, and in that *group* you can attach an arbitrary number of `Uint8Array` buffers. And as we saw, `EncodedVideoChunk` objects are just binary data + metadata. MoQ doesn’t provide a specific protocol for how to send video or audio data. A core aspect of MoQ is that it is content agnostic, so you can come up with any schema you want for transmitting encoded chunks, as long as it is packaged as a `Uint8Array`. This goes well with WebCodecs, in that both technologies gives you much more control over encoding/data-transfer than is possible with WebRTC. If you just want something that works though, you can use an existing protocol like Hang which both works and is incredibly simple. #### Hang Protocol [Section titled “Hang Protocol”](#hang-protocol) Hang is a protocol for transmitting streaming media via MoQ. There is a [library](https://github.com/moq-dev/moq/tree/main/js/hang) to implement this, but the protocol is simple enough to implement yourself. ###### Catalog.json [Section titled “Catalog.json”](#catalogjson) Hang works by the publisher publishing a track called `'catalog.json'` with the available video and audio tracks to consume with the following structure: ```json { "video": { "renditions": { /*video0 is the name of the video track */ "video0": { "codec": "avc1.64001f", "description": "0164001fffe100196764001fac2484014016ec0440000003004000000c23c60c9201000568ee32c8b0", "codedWidth": 1280, "codedHeight": 720 } }, "priority": 1 }, "audio": { "renditions": { /*audio1 is the name of the audio track */ "audio1": { "codec": "mp4a.40.2", "sampleRate": 44100, "numberOfChannels": 2, "bitrate": 283637 } }, "priority": 2 } } ``` Where you specify available ‘audio’ tracks under ‘audio’ and video tracks under ‘video’. Each available track is listed under `'renditions'`, and you’d specify the track name for each track. The value for `catalog.video.tracks[trackName]` is the `VideoDecoderConfig` you need to decode the video track, and `catalog.audio.tracks[trackName]` has the config needed for `AudioDecoderConfig`. So to actually connect to a session, and be ready to start sending data, we’d have the publisher publish a broadcast, and have each subscriber subscribe to a broadcast, which provides the namespace. * Publisher ```typescript import * as Moq from "@moq/lite"; const connection = await Moq.connect("https://relay.moq.some-cdn.com"); const broadcast = new Moq.Broadcast(); connection.publish('my-broadcast', broadcast); ``` * Subscriber ```typescript import * as Moq from "@moq/lite"; const connection = await Moq.connect("https://relay.moq.some-cdn.com"); const broadcast = connection.consume("my-broadcast"); ``` Then, the publisher will publish track info via catalog.json. Because MoQ lite is built in a pull manner, the publisher listens for `catalog.json` track requests. ```typescript for (;;) { const trackRequest = await broadcast.requested(); const requestedTrack = trackRequest.track; if (requestedTrack.name === 'catalog.json') { const catalogJson = JSON.stringify(catalogData); const group = requestedTrack.appendGroup(); group.writeString(catalogJson); group.close(); } } ``` Any subscriber can then subscribe to the `catalog.json` track in the broadcast, and once it receives the catalog, it can start listening for the video and audio tracks, as well as set up the `AudioDecoder` and `VideoDecoder` ```typescript const catalogTrack = broadcast.subscribe('catalog.json'); for (;;) { const catalogGroup = await catalogTrack.nextGroup(); if (catalogGroup) { const catalogJson = await catalogGroup.readString(); const catalog = JSON.parse(catalogJson); // You know what tracks to listen for } } ``` ###### Streaming chunks [Section titled “Streaming chunks”](#streaming-chunks) The catalog has most of the data now needed to decode video or audio chunks, but there’s still two key bits of info needed: which chunks are key frames, and the timestamp of each chunk. First, to encode the timestamp, we’ll actally use a fixed 8-byte header to store the timestamp as an unsigned 8-byte integer. ```typescript //EncodedVideoChunk or EncodedAudioChunk const timestamp = chunk.timestamp; const header = new Uint8Array(8); const view = new DataView(header.buffer, header.byteOffset, 8); view.setBigUint64(0, BigInt(timestamp)); ``` Then, to encode the chunk, we’ll create a `Uint8Array` which is the size of the encoded chunk + the header byteLength, and then we set the header at position 0, and the chunk data at position 8 (header byteLength). ```typescript const data = new Uint8Array(header.byteLength + chunk.byteLength); data.set(header, 0); chunk.copyTo(data.subarray(header.byteLength)); ```  The receiver would parse the header to get the timestamp, and rest of the array would be the actual chunk data. This just leaves the question of which chunks are keyFrames. The way we can handle this is by writing chunks in groups ```typescript let group: Moq.Group | undefined; const encoder = new VideoEncoder({ output: (frame: EncodedVideoChunk) => { if (frame.type === "key") { groupTimestamp = frame.timestamp as Time.Micro; group?.close(); group = track.appendGroup(); } const buffer = encodeFrame(frame); // Logic from above group?.writeFrame(buffer); }, error: (err: Error) => { track.close(err); group?.close(err); }, }); ``` Then, when the subscriber listens for new groups in the track, the first frame in the group is always a key frame ```typescript const track = await broadcast.subscribe("videoTrack"); // Read data as it arrives for (;;) { const group = await track.nextGroup(); if (!group) break; let keyframe = true; // First is always a key frame for (;;) { const frame = await group.readFrame(); if(frame){ parseFrame(frame, keyframe); keyframe = false; } } } ``` While MoQ was built to be content agnostic, one reason for including `groups` as a core aspect was to enable sending groups of pictures (a key frame and all it’s subsequent delta frames), to improve streaming stability #### Browser to Browser Streaming [Section titled “Browser to Browser Streaming”](#browser-to-browser-streaming) With the Hang protocol, we now have everything to start streaming WebCodecs audio and video over MoQ. We’ll start by defining a publisher, which takes in the Audio/Video Config, listens for audio/video tracks, and creates audio/video pipelines to stream over MoQ. Next we define the subscriber, which will listen for `catalog.json`, and then when it’s available, it will parse the catalog, and setup a `VideoDecoder` for the video track, an `AudioDecoder` for the audio track, and then it will start listening for each track, retrieving each group of frames and sending them for decode. We’ll render the video frames to a `` which is simple enough, but we also need to play back the `AudioData` objects via WebAudio, so we’ll create an Audio Player class. Now finally we can add the interface which will load the publisher and subscriber respectively, use `getUserMedia` to get the source from the publisher, and start publishing data to the subscriber(s). We can now finally put everything together in a live demo, where it will stream your webcam through Media over Quic (via a public cloudflare relay) from the publisher tab to the subscriber tab. And that’s it! That’s the basics of streaming audio and video over Media over Quic. You can find the source code for the demo here: ([HTML](https://github.com/sb2702/webcodecs-examples/tree/main/demos/moq/browser-to-browser), [JS](https://github.com/sb2702/webcodecs-examples/tree/main/src/moq)). A lot of this was manually implemented, but you can also use the [hang library](https://github.com/moq-dev/moq/tree/main/js/hang) directly for a more out-of-box experience. ## Streaming to and from a server [Section titled “Streaming to and from a server”](#streaming-to-and-from-a-server) The idea behind MoQ is that a server can act as a publisher or a subscriber just like any browser client. When streaming data from a browser to a server, the browser would act as a publisher, and the server would act as a subscriber. When streaming from a server to a browser, the server would be the publisher and the browsers would be subscribers. #### Server to Browser [Section titled “Server to Browser”](#server-to-browser) A primary use case for streaming from a browser to a server would be for “recording” features, such as recording a meeting / webinar, or recording high-definition versions of user’s web-cameras, which are common features of meeting, webinar and live-streaming softwares. To accomplish this, we’ll have a server connect to a MoQ relay, and subscribe to the same stream that subscribers listen to.  Many existing platforms use a similar approach with WebRTC where the sever joins a session as a participant and just ‘records’, however this usually involves decoding the video from the WebRTC stream and re-encoding it, which is compute intensive and limits scalability. One advantage of Webcodecs is that we can avoid a decode/encode process and directly mux video to hard disk which is much more efficient. Because WebCodecs provides raw encoded video/audio data, it can work with server-side media processing libraries like [PyAV](https://github.com/PyAV-Org/PyAV) and [NodeAV](https://github.com/seydx/node-av), which are server-runtime bindings for ffmpeg, allowing you to mux encoded video data on the server (to record a user’s stream). Because [Mediabunny](../../projects/mediabunny) works on the server, we’ll use that as our example, but you can use whatever media processing library is available for your target language: Using Mediabunny to mux files in a javascript/typescript run time, here’s how you’d set up the muxer to write the encoded stream to disk: ```typescript import { Output, EncodedPacket, EncodedVideoPacketSource,EncodedAudioPacketSource, FilePathTarget, Mp4OutputFormat, WebMOutputFormat } from 'mediabunny'; const output = new Output({ format: new Mp4OutputFormat(), target: new FilePathTarget(outputPath), //Wherever you save this }); // Create video source const videoSource = new EncodedVideoPacketSource('avc'); output.addVideoTrack(videoSource); // Create audio source const audioSource = new EncodedAudioPacketSource('aac' ); output.addAudioTrack(audioSource); ``` As you get data from the client, you’d mux frames as so: ```typescript function handleFrame(frame, meta) { if (frame.type === 'video') { const packetType = frame.keyframe ? 'key' : 'delta'; const packet = new EncodedPacket(frame.data, packetType, frame.timestamp/1e6, frame.duration/1e6); videoSource.add(packet, meta); } else if (frame.type === 'audio){ const packet = new EncodedPacket(frame.data, 'key', frame.timestamp/1e6, frame.duration/1e6); audioSource.add(packet, meta); } } ``` Where `frame` and `meta` are essentially what come out from the `AudioEncoder` and `VideoEncoder`, but because we are transmitting data via binary, and `EncodedVideoChunk` and `EncodedAudioChunk` don’t exist in server run timestamp we need to encode it to binary on the client, and decode it from binary on the server and just preserve the data structure of `EncodedVideoChunk`. * Browser ```typescript new VideoEncoder({ output: (chunk: EncodedVideoChunk, meta: any){ const buffer encodeBuffer(chunk, meta); //Send this over the network }, // ... }) ``` * Server ```typescript const {encodedChunk, meta} = decodeBuffer( buffer); ``` Here’s a full Serialization/Deserialization example Then, when you start listening on the server for the stream of data, you’d essentially do something like this: ```typescript function onDataFromNetwork(buffer: Uint8Array){ const frame = parseFrame(buffer); //parse the frame handleFrame(frame); //Mux it to disk } ``` When you’re done recording, just call `output.finalize()` ```typescript await output.finalize(); // File saved to disk ``` The file will be saved to disk. Muxing is efficient enough that you could record dozens of streams in parallel on a single server. ###### Demo [Section titled “Demo”](#demo) The `@moq/lite` client we used earlier in the browser also works on the server, although as of January 2026, WebTransport is not available in any server js environment like Node, Bun or Deno, so the server will fall back to connecting to the relay via WebSockets. Additionally, to use `@moq/lite` in Node, you’ll need to use a polyfill to enable WebSocket support ```javascript import WebSocket from 'ws'; import * as Moq from '@moq/lite'; // Polyfill WebSocket for MoQ globalThis.WebSocket = WebSocket; ``` For the first time, this demo can’t be embedded in the document as it’s a server repo. You’ll need a javascript runtime (e.g. node, bun, deno) to run the server: ```plaintext git clone https://github.com/sb2702/webcodecs-examples.git cd webcodecs-examples/src/moq-server npm install node subscriber ``` And just open up to `http://localhost:3000/upload.html`  You’ll be able to stream encoded video data to the local server over webcodecs, and mux the stream to a local video file. You can of course see the full source code here: ([server](https://github.com/sb2702/webcodecs-examples/blob/main/src/moq-server/subscriber.js), [browser](https://github.com/sb2702/webcodecs-examples/blob/main/src/moq-server/public/upload.html)) ### Server to browser [Section titled “Server to browser”](#server-to-browser-1) #### HLS & Dash [Section titled “HLS & Dash”](#hls--dash) The primary use case for streaming video from a server to a browser would be your typical “live streaming” use case where a server broadcasts some live stream of video from a source (like a sports match), which is typically done by encoding and packaging a source stream into a streaming format like HLS or Dash, which get sent to a CDN \[[3](https://www.mux.com/articles/hls-vs-dash-what-s-the-difference-between-the-video-streaming-protocols)].  You then have video player software like [hls.js](https://github.com/video-dev/hls.js) or [shaka player](https://github.com/shaka-project/shaka-player) on each viewer’s device which progressively fetch chunks of the video from a CDN using normal HTTP requests.  #### Media over Quic [Section titled “Media over Quic”](#media-over-quic-1) Previously in the browser to browser streaming case, we saw that a Media over Quic relay (also a CDN) could enable an individual browser to stream to many subscribers at the scale of traditional streaming, but without the server processing and latency overhead of traditional streaming.  It’s also possible to stream video to a Media over Quic relay from a server to subscribers, accomplishing roughly the same behaviour and scale as HLS/DASH streaming.  One key difference though is the `Quic` part of Media over Quic, whereby in this case, viewers are not fetching video segments from a CDN, but instead maintaining an active, open connection to the relay using the [Quic protocol](https://en.wikipedia.org/wiki/QUIC). This means that video never has to go through an intermediate step of being muxed and saved to `ts` files, and then fetched by player software. With Media over Quic, encoded video and audio can directly be sent in a continious stream to subscribers and decoded with WebCodecs, with the real-time latency of a video call, but at the scale of a CDN with millions of subscribers. Compared to traditional HLS/DASH streaming, this reduces latency by quite a bit, which is why many companies are excited about it \[[3](https://blog.cloudflare.com/moq/)]\[[4](https://github.com/facebookexperimental/moq-encoder-player)] #### WebCodecs needs Media Over Quic for streaming [Section titled “WebCodecs needs Media Over Quic for streaming”](#webcodecs-needs-media-over-quic-for-streaming) Without the Media over Quic layer, using WebCodecs to stream video from a server to many devices (say via WebSockets) is impractical. You’d be better off using established technologies like WebRTC for real-time, low-volume streaming, or HLS/DASH streaming for high-volume streaming with some latency. So, for livestreaming with WebCodecs from the server to many clients, Media over Quic is the necessary enabling network layer, and WebCodecs + Media over Quic as a stack has concrete advantages compared to WebRTC and HLS/DASH streaming (low latency and high volume). #### Do you need a server? [Section titled “Do you need a server?”](#do-you-need-a-server) Most of the time in streaming, the source of your video isn’t actually your server, typical broadcast workflows include sending video from source cameras via an older protocol like RTMP\[[5](https://en.wikipedia.org/wiki/Real-Time_Messaging_Protocol)] to a media server, which then processes the stream into an HLS or DASH format for consumption. There’s no reason you couldn’t have a server that ingests RTMP and outputs to Media over Quic, but RTMP itself adds latency, reducing the primary benefit of Media over Quic. For traditional broadcast workflows (like sports streaming), which also involves specialized hardware, you’d need to replace RTMP and also handle multi-track encoding at the source for Media over Quic to be viable, so there are many incentives to stick with established workflows for traditional broadcasters. On the other hand, ff you’re an application developer who wants to stream video but also controls the video source, you may not even need a server. In the case of video conferencing, webinars or browser-based live-streaming tools, where the publisher is a user, you don’t even need a server, as client devices are the publisher:  In cases where your application owns the end broadcaster -> viewer stack, Media over Quic + WebCodecs makes much more sense as there are concrete performance and costs benefits compared to older workflows, and in that scenario you might not even need a server to stream video. #### Demo [Section titled “Demo”](#demo-1) Coming soon - server streaming via media over quic ## Productionization [Section titled “Productionization”](#productionization) #### Authentication [Section titled “Authentication”](#authentication) All the examples thus far have used public, un-authenticated relays. MoQ does have authentication built in, you’ll need to manage your own relay server and set up authentication for it. MoQ relays use signed JWT tokens for stateless authentication. You first generate a key, then configure your server to use the key, and finally you create keys to authenticate users. ###### Setting up your own sever [Section titled “Setting up your own sever”](#setting-up-your-own-sever) **Step 1** Clone the moq relay repo ```bash git clone https://github.com/moq-dev/moq.git cd moq ``` **Step 2** Install [Nix](https://nixos.org/download/) **Step 3** Enable [Nix flakes](https://nixos.wiki/wiki/Flakes) **Step 4** Run the server ```bash nix develop -c just dev ``` See the [setup docs](https://github.com/moq-dev/moq#) for more details ###### Generate a key [Section titled “Generate a key”](#generate-a-key) You can use either a CLI or a Rust/JS library to generate a key. Here’s how you’d install the CLI (Rust is a prerequisite) **Step 1** Install the CLI ```bash cargo install moq-token-cli ``` **Step 2** Generate a key ```bash moq-token --key "root.jwk" generate ``` **Step 3**: Configure the server to use the key You need to edit or create `config.toml` in the root of the server repo, and include the following ```text [auth] key = "root.jwk" # Path to the key we generated. ``` By specifying the auth and root, the server will by default require auth for all connections **Step 4**: Use the key to sign tokens ```bash moq-token --key "root.jwk" sign \ --root "rooms/meeting-123" \ --subscribe "" \ --publish "alice" \ --expires 1703980800 > "alice.jwt" ``` *** This creates a token that allows a user to connect to the relay url `/` and `publish` to any track with the prefix `alice/**` See more docs [here](https://github.com/moq-dev/moq/blob/main/doc/concepts/authentication.md) #### Retry [Section titled “Retry”](#retry) //TODO
# How to build a Video Player in WebCodecs
> High level architectural explanation of how to build a video player in WebCodecs
 In the [Video Decoder](../../basics/decoder) section, we showed how to to build a [video decoding loop](../../basics/decoder#decoding-loop) in WebCodecs. In the [WebAudio](../../audio/web-audio) section, we showed how to build an [audio player](../../audio/web-audio#webaudio-audio-player) with WebAudio. In this guide, we’ll go over how to put these two components together to create a working video player in WebCodecs. I don’t expect anyone to actually use this demo video player as-is in their projects. If you are working with WebCodecs, you presumably have some custom requirements that you can’t accomplish with the `` tag. Instead, the goal is to explain all the components you’ll need, and how to integrate them together into a working video player based on best practices. The architecture is derived from my battle-tested production apps \[[1](https://katana.video)]\[[2](https://free.upscaler.video)]. It’s not the only way to build a WebCodecs based video player, but there aren’t other good guides on how to do this, and LLMs are phenomenally bad at WebCodecs. So consider this a starting point for building a player, and as you get more comfortable with WebCodecs, you can adjust as needed for your own use cases. The full source code is available [here](https://github.com/sb2702/webcodecs-examples/tree/main/src/player). ## Webcodecs Player Architecture [Section titled “Webcodecs Player Architecture”](#webcodecs-player-architecture) Given we’ve already covered how to play audio and to render video, the main task is to now synchronize audio and video playback. ### Synchronizing Audio and Video [Section titled “Synchronizing Audio and Video”](#synchronizing-audio-and-video) #### Audio as ground truth [Section titled “Audio as ground truth”](#audio-as-ground-truth) We need a ground source of truth, and we’re going to choose the **audio timeline as our ground source of truth**. Specifically, the audio player has a `AudioContext` whose `currentTime` property is the reference point used to construct our audio timeline, as we covered in the ([audio player](../../audio/web-audio#webaudio-audio-player)). We just focus on making sure the audio timeline is consistent, and we’ll know exactly where in playback we are. Even if there is no audio track, the `AudioContext` will still have a `currentTime` property, and the audio renderer can still create a consistent timeline. #### Video as a receiver [Section titled “Video as a receiver”](#video-as-a-receiver) We’re then going to construct the video renderer to render video at a given timestamp via a render function `render(time)`. ```typescript function render(time: number){ //try to render the closest VideoFrame to time } ``` The key word here is ‘try’. If you remember from the [decoding loop](../../basics/decoder#decoding-loop), we have a *render buffer* of `VideoFrame` objects which have been decoded. We **cannot** guarantee that there is a `VideoFrame` corresponding to the requested timestamp, or even that there is a `VideoFrame` that is close to the requested timestamp. The approach is to *try* to find the latest `VideoFrame` that is before the current requested time, and render that. It is almost guaranteed that some render calls won’t be able to find a suitable `VideoFrame` and that’s okay, it’s normal, it’s expected. In practice, you’ll end up skipping some frames (if playback is faster than the video framerate), or dropping some frames (if the decoder can’t keep up with playback), but this architecture will keep the video synchronized to the audio. #### Clock [Section titled “Clock”](#clock) While the audio renderer has its own consistent timeline, we still need to regularly poll the current time from the audio renderer, and regularly make `render` calls to the video renderer. For this, we’re going to create a **Clock** interface, for which we’ll create a regular poll mechanism called `tick` ```javascript function tick(){ // Poll current time from audio renderer // run render(time) // Update ui // whatever else requestAnimationFrame(tick) } ``` In the actual player code, we’ll have an event broadcast/listener system so that we do ```javascript function tick(){ //Calculate currentTime this.emit('tick', currentTime) requestAnimationFrame(tick) } ``` and everything else can subscribe to events ```javascript clock.on('tick', function(time: number){ /** Do whatever */}) ``` #### Render Loop [Section titled “Render Loop”](#render-loop) Putting them together, we have a Clock object which regularly polls the current time from the audio render, and calls the render() function of the video renderer on every call of `tick`.  This will be the core of our render loop, to play both audio and video back in sync. ### Loading File Data [Section titled “Loading File Data”](#loading-file-data) For the audio renderer and video renderer to work, we actually need to feed them encoded audio and video data (each render handles its own decoding). In the previous hello world examples, we just loaded the entire video’s worth of `EncodedAudioChunk` and `EncodedVideoChunk` data, which is fine for very small demo videos. If we want to handle large videos though, we’ll need to progressively load data from our source file. #### Demuxer [Section titled “Demuxer”](#demuxer) What we can do is to create a standalone file reader / demuxer, which we instantiate with a `File` handle, and from which we can extract track data and audio/video track segments.  #### Worker setup [Section titled “Worker setup”](#worker-setup) We’ll set up this demuxer in its own worker thread to isolate it from other processes. We’ll then give this worker to both the audio renderer and video renderer, so, they can fetch encoded chunks from the demuxer.  Each renderer will manage its own data lifecycle independently, independently fetching chunks from the worker, decoding and buffering data as needed, so we can keep the architecture clean and isolate concerns. With this, the render loop should be able to indefinitely fetch and render audio and video in a synchronized fashion indefinitely. ### Player object [Section titled “Player object”](#player-object) Now that we have our core render loop and data fetching, we need to handle for primary player events such as *play*, *pause* and *seek*. To manage all of this, we’ll have a master `Player` interface, which will: * Instantiate the `Demuxer`, `Clock`, `AudioRenderer` and `VideoRenderer` * Call setup functions for each * Extract track data from the `Demuxer` * Expose `play()`, `pause()` and `seek()` events #### Utilities [Section titled “Utilities”](#utilities) This is more just my personal architecture style, but we’re going to use an `event` based architecture, so that components can ‘listen’ for events like pause/play/seek, via an `EventEmitter` class we will create. We’ll also a utility `WorkerController` class that lets us treat calls to workers (like the `Demuxer`) as async calls (e.g. await `demuxer.getTrackSegment('video', start, end)`) #### Pulling it all together [Section titled “Pulling it all together”](#pulling-it-all-together) Putting all of these together, we now have our basic, barebones architecture for our WebCodecs video player.  Play / pause / seek events will go to our clock, which will in turn propagate events to the `AudioRenderer`. The player also exposes utilities for fetching the current playback time, and video metadata (such as duration), which should be everything we need to actually build a functional WebCodecs player and build a UI interface for it. ## WebCodecs Player Components [Section titled “WebCodecs Player Components”](#webcodecs-player-components) Now that we have the high level architecture, we’ll actually include the code components for each. #### File Loader [Section titled “File Loader”](#file-loader) First, we’ll create our `Demuxer`. There are multiple libraries for demuxing like [Mediabunny](https://mediabunny.dev/) and [web-demuxer](https://www.npmjs.com/package/web-demuxer) but I’ll use my own [demuxer](https://github.com/sb2702/webcodecs-utils/blob/main/src/demux/mp4-demuxer.ts) since that’s what I use in production. You can see how to build a Mediabunny based player [here](../../media-bunny/playback) The demuxing library already has all the methods, so we’re just creating a worker wrapper around the main methods. #### Audio Renderer [Section titled “Audio Renderer”](#audio-renderer) For the audio renderer, we’re going to make two more changes compared to the [WebAudio tutorial](../../audio/web-audio#webaudio-audio-player), which is to not load the entire video’s audio in into memory via `decodeAudioData(await file.arrayBuffer())`. ###### WebCodecs <> WebAudio [Section titled “WebCodecs <> WebAudio”](#webcodecs--webaudio) Our WebAudio demos just loaded mp3 demos (the file in file.arrayBuffer() was an mp3 file), but here we now need to handle video file inputs. Our `Demuxer` library can extract audio data from a video file, but it returns data as `EncodedAudioChunk[]`. Rather than decoding the audio data into `AudioData[]`, extracting `Float32Array` channel data, constructing `AudioBuffers` and copying channel data over, it’s a lot faster and compute efficient to just mux our `EncodedAudioChunk[]` into a virtual file ```typescript import { Muxer, ArrayBufferTarget } from 'mp4-muxer' muxEncodedChunksToBuffer(chunks: EncodedAudioChunk[], config: AudioTrackData): ArrayBuffer { // Create MP4 muxer const muxer = new Muxer({ target: new ArrayBufferTarget(), fastStart: 'in-memory', firstTimestampBehavior: 'offset', audio: { codec: 'aac', sampleRate: config.sampleRate, numberOfChannels: config.numberOfChannels } }); for (const chunk of chunks) { muxer.addAudioChunk(chunk); } await muxer.finalize(); return muxer.target.buffer; } ``` We can then load the `AudioBuffer` using `ctx.decodeAudioData`. It feels hacky, but it’s faster and more efficient. ```typescript const muxedBuffer = this.muxEncodedChunksToBuffer( chunks, this.audioConfig!); const audioBuffer = await this.audioContext!.decodeAudioData(muxedBuffer); ``` ###### Segmented Loading [Section titled “Segmented Loading”](#segmented-loading) The other change we’ll make is to load the audio is ‘segments’ of 30 seconds, to avoid loading potentially hours worth of raw audio into memory and causing memory issues. ```typescript async loadSegment(time: number) { const segmentIndex = Math.floor(time / SEGMENT_DURATION); // Check cache first if (this.audioSegments.has(segmentIndex)) { return this.audioSegments.get(segmentIndex); } // Fetch EncodedAudioChunks for this segment const encodedChunks = await this.getEncodedChunksForTime(segmentIndex * SEGMENT_DURATION); try { const muxedBuffer = await this.muxEncodedChunksToBuffer(encodedChunks, this.audioConfig!); const audioBuffer = await this.audioContext!.decodeAudioData(muxedBuffer); this.audioSegments.set(segmentIndex, audioBuffer); // Cache for later return audioBuffer; } catch (error) { console.error('Error loading audio segment:', error); return null; } } ``` We’ll store these buffers in a cache, and can pre-load them and clean them up as needed. ```typescript async preloadNextSegment(startTime: number) { if (this.isPreloading || startTime >= this.duration) return; const nextSegmentIndex = Math.floor(startTime / SEGMENT_DURATION); // Check if we already have this segment cached if (this.audioSegments.has(nextSegmentIndex)) return; this.isPreloading = true; try { const nextSegment = await this.loadSegment(startTime); if (!nextSegment || !this.isPlaying) return; this.scheduleSegment(nextSegment, startTime, 0); } finally { this.isPreloading = false; } } ``` And we schedule future segments for playback ```typescript scheduleSegment(audioBuffer: AudioBuffer, startTime: number, offset: number) { const sourceNode = this.audioContext!.createBufferSource(); sourceNode.buffer = audioBuffer; sourceNode.connect(this.audioContext!.destination); const playbackTime = this.startTime + (startTime - this.pauseTime); sourceNode.start(playbackTime, offset); // Clean up completed nodes sourceNode.onended = () => { sourceNode.disconnect(); this.scheduledNodes.delete(startTime); }; } ``` ###### Complete Audio Renderer [Section titled “Complete Audio Renderer”](#complete-audio-renderer) This gives us a complete audio renderer with segmented loading #### VideoRenderer [Section titled “VideoRenderer”](#videorenderer) For the video renderer, we will create a `VideoRenderer` class using the same decode patterns covered in the [decoding loop](../../basics/decoder#decoding-loop) section. However, just like in the audio renderer, we’ll enable chunked loading so that we can load encoded video segments in chunks. We’ll store this in a VideoWorker, since this will also be loaded inside of a worker. The VidoeWorker will manage multiple VideoRenderers, and will dynamically load each and redirect render calls appropriately. Finally, we’ll create a simple wrapper around the video worker, which can be called by the player on the main thread, and which will propagate events to the VideoWorker worker. With all three of those components, we’ll be able to run render calls `video.render() -> videoWorker.render() -> videoRenderer.render`  #### Clock [Section titled “Clock”](#clock-1) Next, we have the Clock class which will manage the update loop via the `tick` handler, and broadcast updates to the VideoWorker and AudioRenderer. #### Player [Section titled “Player”](#player) Finally, we’ll include the player interface as described previously, which will instantiate all the components, and expose the pause/play/seek methods as well as event handlers via the `on` listener (which passes through to the Clock), so that it we can build a UI around it. We’ll also expose `getCurrentTime()` and `player.duration` which we’ll need for the playback progress bar for a UI. ## Demo [Section titled “Demo”](#demo) Now that we’ve built the player, we can go ahead and vibe-code a simple player interface, which will load a video file, or a demo video ([Big Buck Bunny](../../reference/inside-jokes#big-buck-bunny)) and verify playback works. You can see the full source code for the player [here](https://github.com/sb2702/webcodecs-examples/tree/main/src/player). You can see the source code for the demo here ([html](/demo/player/index.html), [js](/demo/player/demo.js)) Now we’ve got a full working webcodecs based video player, and hopefully that provides enough structure to get started with video playback and adapt to your own use case.
# How to transcode video with WebCodecs
> A comprehensive guide for to use WebCodecs to transcode video in the browser
In the [Video Decoder](../../basics/decoder) section, we learned how to decode video, and in the [Video Encoder](../../basics/decoder) section, we learned how to encode video, and so naturally you’d think that transcoding is just chaining those two things together.  Conceptually yes, transcoding is just chaining a decode process to an encode process, but as we discussed earlier, a `VideoEncoder` and `VideoDecoder` aren’t simple `async` calls, but rather more like [Rube Goldberg machines](../../reference/inside-jokes#rube-goldberg-machine) that you have to push chunks and frames through. To properly implement transcoding in WebCodecs, we can’t just think of it as a simple for loop: ```typescript //Pseudocode. This is NOT how transcoding works for (let i=0; i< numChunks; i++){ const chunk = await demuxer.getChunk(i); const frame = await decoder.decodeFrame(frame); const processed = await render(frame); const encoded = await encoder.encode(processed); muxer.mux(encoded); } ``` Instead, we need to think of it as a pipeline, where you are chaining stages together, and each stage is simultaneously holding multiple chunks or frames.  As we’ll see in this section, I’m not mentioning pipelines just as an analogy, we’ll build a Javascript transcoding pipeline via the [Streams API](https://developer.mozilla.org/en-US/docs/Web/API/Streams_API/). ## Stages in our Pipeline [Section titled “Stages in our Pipeline”](#stages-in-our-pipeline) In reality, our pipeline is more than just a decoder and an encoder, there are actually 5 stages. **File Reader**: First, we need to read `EncodedVideoChunk` objects from the file. While in previous examples we’ve loaded the entire video’s worth of chunks at once, in production we want to read `EncodedVideoChunk` objects progressively, ideally as a “Read Stream”, where we’re streaming chunks from the file’s hard disk. The demuxing library [web-demuxer](https://github.com/bilibili/web-demuxer/) explicitly returns a Javascript `ReadableStream` while [Mediabunny](https://mediabunny.dev/) does streaming internally, but both read from the source file on hard disk and return a stream of `EncodedVideoChunk` objects.  **Decoding**: Next we need to decode the `EncodedVideoChunk` objects into `VideoFrame`, consider this a ‘data transformation’ stage of the pipeline.  **Render**: You may optionally want to do some kind of processing on the frame, like adding a filter, taking in one `VideoFrame` and returning another `VideoFrame` object.  **Encoding** You then need to take in the `VideoFrame` objects, and encode them, and return `EncodedVideoChunk` objects.  **Muxing** Finally, we need to take each `EncodedVideoChunk` object and mux it by inserting the data and metadata into an `ArrayBuffer` or potentially to an actual file on hard disk. You would consider this a ‘write stream’.  Overall this gives us a complete transcoding pipeline of 5 stages, from the source file to the destination file:  Beyond just piping data through, we also need to make sure we manage constraints, by making sure that: * We limit the number of active `VideoFrame` objects in memory * We limit the encoder’s encode queue * We limit the decoder’s decode queue * We don’t read the entire file’s worth of content at once ## Javascript Streams API [Section titled “Javascript Streams API”](#javascript-streams-api) The browser’s [Streams API](https://developer.mozilla.org/en-US/docs/Web/API/Streams_API/) is perfectly designed for building transcoding pipelines. It provides three key stream types: * **ReadableStream** - Read data from a source in chunks (e.g., demuxer reading from file) * **WritableStream** - Write data to a destination in chunks (e.g., muxer writing to file) * **TransformStream** - Transform chunks from one type to another (e.g., decoder, encoder) You can chain these streams together to form a complete pipeline: ```typescript const transcodePipeline = chunkReadStream .pipeThrough(new VideoDecoderStream(videoDecoderConfig)) .pipeThrough(new VideoRenderStream()) .pipeThrough(new VideoEncoderStream(videoEncoderConfig)) .pipeTo(createMuxerWriter(muxer)); await transcodePipeline; ``` The Streams API automatically handles **backpressure**—when downstream stages (like encoding) can’t keep up, upstream stages (like file reading) automatically slow down. This prevents memory overflow while maximizing throughput. For a detailed explanation of the Streams API, including backpressure, `highWaterMark`, and complete stream implementations, see the [Streams API primer](../../concepts/streams). ## Transcoding Stream implementation [Section titled “Transcoding Stream implementation”](#transcoding-stream-implementation) Now let’s go ahead and walk through a code example where we actually build such a pipeline, and put it in an `async transcodeVideo()` function. #### File Reader [Section titled “File Reader”](#file-reader) Here we’ll use [web-demuxer](https://github.com/bilibili/web-demuxer/) since it integrates really nicely with the Streams API. First we load the demuxer ```typescript import { WebDemuxer } from 'web-demuxer'; const demuxer = new WebDemuxer({ wasmFilePath: "https://cdn.jsdelivr.net/npm/web-demuxer@latest/dist/wasm-files/web-demuxer.wasm", }); await demuxer.load( file); ``` Then we just create a `ReadableStream` with `demuxer.read` ```typescript const chunkStream = demuxer.read('video', 0); ``` ### DemuxingTracker [Section titled “DemuxingTracker”](#demuxingtracker) Next we’ll add an intermediate utility `TransformStream` which will do two things: 1. We will count the chunks (we get `chunkIndex`) which we’ll use in the `VideoEncoder` 2. We apply a `highWaterMark` to throttle the reader, and limit it to 20 chunks in memory ```typescript class DemuxerTrackingStream extends TransformStream { constructor() { let chunkIndex = 0; super({ async transform(chunk, controller) { // Apply backpressure if downstream is full while (controller.desiredSize !== null && controller.desiredSize < 0) { await new Promise((r) => setTimeout(r, 10)); } // Pass chunk with index controller.enqueue({ chunk, index: chunkIndex++ }); }, }, { highWaterMark: 20 } // Buffer up to 20 chunks from demuxer ); } } ``` #### Decoder [Section titled “Decoder”](#decoder) Next, we’ll add a DecoderStream, where we setup the decoder in `start` (which gets called at initialization), submit chunks for decoding in `transform` and flush the decoder in `flush`. Note that there is a `controller` being passed both to `start` and to `transform`, and this lets define how we send chunks to the next stage in the decoder initialization in `start()` while also sending chunks for decoding in `transform()`. The `TransformStream` class also has a `flush` method which will automatically be called when the stream has no more inputs to process, and we just pass that flush call to `decoder.flush()`. Is that not elegant? ```typescript class VideoDecoderStream extends TransformStream<{ chunk: EncodedVideoChunk; index: number }, { frame: VideoFrame; index: number }> { constructor(config: VideoDecoderConfig) { let pendingIndices: number[] = []; super( { start(controller) { decoder = new VideoDecoder({ output: (frame) => { const index = pendingIndices.shift()!; controller.enqueue({ frame, index }); }, error: (e) => controller.error(e), }); decoder.configure(config); }, async transform(item, controller) { // limit decoder queue while (decoder.decodeQueueSize >= 20) { await new Promise((r) => setTimeout(r, 10)); } // check for downstream backpressure while (controller.desiredSize !== null && controller.desiredSize < 0) { await new Promise((r) => setTimeout(r, 10)); } // Track this frame's index and decode pendingIndices.push(item.index); decoder.decode(item.chunk); }, async flush(controller) { await decoder.flush(); if decoder.state !== 'closed' decoder.close(); }, }, { highWaterMark: 10 } // Buffer up to 10 frames before applying backpressure ); } } ``` #### Render Stream [Section titled “Render Stream”](#render-stream) Here we’ll add a a placeholder for if you want to do any custom processing on the frame (like adding a filter). For the demo we’ll just pass the item through. ```typescript class VideoRenderStream extends TransformStream<{ frame: VideoFrame; index: number }, { frame: VideoFrame; index: number }> { constructor() { super( { async transform(item, controller) { /* This is where you'd do custom processing on the frame, e.g. render(item.frame) const frame = new VideoFrame(canvas, {timestamp: item.frame.timestamp}) item.frame.close(); controller.enqueue({ frame, index: item.index }); //*/ controller.enqueue(item); }, }, { highWaterMark: 5 } // Keep render buffer small ); } ``` #### EncodeStream [Section titled “EncodeStream”](#encodestream) Next we’ll add the Encoder stream, which is a wrapper around `VideoEncoder` similar to the decoder transform stream. Here, again, we’re rate limiting based on backpressure ```typescript class VideoEncoderStream extends TransformStream< { frame: VideoFrame; index: number }, { chunk: EncodedVideoChunk; meta: EncodedVideoChunkMetadata } > { constructor(config: VideoEncoderConfig) { super( { start(controller) { encoder = new VideoEncoder({ output: (chunk, meta) => { controller.enqueue({ chunk, meta }); }, error: (e) => controller.error(e), }); encoder.configure(config); }, async transform(item, controller) { // Backpressure checks BEFORE encoding: // 1. Check encoder's internal queue while (encoder.encodeQueueSize >= 20) { await new Promise((r) => setTimeout(r, 10)); } // 2. Check downstream backpressure (TransformStream buffer) while (controller.desiredSize !== null && controller.desiredSize < 0) { await new Promise((r) => setTimeout(r, 10)); } // Encode with keyframe every 60 frames encoder.encode(item.frame, { keyFrame: item.index % 60 === 0 }); item.frame.close(); }, async flush(controller) { await encoder.flush(); if (encoder.state !== 'closed') encoder.close(); }, }, { highWaterMark: 10 } ); } } ``` ### MuxStream [Section titled “MuxStream”](#muxstream) Finally we’ll create a `WritableStream` we can pipe to. Here we’ll use `mp4-muxer` and a `StreamTarget` which will tell the muxer to stream chunks to the destination (which could be a file as in a [FileSystemWriteableFileStream](https://developer.mozilla.org/en-US/docs/Web/API/FileSystemWritableFileStream)), but I’ll use `InMemoryStorage` which has the same API as a file write stream but just writes to a blob so you can use the same code whether or not writing to disk or to an in-memory blob. ```typescript import { Muxer, StreamTarget } from 'mp4-muxer' import {InMemoryStorage} from 'webcodecs-utils' const storage = new InMemoryStorage(); const target = new StreamTarget({ onData: (data: Uint8Array, position: number) => { storage.write(data, position); }, chunked: true, chunkSize: 1024*1024*10 }); ``` Then you’d create the actual muxer ```plaintext const muxer = new Muxer({ target, video: { codec: 'avc', width, height, }, firstTimestampBehavior: 'offset', fastStart: 'in-memory', }) ``` And then finally you’d create a `WriteStream` wrapper around the muxer ```typescript function createMuxerWriter( muxer: Muxer): WritableStream<{ chunk: EncodedVideoChunk; meta: EncodedVideoChunkMetadata }> { return new WritableStream({ async write(value) { muxer.addVideoChunk(value.chunk, value.meta); } }); } ``` ### Full pipeline [Section titled “Full pipeline”](#full-pipeline) Then you’d finally do ```typescript const encodedPipeline = chunkStream .pipeThrough(new DemuxerTrackingStream()) .pipeThrough(new VideoDecoderStream(videoDecoderConfig)) .pipeThrough(new VideoRenderStream()) .pipeThrough(new VideoEncoderStream(videoEncoderConfig)) .pipeTo(createMuxerWriter(muxer)); await encodedPipeline; ``` And that’s it! Isn’t that elegant? Okay, that’s not 100% true, we still need the audio. We can create our audio mux wrapper ```typescript function createAudioMuxerWriter( muxer: Muxer): WritableStream { return new WritableStream({ async write(chunk) { muxer.addAudioChunk(chunk); } }); } ``` And our audio read stream ```typescript const audioStream = > demuxer.read('audio', 0); ``` And then we just pipe them together ```typescript await audioStream.pipeTo(createAudioMuxerWriter(muxer)); ``` And *now* we’re done! Here’s the full pipeline in code: ```typescript import { getBitrate, InMemoryStorage, getCodecString } from 'webcodecs-utils'; import { WebDemuxer } from "web-demuxer"; import { Muxer, StreamTarget } from 'mp4-muxer'; export async function transcodePipeline( file: File, ): Promise { // Step 1: Set up demuxer const demuxer = new WebDemuxer({wasmFilePath: "https://cdn.jsdelivr.net/npm/web-demuxer@latest/dist/wasm-files/web-demuxer.wasm"}); await demuxer.load( file); // Step 2: Extract metadata const mediaInfo = await demuxer.getMediaInfo(); const videoTrack = mediaInfo.streams.filter((s)=>s.codec_type_string === 'video')[0]; const audioTrack = mediaInfo.streams.filter((s)=>s.codec_type_string === 'audio')[0]; const duration = videoTrack.duration; const width = videoTrack.width; const height = videoTrack.height; const videoDecoderConfig = await demuxer.getDecoderConfig('video'); const audioConfig = await demuxer.getDecoderConfig('audio'); // Step 3: Set up muxer const storage = new InMemoryStorage(); const target = new StreamTarget({ onData: (data: Uint8Array, position: number) => { storage.write(data, position); }, chunked: true, chunkSize: 1024*1024*10 }); const muxerOptions: any = { target, video: { codec: 'avc', width, height, }, firstTimestampBehavior: 'offset', fastStart: 'in-memory', }; if (audioConfig) { muxerOptions.audio = { codec: 'aac', numberOfChannels: audioConfig.numberOfChannels, sampleRate: audioConfig.sampleRate, }; } const muxer = new Muxer(muxerOptions); // Step 4: Configure encoder const bitrate = getBitrate(width, height, 30, 'good'); const videoEncoderConfig: VideoEncoderConfig = { codec: getCodecString('avc', width, height, bitrate), width: width, height: height, bitrate: Math.round(bitrate), framerate: 30, }; // Step 5: Build the pipeline // Get the native ReadableStream from web-demuxer const chunkStream = demuxer.read('video', 0); // Build the pipeline with automatic backpressure const encodePipeline = chunkStream .pipeThrough(new DemuxerTrackingStream()) .pipeThrough(new VideoDecoderStream(videoDecoderConfig)) .pipeThrough(new VideoRenderStream()) .pipeThrough(new VideoEncoderStream(videoEncoderConfig)) .pipeTo(createVideoMuxerWriter(muxer)); // Step 6: Await for pipeline await encodePipeline; // Step 7: Pipe audio to muxer writer (pass-through, no transcoding) if (audioConfig) { const audioStream = > demuxer.read('audio', 0); const audioWriter = createAudioMuxerWriter(muxer); await audioStream.pipeTo(audioWriter); } // Step 8: Finalize muxer.finalize(); const blob = storage.toBlob('video/mp4'); return blob; } ``` ### Transcoding Demo [Section titled “Transcoding Demo”](#transcoding-demo) As we discussed in the pipeline section, we’ll use H264 / AVC to transcode the video using the same height/width and standard bitrate settings, outputting at 30fps. Here’s the vibe coded demo: You can find the source code for the transcode function [here](https://github.com/sb2702/webcodecs-examples/blob/main/src/transcoding/transcode-pipeline.ts). You can find the source code for the demo here: [html](/demo/transcoding/index.html), [js](/demo/transcoding/demo.js)
# Main use cases for WebCodecs
> Managing encoder queues and flushing
Work in Progress * [Video Player](../playback) * [Transcoding](../patterns) * [Video Editing](../patterns/) * [Programmatic Video Generation](../generation) * [Live Streaming + Conferencing](../patterns/)
# Compute Optimization
> OffscreenCanvas patterns
TBD
# Memory Management
> Explicit resource closing to avoid GPU leaks
TBD
# Zero-Copy Rendering
> Passing VideoFrame to WebGPU/WebGL
TBD
# Mediabunny - ffmpeg for the web
> How Mediabunny helps with this
Hopefully you are convinced that WebCodecs is [more complex than it looks](../reality-check), but you can make your life significantly easier by using [Mediabunny](https://mediabunny.dev/), which can be thought of as the “ffmpeg for the web”; WebCodecs gives low-level access to hardware accelerated video encoding and decoding in the browser. [Mediabunny](https://mediabunny.dev/) builds on top of WebCodecs, adding key utilities like muxing/demuxing, simplifying the API, and implementing best practices. The result is a general purpose media processing library for the browser. Mediabunny facilitates common media processing tasks like * Extracting metadata from a video * Transcoding a video * Procedurally generating a video * Muxing / demuxing live video streams Let’s take a look at how decoding would work with Mediabunny ```typescript import { VideoSampleSink, Input, BlobSource, MP4 } from 'mediabunny'; async function decodeFile(file: File){ const input = new Input({ formats: [MP4], source: new BlobSource(file), }); const canvas = document.createElement('canvas'); const ctx = canvas.getContext('2d'); const videoTrack = await input.getPrimaryVideoTrack(); const sink = new VideoSampleSink(videoTrack); for await (const sample of sink.samples()) { sample.draw(ctx, 0, 0); } } ``` In the Mediabunny example, you can see off the bat that it: ✅ Handles Demuxing\ ✅ Turns reading VideoFrames from a callback pattern to an iterator pattern\ ✅ Handles decoder queue, and progressive reading from file\ ✅ Handles edge cases like corrupted frames If you were to do any other code example, like transcoding or streaming, you’d immediately see how much easier it is using Mediabunny than vanilla WebCodecs because it simplifies so many details and handles a lot of the ‘gotchas’. ## Core Concepts [Section titled “Core Concepts”](#core-concepts) Mediabunny simplifies a lot of the details compared to video encoding and decoding, and to facilitate this, it has an API that is a bit different from the core WebCodecs API. #### No more Encoder and Decoder [Section titled “No more Encoder and Decoder”](#no-more-encoder-and-decoder) With Mediabunny you don’t need to work directly with the `VideoEncoder` or `VideoDecoder`. Mediabunny still uses them under the hood, but the API and core concepts are designed in a way that you don’t touch them anymore. #### Inputs and Outputs [Section titled “Inputs and Outputs”](#inputs-and-outputs) Instead, you work with Inputs and Outputs, which are wrappers around actual video or audio files. ###### Inputs [Section titled “Inputs”](#inputs) Inputs are a wrapper around some kind of video source, whether that’s a blob, a file on disk (for server js environments), a remotely hosted URL or an arbitrary read stream.  That makes it possible to maintain the same video processing logic regardless of where your video is coming from. For example, you could build a video player and maintain the same playback logic regardless of whether your video is cached locally or coming from a remotely hosted url. The “where your video” is coming from is encapsulated by the `source` parameter for the `Input` constructor, as below: ```typescript import { Input, ALL_FORMATS, BlobSource } from 'mediabunny'; const input = new Input({ formats: ALL_FORMATS, source: new BlobSource(file), }); ``` ###### Outputs [Section titled “Outputs”](#outputs) Likewise, Outputs are a wrapper around wherever you might write a file to, whether that’s an `ArrayBuffer` (in memory), a local file (for serverjs environments) or a write stream.  The API is likewise similar for output, but here, the ‘wherever you might write a file to’ is encapsulated by the `target` parameter. ```typescript import { Output, Mp4OutputFormat, BufferTarget } from 'mediabunny'; const output = new Output({ format: new Mp4OutputFormat(), target: new BufferTarget(), }); ``` This way, you can maintain the same processing logic regardless of where your file is being written to. #### Tracks [Section titled “Tracks”](#tracks) WebCodecs never explicitly define or work with *Tracks*, like a file’s Audio or Video tracks, even if other Web APIs do. Mediabunny explicitly deals with tracks, facilitating reading and writing data to/from files and streams. ```typescript // We'll need this to read video data const videoTrack = await input.getPrimaryVideoTrack(); ``` And we’ll also write to output tracks, e.g. ```typescript output.addVideoTrack(videoSource); // We'll get to this next ``` #### Media Sources and Sinks [Section titled “Media Sources and Sinks”](#media-sources-and-sinks) Mediabunny introduces a new concept called *Sources* and *Sinks*. A *Media Source* a place where you get video from, and a *Media Sink* is where you send video to. ###### MediaSource [Section titled “MediaSource”](#mediasource) A media source is where you’d get video from, like a `` or a webcam, and a *Media Source* is what you would pipe to an *Output*.  So to record a `` to file, the setup to pipe the canvas to the file would look like this ```typescript import { CanvasSource, Output, Mp4OutputFormat } from 'mediabunny'; const videoSource = new CanvasSource(canvasElement, {codec: 'avc',bitrate: 1e6}); const output = new Output({ format: new Mp4OutputFormat(), target: new BufferTarget(), }); output.addVideoTrack(videoSource); ``` Then actually recording a canvas would look something like this: ```typescript await output.start(); for (let i=0; i < 10; i++){ //Grab 10 frames a 100ms intervals videoSource.add(i*0.1, 0.1); //timestamp, duration await new Promise((r)=>setTimeout(r, 100)); } await output.finalize() ``` ###### MediaSinks [Section titled “MediaSinks”](#mediasinks) A Media Sink is where you’d send video or audio to. You would usually pipe an *Input* to a *MediaSink*.  One really nice advantage of Mediabunny is efficiently handling the WebCodecs to WebAudio interface, handling the direct conversion to `AudioBuffer` objects and facilitating playback of audio in the browser. Here’s how you’d play back audio in the browser from a video file, by connecting an input to `AudioBufferSink` ```typescript import { AudioBufferSink } from 'mediabunny'; const audioTrack = await input.getPrimaryAudioTrack(); const sink = new AudioBufferSink(audioTrack); for await (const { buffer, timestamp } of sink.buffers()) { const node = audioContext.createBufferSource(); node.buffer = buffer; node.connect(audioContext.destination); node.start(timestamp); } ``` #### Packets and Samples [Section titled “Packets and Samples”](#packets-and-samples) Mediabunny also uses slightly different terminology from WebCodecs. Whereas WebCodecs has `VideoFrame` and `AudioData` for raw video and audio, Mediabunny uses `VideoSample` and `AudioSample`. Here’s a quick table comparing the terminology | | WebCodecs | Mediabunny | | ------------- | ------------------- | -------------------- | | Raw Video | `VideoFrame` | `VideoSample` | | Raw Audio | `AudioData` | `AudioSample` | | Encoded Video | `EncodedVideoChunk` | `EncodedVideoPacket` | | Encoded Audio | `EncodedAudioChunk` | `EncodedAudioPacket` | These are mostly comparable, and you can easily convert between the two using the following methods | | WebCodecs -> Mediabunny | Mediabunny-> WebCodecs | | ------------- | ---------------------------------- | ------------------------------ | | Raw video | `new VideoSample(videoFrame)` | `sample.toVideoFrame()` | | Raw audio | `new AudioSample(audioData)` | `sample.toAudioData()` | | Encoded Video | `EncodedPacket.fromEncodedChunk()` | `packet.toEncodedVideoChunk()` | | Encoded Audio | `EncodedPacket.fromEncodedChunk()` | `packet.toEncodedAudioChunk()` | This is helpful as WebCodecs primitives like `VideoFrame` are not defined in server runtimes like Node, but Mediabunny works just fine. It also allows you to work with a common type for raw audio (`AudioSample`) instead of juggling two redundant APIs like `AudioBuffer` (for WebAudio) and `AudioData` for WebCodecs. #### For Loops [Section titled “For Loops”](#for-loops) As I’ve discussed several times, with WebCodecs you can’t treat encoding and decoding as a simple per frame operation \[[1](../../patterns/transcoding)] ```typescript //Pseudocode. This is NOT how transcoding works for (let i=0; i< numChunks; i++){ const chunk = await demuxer.getChunk(i); const frame = await decoder.decodeFrame(frame); const processed = await render(frame); const encoded = await encoder.encode(processed); muxer.mux(encoded); } ``` Instead, you need to treat them as a pipeline, with internal buffers and queues at each stage of the process [\[2\]](../../concepts/streams). Mediabunny abstracts the pipeline complexity away, enabling you to actually perform per-frame operations: ```typescript import { BlobSource, Input, MP4, VideoSampleSink } from 'mediabunny'; const input = new Input({ formats: [MP4], source: new BlobSource(file), }); const videoTrack = await input.getPrimaryVideoTrack(); const sink = new VideoSampleSink(videoTrack); // Loop over all frames for await (const sample of sink.samples()) { const frame = await sample.toVideoFrame(); //Do something with the frame } ``` I’m not trying to be pedantic with this guide, treating video processing as a pipeline is best practice. Mediabunny actually does use the [Streams API](../../concepts/streams) under the hood, but uses clever architecture to simplify the API so that you can treat it as an async per-frame operation and not worry about buffer stalls or memory management. ### Other differences [Section titled “Other differences”](#other-differences) A few other differences to note compared to WebCodecs: * Mediabunny uses seconds, not microseconds for all timestamps and durations * Mediabunny works with MP3 files * You don’t need to specify fully qualified codec strings, just the codec family (e.g. `avc` instead of `avc1.42001f`) ### A concrete example [Section titled “A concrete example”](#a-concrete-example) With the core concepts covered, perhaps the easiest way to understand Mediabunny is to see a working end to end example. To that end, we’ll use Mediabunny to transcode a video file, just re-encoding the video track and passing through the audio without re-encoding. ```typescript import { BlobSource, BufferTarget, Input, MP4, Mp4OutputFormat, Output, QUALITY_HIGH, VideoSample, VideoSampleSink, EncodedAudioPacketSource } from 'mediabunny'; async function transcodeFile(file: File): Promise { const input = new Input({ formats: [MP4], source: new BlobSource(file), }); const audioTrack = await input.getPrimaryAudioTrack(); const videoTrack = await input.getPrimaryVideoTrack(); const output = new Output({ format: new Mp4OutputFormat(), target: new BufferTarget(), }); const videoSource = new VideoSampleSource({ codec: 'avc', bitrate: QUALITY_HIGH, keyFrameInterval: 5, }); const audioSource = new EncodedAudioPacketSource(audioTrack.codec); output.addVideoTrack(videoSource, { frameRate: 30 }); output.addAudioTrack(audioSource); const sink = new VideoSampleSink(videoTrack); const audioSink = new EncodedPacketSink(audioTrack); // Loop over all frames, with re-encoding for await (const sample of sink.samples()) { videoSource.add(sample); } // Pass audio without re-encoding for await (const packet of audioSink.packets()) { audioSource.add(packet); } await output.finalize(); return output.target.buffer } ``` ## Further resources [Section titled “Further resources”](#further-resources) #### Mediabunny [Section titled “Mediabunny”](#mediabunny) * [Website](https://mediabunny.dev/) * [Mediabunny Discord](https://discord.com/invite/hmpkyYuS4U)
# Media over Quic - Low-latency streaming protocol
> How Media over Quic enables WebCodecs streaming
Media over Quic (MoQ) is a new protocol for streaming real-time media over a network. Used together with WebCodecs, Media over Quic is an alternative to older technologies like WebRTC (primarily used for video conferencing) or HLS/DASH streaming (for streaming live broadcasts). Media over Quic promises the real-time interactivity of video-conferencing with the scale of live broadcast streaming to millions, something which can’t be done with older technologies. As of January 2026, Media over Quic is still very new, with standards and core libraries still being developed. It is mature enough for early adopters to start building with it, but still too early for a seamless developer experience. ## What is Media over Quic? [Section titled “What is Media over Quic?”](#what-is-media-over-quic) Media over Quic (MoQ) is an open protocol being developed at the IETF for real-time media delivery over the internet. At its core, MoQ is a pub/sub (publish-subscribe) system built on top of QUIC, the modern transport protocol that powers HTTP/3. Media over Quic works as a pub/sub system where a **publisher** sends streams of encoded media to a **relay** (essentially a CDN), and **subscribers** receive those streams from the relay:  Media over Quic relays are content-agnostic, they don’t know what is going across the network, whether it’s video, audio, text or just random binary code. They also have no visibility as to whether it’s encrypted or not.  Another key aspect is that Media over Quic relays can be chained together, so that some subscribers might receive data that has passed through just 1 relay, and others might receive data that has passed through 5 relays. Media over Quic relays also don’t need to maintain state of the overall “broadcast”, they just act as data-pipes without being aware of many publishers and subscribers there are or how long the session has been active. These are key features that enable Media over Quic to be run through [CDNs](https://en.wikipedia.org/wiki/Content_delivery_network), which enables real-time streaming to millions of viewers simultaneously, something which isn’t possible with more established technologies like [WebRTC](#webrtc). ## WebCodecs needs MoQ for streaming [Section titled “WebCodecs needs MoQ for streaming”](#webcodecs-needs-moq-for-streaming) WebCodecs is intentionally low-level—it gives you `EncodedVideoChunk` and `EncodedAudioChunk` objects, but provides no mechanism to send them over a network. You could use generic data transfer mechanisms like WebSockets or WebTransport, but these lack media-specific features like: * Handling groups of pictures (key frames + delta frames) * Quality degradation during network congestion * Scalable relay infrastructure The irony is that while Media over Quic is 100% content agnostic, it was still specifically designed with WebCodecs in mind, generally to facilitate delivery of encoded video and audio, but those designing the spec specifically have WebCodecs in mind. For non-real-time use cases, or for low volumes (10 to 100 current streams), you could use HTTP requests or WebSockets to send encoded video and audio from a browser to a server. For streaming from a server to a browser though, Media over Quic is the only practical mechanism to stream encoded audio/video at scale in a way that can be consumed with WebCodecs. Any other mechanism (e.g. WebSockets) would be worse than just using WebRTC or HLS/DASH streaming. ## Key Benefits [Section titled “Key Benefits”](#key-benefits) **Sub-second latency at broadcast scale** MoQ can deliver video with 200-300ms latency while serving thousands or even millions of concurrent viewers—something previously impossible without complex infrastructure. **No transcoding needed** Video encoded once by the publisher goes directly to subscribers. No server-side re-encoding between ingest and delivery, reducing latency and infrastructure costs. **CDN support** MoQ relays can be deployed globally via CDN. For example, Cloudflare’s MoQ relay runs in 330+ cities worldwide, providing low-latency access from anywhere. **Efficient transport** QUIC’s multiplexing allows multiple streams over a single connection without head-of-line blocking. During network congestion, MoQ can intelligently drop less important frames (delta frames) while prioritizing key frames. **Simple model** Because the infrastructure model is so simple, it greatly simplifies the networking stack when working with WebCodecs, enabling per-frame level control of video encoding and delivery while completely abstracting away networking details. You don’t even really need to manage a server, as CDN relays handle most of the heavy lifting. ## Current State (December 2025) [Section titled “Current State (December 2025)”](#current-state-december-2025) Media over Quic is still in a very early stage, and relies on several components which are still being developed: #### Web Transport [Section titled “Web Transport”](#web-transport) Along with WebCodecs, Media over Quic relies on [WebTransport](https://developer.mozilla.org/en-US/docs/Web/API/WebTransport) for connections over Quic to scale to millions of concurrent subscribers, but while Chromium browsers support WebTransport, it is still in development in Firefox and Safari. #### Server/tooling [Section titled “Server/tooling”](#servertooling) The client libraries to implement Media over Quic networking like `@moq/lite` are still in development, with only [client side Javascript](https://github.com/moq-dev/moq/tree/main/js/moq-lite) and [Rust](https://github.com/cloudflare/moq-rs) clients available. There is also a [Gstreamer plugin](https://github.com/moq-dev/gstreamer), but core libraries and integrations are missing for other server runtimes and tools. #### Production relays [Section titled “Production relays”](#production-relays) Several CDN providers have announced creating MoQ relays. Here are two that can be used for testing: ###### moq.dev [Section titled “moq.dev”](#moqdev) You can use moq.dev which has 3 public relays: * * * These are managed by the maintainers of the MoQ project and has the latest, up-to-date deployment with authentication, WebSockets fallbacks etc… ###### Cloudflare [Section titled “Cloudflare”](#cloudflare) Cloudflare also has a public relay * It is using an older version of MoQ, and does not yet have key features like authentication, websockets ##### Self hosted [Section titled “Self hosted”](#self-hosted) You can self host a relay, [here are the docs](https://doc.moq.dev/setup/production.html) to get started #### Specification status: [Section titled “Specification status:”](#specification-status) * IETF draft (not finalized) * Breaking changes still possible * Multiple implementations converging on interoperability #### In practice: [Section titled “In practice:”](#in-practice) Media over Quic has enough tooling and support for early adopters to start building with it, but it still requires a lot of ‘DIY’ adaptations and implementations, and is still too early for a seamless developer experience. ## Alternatives for Streaming [Section titled “Alternatives for Streaming”](#alternatives-for-streaming) To understand Media over Quic and whether it’s something you need to consider for a streaming application, you need to keep in mind the existing alternatives: ### HLS/DASH + MSE [Section titled “HLS/DASH + MSE”](#hlsdash--mse) **What it is:** When most people talk about live streams, such as a live-streamed sports match, HLS/DASH + MSE is almost always the stack being used. It is typically done by encoding and packaging a source stream into a streaming format like HLS or Dash, which get sent to a CDN \[[1](https://www.mux.com/articles/hls-vs-dash-what-s-the-difference-between-the-video-streaming-protocols)].  You then have video player software like [hls.js](https://github.com/video-dev/hls.js) or [shaka player](https://github.com/shaka-project/shaka-player) on each viewer’s device which progressively fetch chunks of the video from a CDN using normal HTTP requests.  This enables massive scale, enabling millions of concurrent viewers to watch a stream, and also has established client support across browsers and other devices (native apps, TV players etc..). On the downside, it introduces 3 to 30 second latency from the video camera source (e.g. the sports stadium, or news cameras on the ground) to what viewers on their phone or TV see. It also uses a media encoding server to handle the incoming video streams, transcode and package them and send them to a CDN which incurs sometimes substantial server costs. ### WebRTC [Section titled “WebRTC”](#webrtc) When you normally think of video conferencing on the web, with applications such as Google Meet, you are thinking of WebRTC, which is a protocol for real time video and audio delivery between clients in a WebRTC session. Applications which use WebRTC (especially for video conferencing) typically use a router/relay model, in which every participant streams audio/video to a routing server (specifically an [SFU](https://bloggeek.me/webrtcglossary/sfu/)) which would then apply it’s business logic to route some subset of streams to each participant without re-encoding.  This routing model enables a video call to have 50 participants, while each individual participant isn’t simultaneously streaming 49 other video streams from their home internet connection, only a subset (which is mediated by the relay). This enables real-time interactive video sessions (e.g. video conferencing), but because the routing server needs to maintain state over how many participants there are, and needs to know about the media details (codecs, bandwidth) of each stream, it’s not easy to ‘chain’ servers together, and each server starts facing scalability challenges beyond 100 participants. Most video conferencing apps will have caps on the number of participants for that reason, and scaling to thousands or tens of thousands of participants in a single WebRTC session requires incredible amounts of effort and engineering, and/or most likely it’s just expensive. WebRTC is very well established though, with a mature ecosystem of libraries, vendors and information available. ## What should I use? [Section titled “What should I use?”](#what-should-i-use) I’ll give the boring answer that it depends on your use case. If you want the TLDR: | Protocol | Latency | Scale | Ecosystem Maturity | | ------------ | ------- | -------- | ------------------ | | **HLS/DASH** | 3-30s | Millions | Mature | | **WebRTC** | <1s | Hundreds | Mature | | **MoQ** | <1s | Millions | Nascent | Media over Quic is still very nascent without major well-known apps implementing it in production at scale. There are experiments by large tech companies and there are adventurous startups using it live [\[2\]](https://github.com/facebookexperimental/moq-encoder-player) \[[3](https://hang.live/)], but it still requires more development and tooling to become mainstream. That said, performance benefits are real and so early adopters would likely see competitive advantages compared to established products. ###### Too big for WebRTC, to small for HLS/DASH [Section titled “Too big for WebRTC, to small for HLS/DASH”](#too-big-for-webrtc-to-small-for-hlsdash) The sweet spot for early adopters would likely be application categories which are not well served either by WebRTC or by HLS/DASH. Some examples might include: * Webinar software, where webinars need real-time interactivity but which also need to scale to thousands or tens of thousands of participants * Broadcasting virtual events where speakers typically stream few=>many, but which often involve interactive Q\&A * Browser based live-streaming tools, which stream video from browsers to servers and other participants, while simultaneously streaming social media platforms like Facebook like or YouTube live ###### More control and reliability than WebRTC [Section titled “More control and reliability than WebRTC”](#more-control-and-reliability-than-webrtc) Media over Quic would also be helpful in scenarios where low-level control over video delivery is required, such as in scenarios with remote camera feeds (security cameras, drones, remotely operated vehicles) or in real-time AI video pipelines, where you need to run AI models on a per-frame basis, either for understanding what is going on in a live video feed or transform the video feed. WebRTC is often used in these scenarios (yes, really) but here low-level control of data-packets and the ability to customize the data-feed with custom encodings, along with the more robust connectivity of HTTP3/Quic make Media over Quic an attractive option. Here, the scale benefit of Media over Quic is irrelevant, and using a self-hosted relay would likely be preferable to a public CDN, it’s more about the other aspects of Media over Quic that make it attractive while not needing to invent and maintain a custom networking protocol. ###### For everything else [Section titled “For everything else”](#for-everything-else) For everything else there’s ~~Mastercard~~ WebRTC and HLS/DASH. If you are building standard cookie-cutter video conferencing, WebRTC is the clear better technology. For traditional broadcasting livestreaming, HLS/DASH streaming are still the obvious choice. ## Resources [Section titled “Resources”](#resources) **Official Resources:** * [moq.dev](https://moq.dev/) - Official MoQ project site * [moq setup](https://doc.moq.dev/setup/) - How to get started with MoQ * [IETF MoQ Working Group](https://datatracker.ietf.org/group/moq/about/) - Specification development **Libraries:** * [@moq/lite](https://github.com/moq-dev/moq/tree/main/js/moq-lite) - JavaScript/TypeScript library for browser * [Hang](https://github.com/moq-dev/moq/tree/main/js/hang) - Protocol for streaming media over MoQ * [moq-rs](https://github.com/cloudflare/moq-rs) - Rust implementation **Infrastructure:** * [Cloudflare MoQ relay](https://developers.cloudflare.com/moq/) - Global relay network * [Cloudflare Blog: MoQ](https://blog.cloudflare.com/moq/) - Technical overview and use cases **Implementation Examples:** * See the [Live Streaming pattern](../../patterns/live-streaming) for complete WebCodecs + MoQ implementation examples * Working demos of browser-to-browser streaming * Server-side recording with WebCodecs + MoQ
# Remotion - Programmatic Video Generation
> Remotion enables developers to programmatically generate videos via React
Coming soon
# About WebCodecs Fundamentals
> Why this site exists and who built it
I run a few applications which use WebCodecs \[[1](https://free.upscaler.video/technical/architecture/)]\[[2](https://katana.video/blog/what-does-katana-actually-do)], and when I don’t know something or have a coding question, I do what many engineers do and I ask Google or Claude. When I asked Google “What audio codecs are supported in WebCodecs?” I got the following response:  Google even helpfully provided a code snippet to help me test codec support in the browser:  Nevermind that Google’s code snippet will not work, or that `flac` and `mp3` are not supported by *any* browsers \[[3](../../datasets/codec-support-table)] At least I have been programming for over 15 years, and have spent \~3 years with Web Codecs. I’ve learned to pick up when LLMs make up code, and I’ve included lines like this in my `CLAUDE.md` file ```markdown Please do not suggest any edits in any files in the following folders * 'src/libs/media/player/' * 'src/libs/media/webgpu/' or any other video processing code unless I specifically ask you to ``` I haven’t seen this issue for any other Web API, but for WebCodecs specifically I found it faster and more reliable to learn via trial and error than to ask Google or Claude. I can only imagine what it would be like for a junior developer or a vibe coder trying to build, say, a video editor with WebCodecs. ## How is the AI supposed to know? [Section titled “How is the AI supposed to know?”](#how-is-the-ai-supposed-to-know) At some point, you can’t really blame LLMs for not knowing about WebCodecs because it’s just not well documented. MDN indicates that you need to provide a `codec` string to configure a `VideoEncoder` \[[6](https://developer.mozilla.org/en-US/docs/Web/API/VideoEncoder/configure)] but then there’s no list of valid values for `codec`. Whatever little documentation there is focused on hello world tutorials. MDN indicates that a `VideoEncoder` has a `encodeQueueSize` property, but nowhere was there a note, an urgent warning, anywhere on the internet indicating you need to carefully manage it. I learned that after a customer took down my servers for 6 hours. When I asked Google Search what Audio Codecs are supported in WebCodecs, there was no source anywhere on the internet that answered that question, so of course it made something up. ## A reference for LLMs and humans [Section titled “A reference for LLMs and humans”](#a-reference-for-llms-and-humans) I built [webcodecsfundamentals.org](../../) to be the source that Google references when someone asks about codec support, the training data that helps Claude 6.x and ChatGPT 6.x help vibe coders write working WebCodecs code, and of course a resource for human developers to go to learn the ropes of video-processing in the browser. I built the [Codec support table](../../datasets/codec-support-table) because it should exist somewhere. I can understand why something like this isn’t available on MDN, you’d need a live recurring dataset testing thousands of codec strings on statistically large enough sample sizes on every browser/os combination. But I had the fortune of running my own applications with enough users to collect such [a dataset](../../datasets/codec-support/) so I did.  I hope this resource is helpful to developers looking to get started with WebCodecs. I hope LLMs searching for working code examples can find a reliable source to point to. I hope browser vendors and standards bodies find value in a developer-friendly resource with empirical datasets to reference. Most of all though, I hope that soon I can remove `Please do not suggest any edits in the following folders` from my `Claude.md` file. ## About me [Section titled “About me”](#about-me) My name is [Sam Bhattacharyya](https://sambhattacharyya.com/). I have a background in robotics and “old-school” AI from Columbia and MIT.  * After grad school I started [Vectorly](https://vectorly.io) where I patented a [video codec](https://patents.google.com/patent/US10116963B1/en), (learned it’s hard to commercialize a new codec), pivoted to an [AI filters SDK](https://medium.com/vectorly/building-a-more-efficient-background-segmentation-model-than-google-74ecd17392d5) that was acquired by Hopin in 2021 * I was the head of AI for [Hopin](https://en.wikipedia.org/wiki/Hopin_\(company\)), building AI features for several products before it itself was acquired in 2024 * I started my 2nd startup [Katana](https://katana.video/) to build AI models to automatically edit podcasts * My free [open source hobby project](https://free.upscaler.video) to upscale videos randomly took off and has \~200,000 monthly active users 🤷 I’ve done a bit of everything, from enterprise sales to consumer app marketing to product management to fundraising to engineering to actual ML research (maybe that’s par for the course for founders?). I’m better at the tech stuff though. I’m a particular fan of the intersection of browsers, video and efficient AI models - all 3 of my last major projects involved writing custom neural networks in WebGL/WebGPU for real-time video inference \[[4](https://free.upscaler.video/technical/architecture/)]\[[5](https://katana.video/blog/what-does-katana-actually-do)]\[[6](https://medium.com/vectorly/building-a-more-efficient-background-segmentation-model-than-google-74ecd17392d5)] Among the motivations for this project was also to explore building developer-focused tools and resources, I’ve found it more interesting and less draining than other things I’ve done, and so I’ve got 1-2 more open source projects lined up. ## Acknowledgments [Section titled “Acknowledgments”](#acknowledgments) Special thanks to: * [David (Vanilagy)](https://x.com/vanilagy) for building [Mediabunny](https://mediabunny.dev/) and providing detailed technical feedback on this documentation * [Jonny Burger](https://x.com/JNYBGR) for building [Remotion](https://www.remotion.dev/) and somehow finding this website, fixing mistakes and submitting a PR before I even told anyone about it * The 200,000+ users of free.upscaler.video who (unknowingly) contributed to the codec support dataset * Claude for vibe coding the UI for the demos and the animations, and for being the world’s most computationally inefficient spell-checker. I couldn’t have built this whole site in 10 days without the help ## Contact [Section titled “Contact”](#contact) I’m [@sam\_bha on Twitter/X](https://twitter.com/sam_bha), [sb2702](https://github.com/sb2702) on Github. You can also reach me at . **Found an issue or error?** Please [open an issue on GitHub](https://github.com/sb2702/webcodecs-fundamentals/issues) or submit a pull request with corrections. If you’re building something interesting with WebCodecs, I’d love to hear about it. *** *This site is maintained by Sam Bhattacharyya and released under MIT license. See [Sources & References](/reference/sources) for a full list of cited works.*
# Inside Jokes
> Explanations of the hidden references and inside jokes throughout this site
This site contains a few recurring inside jokes and references which are also found in programmer / internet pop culture. Here is what they mean: ## Citation Needed [Section titled “Citation Needed”](#citation-needed) [Randall Munroe](https://en.wikipedia.org/wiki/Randall_Munroe) is the author of a popular web comic called [xkcd](https://xkcd.com) which includes particularly nerdy humour. One recurring joke from xkcd is the citation needed meme, which originally appeared in the following comic strip on July 4th, 2007.  The original comic itself conveyed a different joke, highlighting that adding `citation needed` note constitutes a passive-aggressive way of calling out someone for an unsubstantiated claim. Later, in Randall munroe’s [“what if”](https://what-if.xkcd.com/) blog as well as the [related books](https://xkcd.com/books/) he’s written, he often includes \[citation needed] under a different context:  Where he adds \[citation needed] next to an obvious fact, as if it required some authoratative source or original research to back up the claim.  The meme adds irreverent humor when discussing topics that might otherwise actually require references, like this website or like Randall Munroe’s other blog posts and book articles, which often are full of real world legitimate citations. These images are the copyright of Randall Munroe \[citation needed]. ## Big Buck Bunny [Section titled “Big Buck Bunny”](#big-buck-bunny) Big Buck Bunny is a movie from the open source animation software [Blender](https://blender.org), as part of the [Peach Open Movie Project](https://peach.blender.org/about/). Unlike most movies and videos, it was released under the Creative Commons 3.0 license which is highly permissive, enabling the movie to be distributed without worry about intellectual property concerns. As such, it became used by video engineers to test video codecs, video playback and really all aspects of video technology. It’s been used so much for this purpose that it has become a meme: [Lightning Talk #1: Charles Sonigo - The Dark Truths of a Video Dev Cartoon](https://www.youtube.com/embed/KDDif85hiUg) As you can see in several of the demos in this repo itself [\[1\]](/demo/player/index.html)[\[2\]](/demo/transcoding/index.html)[\[3\]](/demo/web-audio/basic-playback.html), this guide follows video developer tradition by using big buck bunny in most of the demos. I have worked on some form of video technology for over 10 years, including having patented a vector-based-video codec and encoded big buck bunny as a vector animation \[[4](https://patents.google.com/patent/US10116963B1/en)]\[[5](https://www.youtube.com/watch?v=EvGA5qCfy9I)]. I have never personally watched more than \~60 seconds of Big Buck Bunny. I’ll get to it at some point. If you are interested in watching it, here is the full movie. [](https://katana-misc-files.s3.us-east-1.amazonaws.com/videos/bbb-fixed.mp4) If you do watch the whole thing, you can of course give it a rating on [IMDB](https://www.imdb.com/title/tt1254207/) ## Rube Goldberg Machine [Section titled “Rube Goldberg Machine”](#rube-goldberg-machine) In the [VideoDecoder](../../basics/decoder), [VideoEncoder](../../basics/encoder) and [Transcoding](../../patterns/transcoding) I likened `VideoDecoder` and `VideoEncoder` objects to Rube Goldberg machines, as some type of complex mechanical machine.  In reality, Video Decoders and Video Encoders are actually complex as they encode/decode complex interframe depdencies \[[6](../../basics/encoded-video-chunk/#presentation-order-versus-decode-order)], but that’s hard to visualize, so I likened the encode/decode pipeline to a conveyer belt machine with complex mechanics as a visual metaphor. Rube Goldberg machines are no less complex, but unlike video compression software, Rube Goldberg machines are both incredibly useless and super fun to watch. Here’s an example: [Chain Reaction Rube Goldberg Machine - Guinness World Records](https://www.youtube.com/embed/pixh1vrogjE) If you’re struggling to wrap your head around [Discrete Cosine Transforms](https://www.youtube.com/watch?v=Q2aEzeMDHMA) and [B frames](https://en.wikipedia.org/wiki/Video_compression_picture_types), just imagine your decoder/encoder as a Rube Goldberg machine or marble run, and video frames as dominoes. It won’t help you understand the tech, but at least it’s fun to watch.
# Sources & References
> Key references and resources used throughout this documentation
This page lists the main sources, references, and resources cited throughout WebCodecs Fundamentals. ## W3C Specifications & Standards [Section titled “W3C Specifications & Standards”](#w3c-specifications--standards) * [W3C WebCodecs Specification](https://w3c.github.io/webcodecs/) * [W3C WebCodecs Codec Registry](https://www.w3.org/TR/webcodecs-codec-registry/) * [W3C WebCodecs AAC Codec Registration](https://www.w3.org/TR/webcodecs-aac-codec-registration/) * [WebGPU Specification](https://gpuweb.github.io/gpuweb/) ## MDN Web Docs [Section titled “MDN Web Docs”](#mdn-web-docs) * [VideoEncoder API](https://developer.mozilla.org/en-US/docs/Web/API/VideoEncoder) * [VideoDecoder API](https://developer.mozilla.org/en-US/docs/Web/API/VideoDecoder) * [Streams API](https://developer.mozilla.org/en-US/docs/Web/API/Streams_API) * [Canvas 2D Rendering Context](https://developer.mozilla.org/en-US/docs/Web/API/CanvasRenderingContext2D) * [ImageBitmap](https://developer.mozilla.org/en-US/docs/Web/API/ImageBitmap) * [getUserMedia](https://developer.mozilla.org/en-US/docs/Web/API/MediaDevices/getUserMedia) * [MediaStreamTrackProcessor](https://developer.mozilla.org/en-US/docs/Web/API/MediaStreamTrackProcessor) * [FileSystemWritableFileStream](https://developer.mozilla.org/en-US/docs/Web/API/FileSystemWritableFileStream) * [ImageBitmapRenderingContext](https://developer.mozilla.org/en-US/docs/Web/API/ImageBitmapRenderingContext) ## Libraries & Tools [Section titled “Libraries & Tools”](#libraries--tools) ### Core Libraries [Section titled “Core Libraries”](#core-libraries) * [Mediabunny](https://mediabunny.dev/) - Media processing library for WebCodecs * [Source Code](https://github.com/Vanilagy/mediabunny) * [Discord Community](https://discord.com/invite/hmpkyYuS4U) * [web-demuxer](https://github.com/bilibili/web-demuxer/) - WebAssembly-based demuxer * [mp4-muxer](https://www.npmjs.com/package/mp4-muxer) - MP4 muxing library * [webcodecs-utils](https://www.npmjs.com/package/webcodecs-utils) - Utility functions and polyfills ### Media Over QUIC (MoQ) [Section titled “Media Over QUIC (MoQ)”](#media-over-quic-moq) * [MoQ Specification](https://datatracker.ietf.org/wg/moq/about/) * [moq-dev GitHub](https://github.com/moq-dev/moq) * [Hang Protocol Library](https://github.com/moq-dev/moq/tree/main/js/hang) * [@moq/lite](https://www.npmjs.com/package/@moq/lite) - JavaScript MoQ client ### Video Players [Section titled “Video Players”](#video-players) * [hls.js](https://github.com/video-dev/hls.js) - HLS player * [Shaka Player](https://github.com/shaka-project/shaka-player) - DASH/HLS player ### Server-Side Media Processing [Section titled “Server-Side Media Processing”](#server-side-media-processing) * [PyAV](https://github.com/PyAV-Org/PyAV) - Python FFmpeg bindings * [NodeAV](https://github.com/seydx/node-av) - Node.js FFmpeg bindings * [GStreamer MoQ Plugin](https://github.com/moq-dev/gstreamer) ## Performance & Architecture Articles [Section titled “Performance & Architecture Articles”](#performance--architecture-articles) * [CPU vs GPU with Canvas API](https://www.middle-engine.com/blog/posts/2020/08/21/cpu-versus-gpu-with-the-canvas-web-api) - Analysis of Canvas rendering performance * [WebCodecs Performance (Paul Adenot)](https://www.w3.org/2021/03/media-production-workshop/talks/paul-adenot-webcodecs-performance.html) - W3C workshop talk * [GPU Memory Management](https://people.ece.ubc.ca/sasha/papers/ismm-2017.pdf) - Academic paper on GPU/CPU memory * [WebGPU Explainer](https://gpuweb.github.io/gpuweb/explainer/) - GPU memory model * [Browser Process Architecture](https://sunandakarunajeewa.medium.com/how-web-browsers-use-processes-and-threads-5ddbea938b1c) ## Video Streaming Protocols [Section titled “Video Streaming Protocols”](#video-streaming-protocols) * [HLS vs DASH Comparison (Mux)](https://www.mux.com/articles/hls-vs-dash-what-s-the-difference-between-the-video-streaming-protocols) * [Media over QUIC (Cloudflare)](https://blog.cloudflare.com/moq/) - CDN provider perspective * [Facebook MoQ Encoder-Player](https://github.com/facebookexperimental/moq-encoder-player) * [QUIC Protocol](https://en.wikipedia.org/wiki/QUIC) * [RTMP Protocol](https://en.wikipedia.org/wiki/Real-Time_Messaging_Protocol) * [WebTransport](https://caniuse.com/webtransport) - Browser support ## Codec & Compression Resources [Section titled “Codec & Compression Resources”](#codec--compression-resources) * [YouTube Bitrate Recommendations](https://support.google.com/youtube/answer/1722171#zippy=%2Cbitrate) * [Spectral Band Replication (SBR)](https://en.wikipedia.org/wiki/Spectral_band_replication) - AAC enhancement * [Parametric Stereo](https://en.wikipedia.org/wiki/Parametric_stereo) - AAC stereo encoding ## Test Videos & Media [Section titled “Test Videos & Media”](#test-videos--media) * [Big Buck Bunny](https://peach.blender.org/) - Open-source test video (Blender Foundation) * [Download](https://download.blender.org/demo/movies/BBB/) * [Jellyfish Test Video](https://larmoire.org/jellyfish/) - 1080p quality comparison test ## Example Code & Demos [Section titled “Example Code & Demos”](#example-code--demos) All example code and demos are open source: * [WebCodecs Examples Repository](https://github.com/sb2702/webcodecs-examples) * [Video Player](https://github.com/sb2702/webcodecs-examples/tree/main/src/player) * [Transcoding Pipeline](https://github.com/sb2702/webcodecs-examples/blob/main/src/transcoding/transcode-pipeline.ts) * [MoQ Streaming](https://github.com/sb2702/webcodecs-examples/tree/main/src/moq) * [Webcam Recording](https://github.com/sb2702/webcodecs-examples/blob/main/src/webcam-recording/recorder.ts) * [webcodecs-utils Repository](https://github.com/sb2702/webcodecs-utils) * [MP4 Demuxer](https://github.com/sb2702/webcodecs-utils/blob/main/src/demux/mp4-demuxer.ts) * [MediaStreamTrackProcessor Polyfill](https://github.com/sb2702/webcodecs-utils/blob/main/src/polyfills/media-stream-track-processor.ts) ## Production Applications [Section titled “Production Applications”](#production-applications) Real-world WebCodecs applications referenced: * [free.upscaler.video](https://free.upscaler.video) - Open-source video upscaling tool * [Technical Architecture](https://free.upscaler.video/technical/architecture/) * [Source Code](https://github.com/sb2702/free-ai-video-upscaler) * [Katana.video](https://katana.video) - Professional video editor * [Technical Overview](https://katana.video/blog/what-does-katana-actually-do) ## Other Technical Resources [Section titled “Other Technical Resources”](#other-technical-resources) * [WebGPU Fundamentals](https://webgpufundamentals.org/) - WebGPU learning resource * [Publish-Subscribe Pattern](https://en.wikipedia.org/wiki/Publish%E2%80%93subscribe_pattern) * [Rube Goldberg Machine](https://en.wikipedia.org/wiki/Rube_Goldberg_machine) - Metaphor used for encoder/decoder architecture ## Dataset & Research [Section titled “Dataset & Research”](#dataset--research) * [upscaler.video Codec Support Dataset](/datasets/codec-support/) - Empirical WebCodecs codec support data * [Full Codec Support Table](/datasets/codec-support-table/) * [Dataset Methodology](https://free.upscaler.video/research/methodology/) *** *This documentation is open source and continuously updated. If you notice any missing or incorrect references, please contribute on [GitHub](https://github.com/sb2702/webcodecs-fundamentals).*
# Codec Compatibility
> H.264 vs AV1 vs VP9 compatibility matrix
TBD
# Common Issues
> Buffer stalls, encoder timeouts, and debugging strategies
TBD