Using SoundTouch AudioWorklet for pitch-preserving playback speed control.
Playback with Speed Control
⚠️ SoundTouch worklet failed to load. Falling back to native playbackRate (pitch will shift).
0.0 / 0.0s
Speed:
Status: Loading...
Playback Speed: 1.0x
Using SoundTouch: Loading...
```
**Key takeaways**:
* Native `playbackRate` changes both speed and pitch (chipmunk effect)
* You can fix this with an [AudioWorklet](https://developer.mozilla.org/en-US/docs/Web/API/AudioWorklet)
* The [SoundTouch](https://www.npmjs.com/package/@soundtouchjs/audio-worklet) library offers pitch correction for playback speed adjustment
* You can build your own [AudioWorklet](https://developer.mozilla.org/en-US/docs/Web/API/Web_Audio_API/Using_AudioWorklet) or find other libraries for custom processing
## Next steps
[Section titled “Next steps”](#next-steps)
Hopefully that gives you a good idea of how to play audio in the browser using WebAudio, which should be enough background to build a full webcodecs video player which we will cover [here](../../patterns/playback/).
# Codecs
> Codecs and codec strings
Codecs are the algorithms for turning raw video frames into compact binary encoded video data.
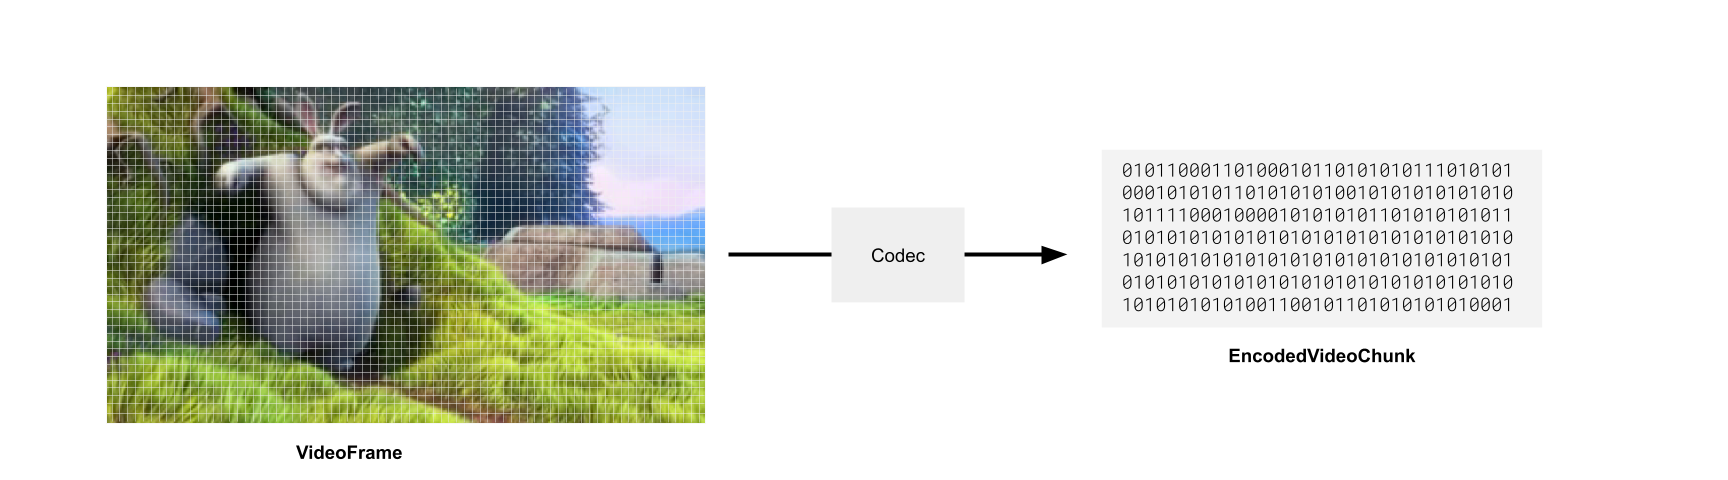
We won’t go into how these algorithms actually work (video compression is its own [big-buck-bunny](../../reference/inside-jokes#big-buck-bunny)-sized rabbit hole) but this article will cover the practical basics that you need to know as a developer building a WebCodecs application.
### Main Video Codecs
[Section titled “Main Video Codecs”](#main-video-codecs)
There are a few major video codecs used in the industry, here are the ones you need to know about for WebCodecs.
**H264**: Also known as ‘AVC’ (Advanced Video Codec). By far the most common codec for common consumer video use. Most “mp4” files that you will find will typically use the h264 codec. This is a patented codec, so while users can freely use h264 players to watch video, large organizations which encode lots of video using h264 may be liable to pay patent royalties.
**H265** - Also known as ‘HEVC’. Less common, newer, and has better compression than h264. Fairly widely supported but with major exceptions, same patent concerns as the h264.
**VP8** - Open source video codec, used often in WebRTC because it is very fast for encoding, though the quality of compression is not as good as other codecs.
**VP9** - Successor to VP8, also open source, developed at Google, many videos on YouTube are encoded with VP9 and also fairly well supported
**AV1** - The latest, most advanced open source codec, with better compression than all the above options, developed by an independent consortium of organizations. Decoding/playback is widely supported across devices and browsers, but because encoding is significantly slower / more expensive than VP9, encoding support on consumer devices is not as widespread.
#### How to practically choose a codec
[Section titled “How to practically choose a codec”](#how-to-practically-choose-a-codec)
**Decoding**
If you have a video supplied by a user or some standard 3rd party source, the codec (and specific codec string) will be stored in the metadata of the actual video file.
In that sense, you don’t have a choice of codec, you just need to find the codec string from the video to feed to the `VideoDecoder`, and demuxing libraries provide this.
```typescript
const input = new Input({
formats: [MP4],
source: new BlobSource(file),
});
const videoTrack = await input.getPrimaryVideoTrack();
// videoTrack.codec => avc (h264)
const codec_string = await input.getCodecParameterString();
// Full codec string used by decoder
const decoderConfig = await videoTrack.getDecoderConfig();
// This is what you'd supply to the `VideoDecoder` to start decoding
```
**Encoding**
Here you do have a choice of what codec to use. Here’s the TLDR version:
* If you’re generating user-facing videos, especially if you want to output .mp4 files, use h264
* If it’s for internal use and/or you want to use .webm files, use VP9 (open source, better compression)
* If you have strong opinions or object to the above, this section isn’t for you
##### Compatibility
[Section titled “Compatibility”](#compatibility)
Don’t forget that not all containers work with all codecs. Here’s the simplified version of which codecs are supported by which containers.
| Codec | **MP4** | **WebM** |
| --------- | ------- | -------- |
| **H.264** | ✅ | ❌ |
| **H.265** | ✅ | ❌ |
| **VP8** | ❌ | ✅ |
| **VP9** | 🟡 | ✅ |
| **AV1** | 🟡 | ✅ |
### Codec strings
[Section titled “Codec strings”](#codec-strings)
Unhelpfully, WebCodecs doesn’t work with simple codec choices like `VP9`
```typescript
const codec = VideoEncoder({
codec: 'vp9', //This won't work!
//...
})
```
Instead, you need a fully qualified *codec string* such as: `vp09.00.10.08` which includes additional settings such as *levels* and *profiles*, which are high-level settings/configs you can choose, which affect low-level encoding choices such as macro-block size and chrome-sub-sampling used by the encoder. The format varies by codec family:
**AV1 Example:** `av01.0.05M.08`
* `av01` = AV1 codec
* `0` = Profile (Main)
* `05M` = Level (5.1)
* `08` = Bit depth
**VP9 Example:** `vp09.00.10.08`
* `vp09` = VP9 codec
* `00` = Profile
* `10` = Level
* `08` = Bit depth
**H.264 Example:** `avc1.64001f`
* `avc1` = H.264/AVC
* `64` = Profile (High)
* `00` = Constraint flags
* `1f` = Level (3.1)
The [W3C WebCodecs Codec Registry](https://www.w3.org/TR/webcodecs-codec-registry/#video-codec-registry) defines the format for each codec family (and thus the rules for constructing valid codec strings), but **does not provide an exhaustive list of valid strings**. Based on the rules by the codec registry, I constructed 1000+ codec strings, and compiled support tables which you can see in the [Codec Support Table](/datasets/codec-support-table/).
If you just want to encode a video and get on with your life, here’s a quick & easy list of codec strings to maximize compatibility.
##### h264
[Section titled “h264”](#h264)
* `avc1.42001f` - base profile, most compatible, supports up to 720p ([99.6% support](/codecs/avc1.42001f.html))
* `avc1.4d0034` - main profile, level 5.2 (supports up to 4K) ([98.9% support](/codecs/avc1.4d0034.html))
* `avc1.42003e` - base profile, level 6.2 (supports up to 8k) ([86.8% support](/codecs/avc1.42003e.html))
* `avc1.64003e` - high profile - level 6.2 (supports up to 8k) ([85.9% support](/codecs/avc1.64003e.html))
##### vp9
[Section titled “vp9”](#vp9)
* `vp09.00.10.08.00` - basic, most compatible, level 1 ([99.98% support](/codecs/vp09.00.10.08.00.html))
* `vp09.00.40.08.00` - level 4 ([99.96% support](/codecs/vp09.00.40.08.00.html))
* `vp09.00.50.08.00` - level 5 ([99.97% support](/codecs/vp09.00.50.08.00.html))
* `vp09.00.61.08.00` - level 6 ([99.97% support](/codecs/vp09.00.61.08.00.html))
Again, refer to the [Codec Support Table](/datasets/codec-support-table/) for full compatability data.
### How to choose a codec string
[Section titled “How to choose a codec string”](#how-to-choose-a-codec-string)
#### Mediabunny
[Section titled “Mediabunny”](#mediabunny)
The easiest way is to use [Mediabunny](https://mediabunny.dev), where you don’t have to choose a codec string. Mediabunny handles this for you internally.
```javascript
import { Output, Mp4OutputFormat,
BufferTarget, VideoSampleSource, VideoSample} from 'mediabunny';
const output = new Output({
format: new Mp4OutputFormat(),
target: new BufferTarget(),
});
const videoSource = new VideoSampleSource({
codec: 'avc', // You just specify avc/h264, Mediabunny handles codec string
bitrate: QUALITY_HIGH,
});
output.addVideoTrack(videoSource, { frameRate: 30 });
for (const frame of frames){
videoSource.add(new VideoSample(frame))
}
```
#### ”Good enough” option
[Section titled “”Good enough” option”](#good-enough-option)
If you don’t want to use Mediabunny, and just want some code that works and minimizes the chance of issues, you can also just specify a bunch of options (best quality /least supported to worst quality/best supported), and pick the first one that is supported.
##### H264
[Section titled “H264”](#h264-1)
```javascript
let codec_string;
const codecs =['avc1.64003e', 'avc1.4d0034', 'avc1.42003e', 'avc1.42001f'];
for(const test_codec of codecs){
const videoEncoderConfig = {
codec: test_codec,
width,
height,
bitrate,
framerate
};
const isSupported = await VideoEncoder.isConfigSupported(videoEncoderConfig);
if(isSupported.supported){
codec_string = test_codec;
break;
}
}
```
##### VP9
[Section titled “VP9”](#vp9-1)
```javascript
let codec_string;
const codecs =['vp9.00.61.08.00', 'vp9.00.50.08.00', 'vp9.00.40.08.00', 'vp9.00.10.08.00'];
for(const test_codec of codecs){
const videoEncoderConfig = {
codec: test_codec,
width,
height,
bitrate,
framerate
};
const isSupported = await VideoEncoder.isConfigSupported(videoEncoderConfig);
if(isSupported.supported){
codec_string = test_codec;
break;
}
}
```
#### Look up
[Section titled “Look up”](#look-up)
If you want something more formal/precise, and don’t want to use Mediabunny, you can use just the lookup table from Mediabunny (taken from [Mediabunny source](https://github.com/Vanilagy/mediabunny/blob/main/src/codec.ts)), which is exposed via [webcodecs-utils](https://www.npmjs.com/package/webcodecs-utils)
```javascript
import { getCodecString, getBitrate } from 'webcodecs-utils';
const bitrate = getBitrate(1920, 1080, 30, 'good')
const codec_string = getCodecString('avc', 1920, 1080, bitrate);
// avc1.640028
```
### Comprehensive list of codec strings
[Section titled “Comprehensive list of codec strings”](#comprehensive-list-of-codec-strings)
See the [Codec Support Table](/datasets/codec-support-table/) for 1,087 tested codec strings with real-world browser and platform support data.
### Device support
[Section titled “Device support”](#device-support)
See the [Codec Support Dataset](/datasets/codec-support/) page for downloadable data and methodology.
# Why WebCodecs is harder than it looks
> Why WebCodecs is harder than it looks
TBD
# VideoDecoder
> Why WebCodecs is harder than it looks
The `VideoDecoder` allows transforming [EncodedVideoChunk](./encoded-video-chunk) objects into [VideoFrame](./video-frame) objects, allowing you to read and render raw video frames from a video file or video stream.

The basic “hello world” API for the decoder works like this:
```typescript
// Simplified example for learning, for prod use a proper demuxing library
const {chunks, config} = await demuxVideo(